Frugal Coupon Living

Stretching Your Pennies, Saving Your Dollars

  • Email
  • Facebook
  • Instagram
  • Pinterest
  • Twitter
  • Home
    • Home Page
    • About Ashley at Frugal Coupon Living
    • Contact
  • Shop
    • Frugal Coupon Living Shop
    • Etsy Store
    • TPT Shop
    • Elf Printables
    • Shipping Policy
  • Printables
    • Shop
    • All Printables
    • Free Printables Library
    • Free Elf Printables
  • Games
  • Party
  • Deals
  • Seasonal
    • Easter
    • Spring
    • April Fools Day
    • Mother’s Day
    • Father’s Day
    • Summer
    • Back to School
    • Halloween
    • Thanksgiving
    • Black Friday & Cyber Monday
    • Christmas
    • New Year’s Eve
    • Valentine’s Day
    • All Seasonal
  • Christian Resources
    • Christian Resources Shop
    • TPT Christian Crafts
    • Etsy Christian Prints
    • Youth Group Games
    • Sunday School Lessons
    • Scripture Cards
    • More Christian Resources

Frankenstein Halloween Preschool Craft

This post may contain affiliate links or ads. Read my privacy policy and disclosure policy here.

March 29, 2019 by Ashley at Frugal Coupon Living Filed Under: Crafts, DIY, Facebook, Halloween, Instagram, Pinterest, Social Media

published date: September 13, 2018
modified datt: March 29,2019

A Halloween Preschool Craft perfect for the kids. Make a paper plate Frankenstein Monster with simple supplies. This is a kid-friendly, easy, October craft that can be done at home on a rainy day, in a pre-k classroom, or appropriate for any young artist – enjoy!

Frankenstein Halloween Preschool Craft

Frankenstein Halloween Preschool Craft

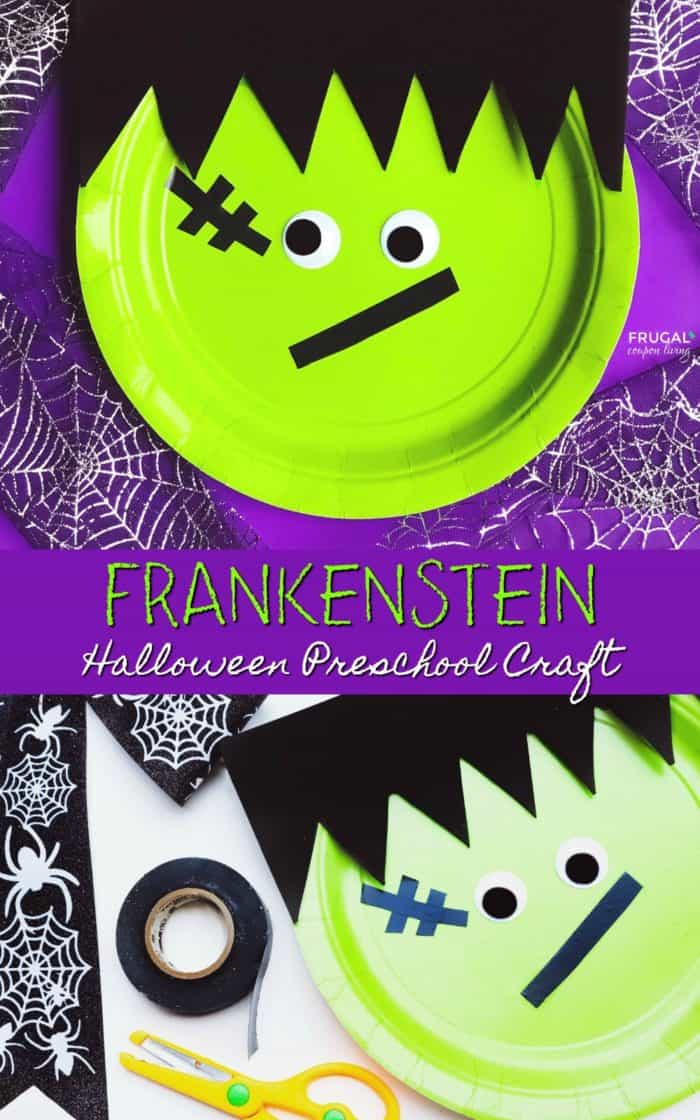
Are you a teacher of a preschool classroom or elementary school? We have an adorable, not-so-scary monster craft for you and your young artists. Chances are you have most of these supplies already on hand, just pick up some Apple Green Paper Plates.  We did this craft with a glue stick but if an adult is on hand, you could use a Hot Glue Gun to ensure a stronger hold. Hang on a window or bulletin board and enjoy!
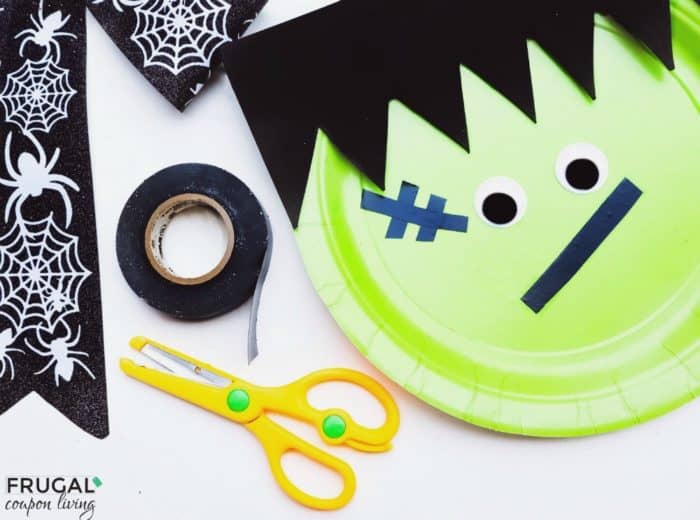
Frankenstein Halloween Preschool Craft Supplies

Supplies:

  • Apple/Lime Green Paper Plates
  • Black Foam Sheets
  • Black Vinyl Electrical Tape
  • Glue Stick or Hot Glue Gun
  • Googly Eyes


Frankenstein Halloween Preschool Craft Tutorial

Directions:

  1. Take your black foam paper and cut out Frankenstein’s Hair. This makes a perfect cutting exercise for little ones! Just have them cut out triangles. You can pre-trace with a pencil.
  2. Once you have hair, take your glue stick and swipe it a few times on the back side of the black foam paper hair also suggest gluing around the edging of the plate where you will place the hair. To ensure a strong setting, have an adult use a glue gun.
  3. Place the glued black foam paper hair onto your green paper plate.
  4. Next use your glue stick (or hot glue gun) to place on your eyes. We used eyes that were the same size, but using different size eyes might create a creepier monster.
  5. Once your eyes are set, take your black electrical tape and cut a piece long enough for Frankenstein’s mouth. Then cut that piece of electrical tape in half making a thinner mouth.
  6. Tape the electrical tape mouth onto your green paper plate. We placed ours at an angle.
  7. With your leftover electrical tape, cut the remaining tape into a bandage for Frankenstein’s head.

Now you have your own Paper Plate Frankenstein!

A Halloween Preschool Craft perfect for the kids. Make a paper plate Frankenstein Monster with simple supplies. Kid-friendly, easy craft for October. #FrugalCouponLiving #Frankenstein #Halloween #PreschoolCraft Click to Tweet

Green Monster Halloween Preschool Craft


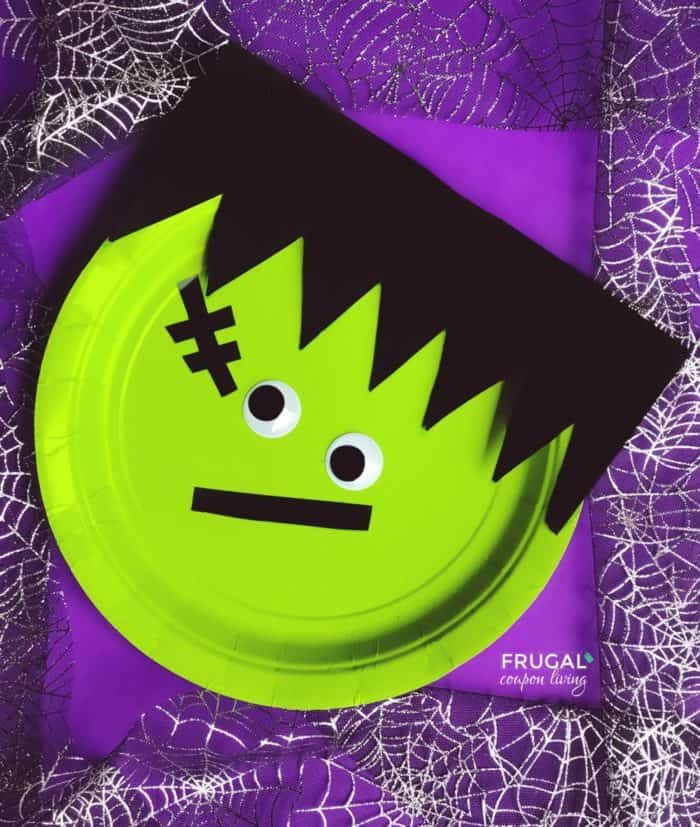
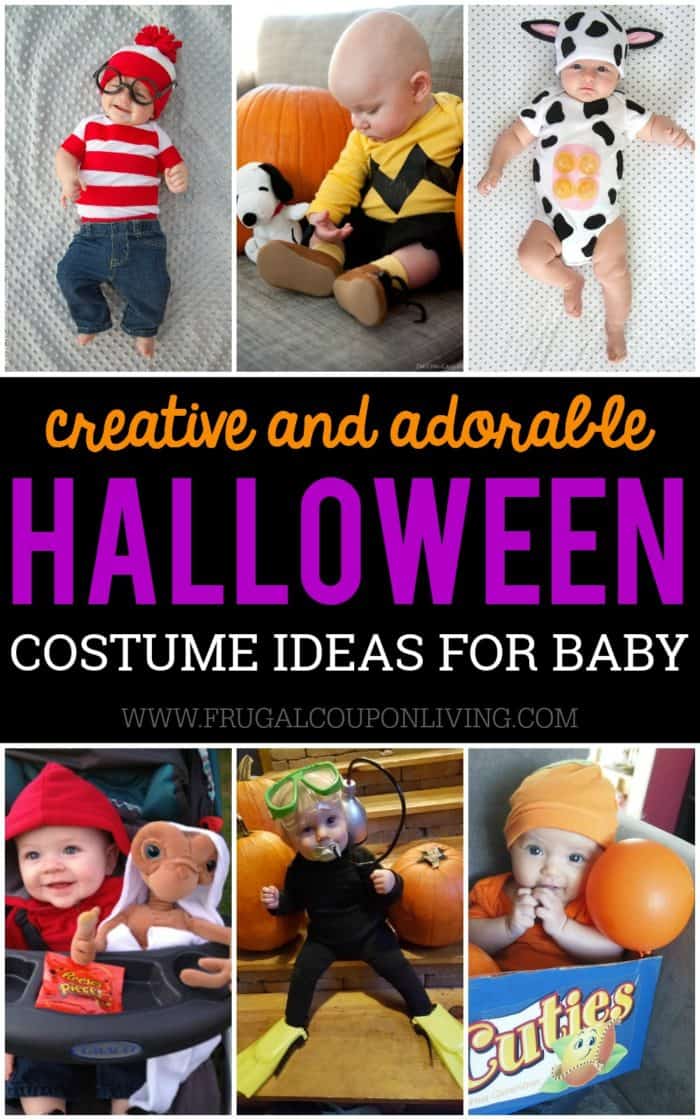
Need Halloween Costume Ideas? These Baby Halloween Costumes Ideas are adorable? What’s your favorite? Pin to your Halloween Pinterest Board.

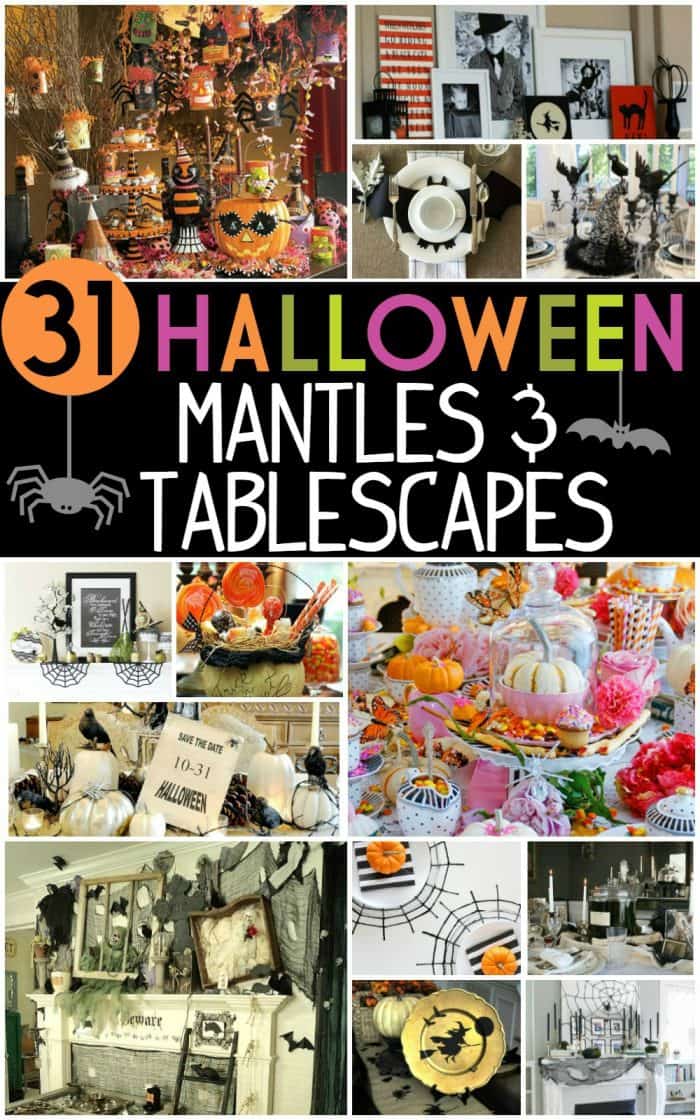
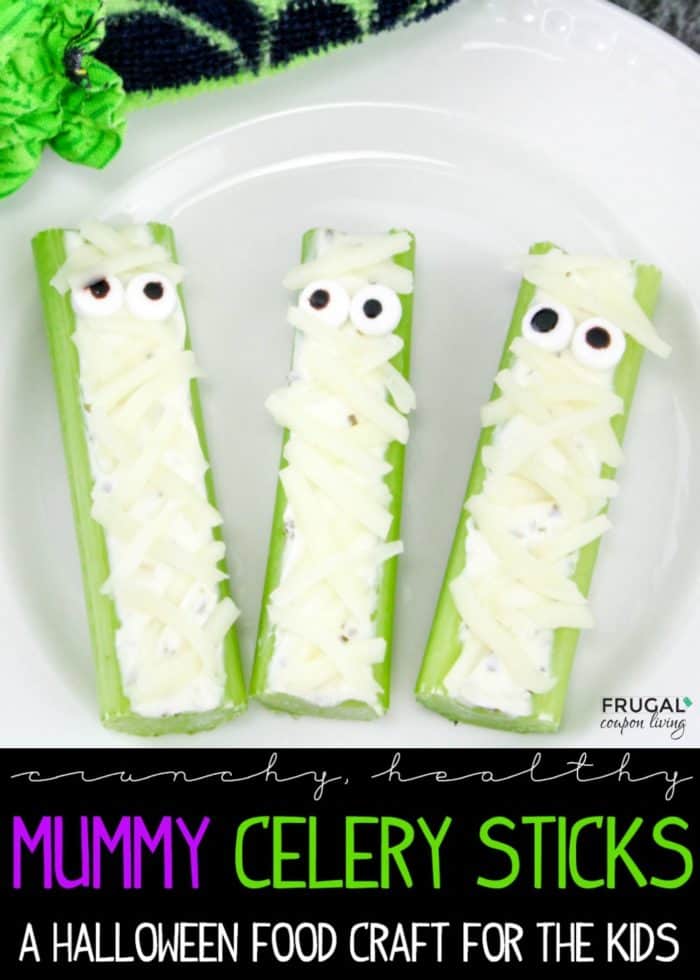
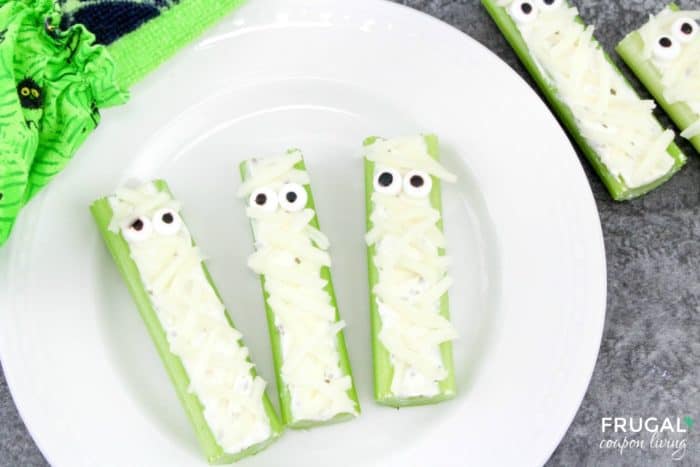
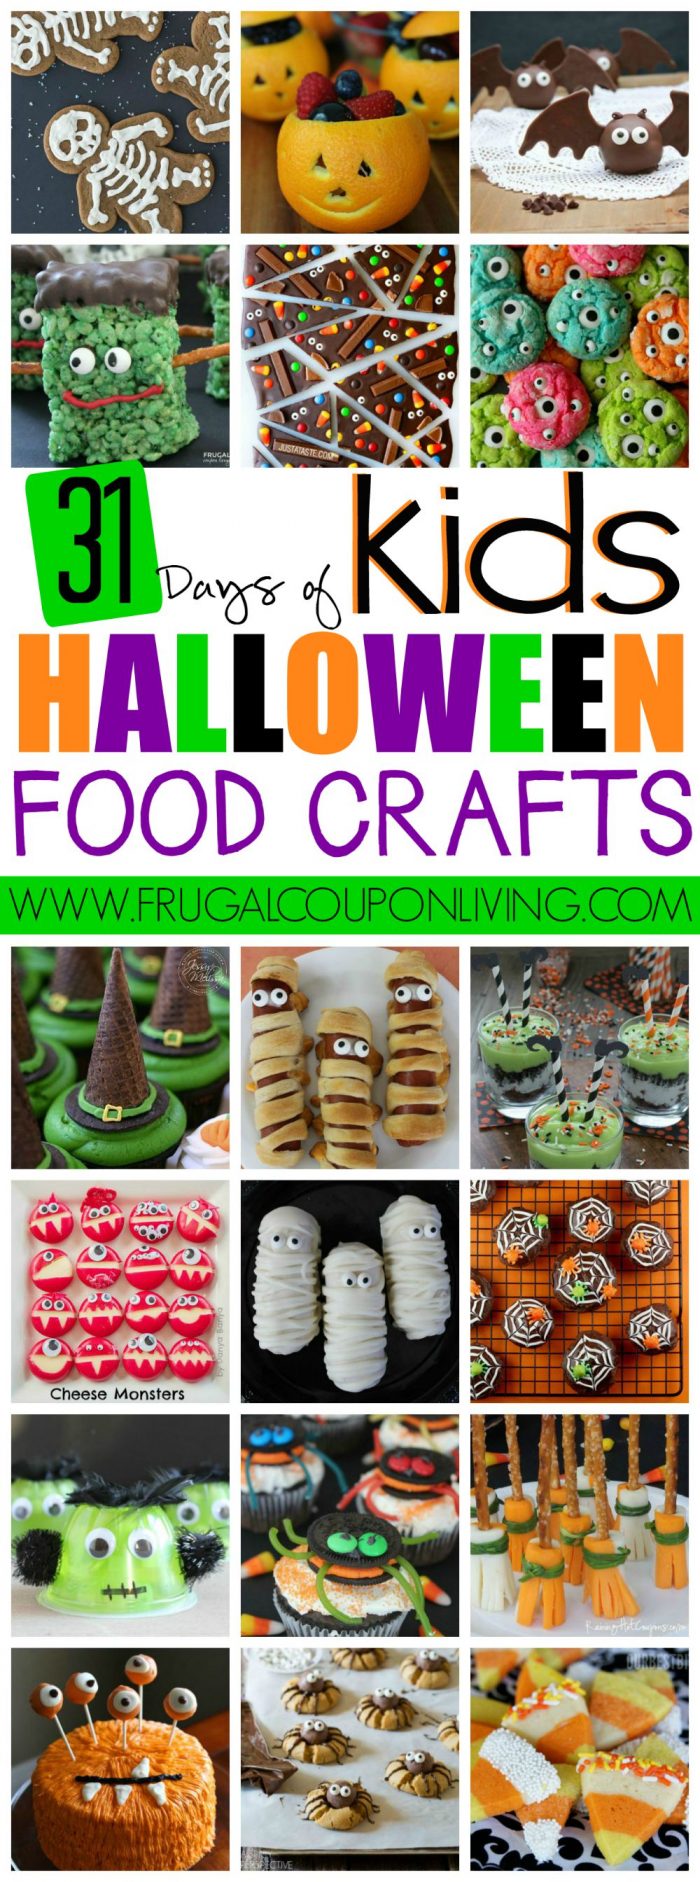
Also enjoy these 31 Days of Kid’s Halloween Food Crafts. Pin to Pinterest on your food, kids and Halloween board.

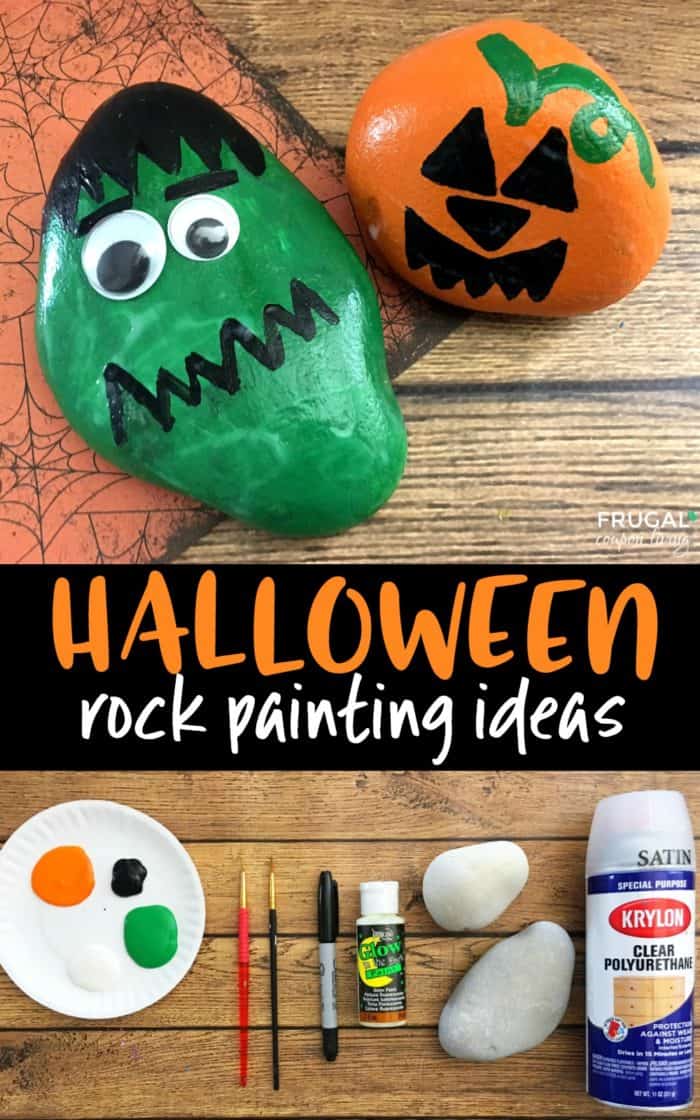
Love rock painting. Take a look at these Halloween Rock Painting Ideas. Pin to Pinterest on your kids and Halloween board.


WHAT’S TRENDING? Looking for a few engaging activities? Grab Minute to Win it Games – Traditional, Holiday, Group, and more! Use these fun activities in the office, classroom, or at your next birthday party.

Mouth-Watering Vampire Halloween Donuts

This post may contain affiliate links or ads. Read my privacy policy and disclosure policy here.

March 29, 2019 by Ashley at Frugal Coupon Living Filed Under: Facebook, Halloween, Instagram, Pinterest, Recipe, Social Media

published date: September 08, 2018
modified datt: March 29,2019

We have the cutest Dracula food craft for you this fall season. These Vampire Halloween Donuts will have anyone craving a mouth-watering bite of this tasty Halloween doughnut. I want to suck… that icing! 

Mouth-Watering Vampire Halloween Donuts

Mouth-Watering Vampire Halloween Donuts

I seriously love planning Halloween for you all.  I think some of my most creative posts cover Halloween (if I may pat myself on the back- ha ha!) I am not sure if it is the temperatures cooling off, the lull of creativity over summer, or the beginning of the seasons, but I love when Halloween season hits and I can come up with all these creative food crafts and Halloween decorations.

This week we wanted to bring to you these very creative Halloween Food Crafts – Dracula Donuts. Speaking of donuts, I had to do some research among my friends – how do you spell donuts? Donuts or Doughnuts? I do it both ways so you will see me interchange the words in the post, but the majority of the vote spelled it donuts – we all blame Dunkin Donuts for the evolution of the word. Dictionary.com prefers doughnuts…. I digress.

Halloween Donuts Ingredients

Back to our tasty Halloween treats. I especially loved this recipe, because it is easy and you can create these adorable vampires in a matter of minutes. In addition to doughnuts (we just picked up some pre-made cake doughnuts at the grocery store but Krispy Kreme would be a great idea too), you will need a few supplies.  Fake vampire teeth are a must. We picked up two dozen for around $5 – a pretty good deal to me!  Also grab 1 container of purple frosting, red gel icing, and black icing.  I think a black gel tube or a black icing writer would be best for this, as well, to properly shape the hairline.  We used black dots for the eyes because I had no candy eyes in my pantry but I have always loved the Wilton Candy Eyes when doing food crafts. They were really cute on our Halloween Jalapeno Popper Mummies.

Enjoy your tasty vampires!


Dracula Halloween Doughnuts

Print
clock clock iconcutlery cutlery iconflag flag iconfolder folder iconinstagram instagram iconpinterest pinterest iconfacebook facebook iconprint print iconsquares squares iconheart heart iconheart solid heart solid icon

Dracula Halloween Donuts | Vampire Food Craft

  • Author: Ashley at Frugal Coupon Living
Print Recipe

Description

We have the cutest Dracula food craft for you this fall season. These Vampire Halloween Donuts will have anyone craving a mouth-watering bite of this tasty Halloween doughnut. I want to suck… that icing! 


Ingredients

Scale
  • 12 donuts
  • 1 container of purple frosting
  • Red gel icing
  • Black icing
  • Fake vampire teeth

Instructions

  1. Lay out a piece of parchment paper.
  2. Add one cup of frosting to a small bowl and heat for 15 seconds in the microwave.
  3. Dip the top of each doughnut into the melted frosting, let any excess drip off and place into your parchment paper.
  4.  Transfer the donuts to the freezer for 15 minutes.
  5. Squeeze your vampire teeth together and place into the center of the donuts.
  6. Use your red gel icing to squeeze around the teeth.
  7. Use your black icing to draw eyes and a pointed hairline.

Did you make this recipe?

Tag @frugalcouponliving on Instagram and hashtag it #frugalcouponliving

Recipe Card powered byTasty Recipes
We have the cutest vampire food craft for you this fall season. These Dracula Halloween Donuts will have anyone craving a mouth-watering bite of this tasty Halloween doughnut. I want to suck... that icing! Click to Tweet

Dracula Doughnuts for Halloween


Since you are inspired, take a look at these other 31+ Days of Halloween Food Crafts. Pin to Pinterest.

Hosting a party? We had fun with these 31 Inspiring Halloween Mantles and Tablescapes. Pin to Pinterest.

Leftover Halloween Candy? Make these Leftover Halloween Candy Recipes. Pin to Pinterest.


WHAT’S TRENDING? Looking for a few engaging activities? Grab Minute to Win it Games – Traditional, Holiday, Group, and more! Use these fun activities in the office, classroom, or at your next birthday party.

Celery Mummy Snacks for Halloween

This post may contain affiliate links or ads. Read my privacy policy and disclosure policy here.

March 29, 2019 by Ashley at Frugal Coupon Living Filed Under: Facebook, Halloween, Instagram, Pinterest, Recipe, Social Media

published date: August 30, 2018
modified datt: March 29,2019

There’s a healthy alternative to your sugary kids food crafts. These Celery Mummy Snacks for Halloween are adorable and made from cheese and celery stalks. 

Celery Mummy Snacks for Halloween

I really try to incorporate the season into my kids daily activities and recipes. I don’t do something every day, in fact sometimes it’s a struggle to get one thing done during the week, but I love making them feel special with creative and EASY Pinterest ideas. Easy being the key word.

In an effort to find something healthy that the kids would love, we came up with our Celery Mummy Snacks. This Kid’s Halloween Kids Food Craft is so simple you might make it as an after school snack every day! The kids can also have their hand in making it as there are a few simple ingredients and they tools are easy – use  butter knife and get it all done!

We also suggest these mummies for a school party snack.  Unless there is dairy allergy, you likely can feed the entire class. They are peanut free and the teacher won’t complain about the extra sugar.

Enjoy and let us know how they turn out! We love to hear from you.

Supplies:

  • Celery
  • Mozzarella Shredded Cheese
  • Cream Cheese (Garlic and Herb or any flavor)
  • Edible Eyeballs


Print
clock clock iconcutlery cutlery iconflag flag iconfolder folder iconinstagram instagram iconpinterest pinterest iconfacebook facebook iconprint print iconsquares squares iconheart heart iconheart solid heart solid icon

Recipe Draft

  • Author: Ashley at Frugal Coupon Living
Print Recipe

Ingredients

  • Celery
  • Mozzarella Shredded Cheese
  • Cream Cheese (Garlic and Herb or any flavor)
  • Edible Eyeballs

Instructions

1. Cut celery into 3-4 inch pieces.
2. Spread the cream cheese onto each celery stick.
3. Place the mozzarella cheese one by one on top of the cream cheese. Make sure to cross them and overlap the pieces so it’ll look like a wrapped mummy.
4. Stick on 2 eyeballs and enjoy this fun treat!


Did you make this recipe?

Tag @frugalcouponliving on Instagram and hashtag it #frugalcouponliving

Recipe Card powered byTasty Recipes

Directions:

Cut celery into 3-4 inch pieces.

Spread the cream cheese onto each celery stick.

Place the mozzarella cheese one by one on top of the cream cheese. Make sure to cross them and overlap the pieces so it’ll look like a wrapped mummy.

Stick on 2 eyeballs and enjoy this fun treat!

There's a healthy alternative to your sugary kids food crafts. These Celery Mummy Snacks for Halloween are adorable and made from cheese and celery stalks. #FrugalCouponLiving #Halloween Click to Tweet


We have so many ideas for Halloween. Take a look at our 31 Days of Kid’s Halloween Food Crafts. Pin to Pinterest on your Halloween and Recipe boards.

Leftover Halloween Candy? Take a look at these Creative Ways to Reuse Leftover Halloween Candy. Pin to Pinterest on your Halloween and Recipe Board.


WHAT’S TRENDING? Looking for a few engaging activities? Grab Minute to Win it Games – Traditional, Holiday, Group, and more! Use these fun activities in the office, classroom, or at your next birthday party.

DIY Weekly Dorm Room Calendar Craft

This post may contain affiliate links or ads. Read my privacy policy and disclosure policy here.

March 29, 2019 by Ashley at Frugal Coupon Living Filed Under: Back To School, Crafts, DIY, Facebook, Instagram, Pinterest, Social Media

published date: August 20, 2018
modified datt: March 29,2019

Do it yourself Weekly Dorm Room Calendar. This easy Paint Chip Craft can be done in a matter of minutes and aids in organizing daily home and school life.

DIY Weekly Dorm Room Calendar Craft

DIY Weekly Dorm Room Calendar Craft

As a former teacher and a mom of pre-teens, one of my favorite posts on Frugal Coupon Living was Dorm Room Hacks and Tips. I loved putting together ideas for the dorm room without having to send one of my girls off to school. I also loved the college organizing ideas that could easily be transformed into Teen Bedroom Ideas.

As any mom knows, keeping teens organized can be a huge challenge, particularly when they go off to college! College kids need all the help they can get when organizing their dorm rooms. Most dorms are tiny spaces with barely any room to move- much less space for organizing supplies! With this cute paint chip dorm room organizer calendar, kids will be prepared to face whatever college has to throw at them. This craft was easy. It took some of our preexisting Paint Chips and turned them into a weekly calendar for college.

Younger kids will also love this cute paint chip calendar, and after you make the first one, you just might have to make one for everyone in the family! This calendar can be placed in a home bedroom, a home command center, and maybe even inside a teen locker for school. Wherever you place your calendar, this is a super inexpensive way to stay organized, and it doubles as cute wall art at the same time!

Happy crafting.

Weekly Dorm Room Calendar Craft Tutorial

Supplies:

  • Laminator and laminating pockets
  • Paint chips in rainbow colors
  • Clothespins in rainbow colors
  • Twine
  • Scissors
  • Permanent markers
  • Dry erase markers


Directions:

  1. Cut the paint chips to the desired size. I rounded the corners on my paint chips to give them a softer appearance.
  2. Place the paint chips into a laminating pocket and run through the laminating machine. Cut the paint chips out of the plastic.
  3. Use a permanent marker to write the days of the week onto the clothespins. If your clothespins are small, use abbreviations for the days of the week. Decide if you want a 7-day or 5-day calendar.
  4. Use a dry erase marker to write the daily tasks onto the paint chips. If your to-do list gets too long, add another paint chip to that day.
  5. Hang the twine string somewhere in a dorm room or on a bulletin board. Use clothespins to secure the paint chips to the string in daily order.
  6. As you complete each task, wipe it off the paint chip. The next week, you can reuse each paint chip to write that day’s tasks.
Do it yourself Weekly Dorm Room Calendar. This easy Paint Chip Craft can be done in a matter of minutes and aids in organizing daily home and school life. Click to Tweet

DIY Weekly Calendar Craft Using Paint Chips


We found some other helpful ideas for college life. Take a look at these Dorm Room Hacks and Tips. Pin to Pinterest.

Have extra paint chips?  Take a look at these Paint Chip Crafts. Add to Pinterest on your Craft Board.

Organize yourself with these Home Command Centers (and Homework Center Ideas) – also great for college life! Pin to Pinterest on your Home and School Boards.


WHAT’S TRENDING? Looking for a few engaging activities? Grab Minute to Win it Games – Traditional, Holiday, Group, and more! Use these fun activities in the office, classroom, or at your next birthday party.

Milk and Cookies Popsicles

This post may contain affiliate links or ads. Read my privacy policy and disclosure policy here.

March 29, 2019 by Ashley at Frugal Coupon Living Filed Under: Facebook, Instagram, Pinterest, Recipe, Social Media, Summer

published date: August 02, 2018
modified datt: March 29,2019

Everyone’s favorite dessert, milk and cookies, twisted into a cool tasty treat – Milk and Cookies Popsicles featuring Golden OREOs.

Milk and Cookies Popsicles

Milk and Cookies Popsicles

We twisted everyone’s favorite dessert into a yummy treat, Milk and Cookies Popsicles! This Popsicle recipe features Golden OREOs.  We did not use whole milk in this recipe, we used our secret ingredient Almond Milk. We make a lot of smoothies in our home, so Almond Milk is a pretty common staple ingredient for us. To add more flavor, we included sugar and vanilla extract.  If you need a Popsicle mold, these are like the molds we used.

Enjoy!

Milk and Cookies Popsicles Ingredients

Ingredients:

  • 2 cups Unsweetened Vanilla Almond milk
  •  ¼ cups Sugar
  • 2 tsp. Vanilla Extract
  • Golden OREOs
  • Popsicle molds – these are like the molds we used, but they have many more options!


Milk and Cookies Popsicles In Process

Directions:

  1. Pour two cups of unsweetened vanilla almond milk into a blender.
  2. Add in ¼ cup of sugar.
  3. Mix in 2 teaspoons of vanilla.
  4. Blend until the mixture is well combined.
  5. Place one whole Golden Oreo into the bottom of each Popsicle mold.
  6. Break another Golden Oreo into fourths, and layer it the rest of the way to the top of each Popsicle mold.
  7.  Pour your Popsicle mixture into each mold to fill it to the top.
  8. Place the tops on each of the Popsicle molds.
  9. Put the Popsicles in the freezer for at least 5 hours.
  10. When ready to serve, you can loosen the Popsicle in the molds with some warm running water.

Milk and Cookies Popsicle Molds

Print
clock clock iconcutlery cutlery iconflag flag iconfolder folder iconinstagram instagram iconpinterest pinterest iconfacebook facebook iconprint print iconsquares squares iconheart heart iconheart solid heart solid icon

Milk and Cookies Popsicles

  • Author: Ashley at Frugal Coupon Living
Print Recipe

Ingredients

Scale
  • 2 cups Unsweetened Vanilla Almond milk
  •  ¼ cups Sugar
  • 2 tsp. Vanilla
  • Golden OREOs
  • Popsicle molds

Instructions

  1. Pour two cups of unsweetened vanilla almond milk into a blender.
  2. Add in ¼ cup of sugar.
  3. Mix in 2 teaspoons of vanilla.
  4. Blend until the mixture is well combined.
  5. Place one whole Golden Oreo into the bottom of each Popsicle mold.
  6. Break another Golden Oreo into fourths, and layer it the rest of the way to the top of each Popsicle mold.
  7.  Pour your Popsicle mixture into each mold to fill it to the top.
  8. Place the tops on each of the Popsicle molds.
  9. Put the Popsicles in the freezer for at least 5 hours.
  10. When ready to serve, you can loosen the Popsicle in the molds with some warm running water.

Did you make this recipe?

Tag @frugalcouponliving on Instagram and hashtag it #frugalcouponliving

Recipe Card powered byTasty Recipes


Everyone's favorite dessert, milk and cookies, twisted into a cool tasty treat - Milk and Cookies Popsicles featuring Golden OREOs. #FrugalCouponLiving Click to Tweet

Milk and Cookies Popsicles


Hey Popsicle lovers! You will want to see the other Popsicle Ideas, Summertime Popsicle Recipes. Pin to Pinterest.

Enjoy our Chocolate Covered Strawberry Popsicles. Pin to Pinterest.

Also take a look at this cookie recipe – Cookie Skillet! Pin to Pinterest.


WHAT’S TRENDING? Looking for a few engaging activities? Grab Minute to Win it Games – Traditional, Holiday, Group, and more! Use these fun activities in the office, classroom, or at your next birthday party.

Easy Back to School Apple Pops – 2 Simple Ingredients

This post may contain affiliate links or ads. Read my privacy policy and disclosure policy here.

March 29, 2019 by Ashley at Frugal Coupon Living Filed Under: Back To School, Facebook, Instagram, Pinterest, Recipe, Social Media

published date: August 04, 2018
modified datt: March 29,2019

We have the cutest after school snack for the kids. These Back to School Apple Pops are easy to make with only two simple ingredients – candy melts and nutter butter cookies. They look just like apple cores! 

Back to School Apple Pops

Easy Back to School Apple Pops - 2 Simple Ingredients

We did something similar a few years ago but we wanted to evolve it for those that love peanut butter as much as we do. These back to School Apple Pops are an easy after school snack. They require only two ingredients – Nutter Butter Cookies and Wilton Candy Melts (of various colors.) Make them before the kids get home as a fun surprise or unwind one afternoon and make them with the kids. Don’t forget to bag a few and send in to school for a special teacher!

Allergy alert! These do contain peanut butter so consider making our Apple OREO Pops as an alternative.

Nutter Butter Apple Pops

Supplies:

List supplies with bullets and Amazon Links

  • Nutter Butter Peanut Butter Sandwich Cookies
  • Wilton white candy melts
  • Wilton red candy melts
  • Wilton light cocoa candy melts
  • Wilton light green candy melts
  • Green lollipop sticks
  • Parchment paper/sheets
  • Decorating bag


Print
clock clock iconcutlery cutlery iconflag flag iconfolder folder iconinstagram instagram iconpinterest pinterest iconfacebook facebook iconprint print iconsquares squares iconheart heart iconheart solid heart solid icon

Easy Back to School Apple Pops – 2 Simple Ingredients

  • Author: Ashley at Frugal Coupon Living
Print Recipe

Description

We have the cutest after school snack for the kids. These Back to School Apple Pops are easy to make with only two simple ingredients – candy melts and nutter butter cookies. They look just like apple cores! 


Ingredients

  • Nutter Butters
  • Wilton white candy melts
  • Wilton red candy melts
  • Wilton light cocoa candy melts
  • Wilton light green candy melts
  • Green lollipop sticks
  • Parchment paper
  • Decorating bag

Instructions

1. In a small microwave safe bowl, heat 2 cups of the white, 2 cups of red and 1/4 cup of brown candy melts in separate microwave safe bowls on 50% power for 3-4 minutes. Make sure to stir every 30 seconds until melted. (This evens out the temperature and prevents burning.)

2. Once melted, carefully open a Nutter Butter cookie and add a dollop of melted white chocolate and gently press a green lollipop stick onto the frosting side of the Nutter butter so the stick sticks out the top about 1/2” (for your stem) and carefully place the Nutter Butters back together.

3. Place your cookies on a baking pan lined with parchment paper and transfer to the freezer for 5 minutes.

4. After freezing, hold the lollipop sticks over the melted white chocolate and coat the center with the melted white chocolate, let any excess drip off and set back onto the parchment paper and into the freezer for another 5 minutes.

5. After freezing, hold onto the lollipop stick over the red chocolate and coat the top and bottom of the Nutter Butter with red chocolate, let any excess drip off and place onto a piece of parchment paper

6. Break a small green candy melt in half, smooth the edges with your finger and place on top of the Nutter Butter by the “stem” or green lollipop stick.  Transfer to the freezer for 15 minutes.

7. In a small microwave safe bowl, heat 1/4 cup of your light cocoa candy melts on 50% power for 2-3 minutes, stirring every 30 seconds until melted, pour into a decorating bag and cut a tiny tip off the end of the bag.

8. Use your decorating bag of light cocoa candy melts to draw 4 tiny seeds onto the white center of the apple.

9. Let harden and enjoy!


Did you make this recipe?

Tag @frugalcouponliving on Instagram and hashtag it #frugalcouponliving

Recipe Card powered byTasty Recipes

How to make Nutter Butter Apple Core Pops

The easiest after school snack. These Back to School Apple Pops are easy to make with only two simple ingredients. They look just like apple cores! Click to Tweet

Nutter Butter Apple Core Pops


Look at this other creative Back to School Snack using Candy Melts and Graham Crackers. Back to School Graham Cracker Pencils – Pin to Pinterest.

We have other Apple Pops, enjoy these Apple OREO Pops. Pin to Pinterest.

This bagel is a hoot! Woodland Owl Bagel. Pin to Pinterest.

Also enjoy these tasty after school desserts – Back to School Apple Cupcakes . Pin to Pinterest.

Save all these creative Back to School Kid Snack Ideas too. You will want them for class parties or for when the kids get home. Pin to Pinterest.


WHAT’S TRENDING? Looking for a few engaging activities? Grab Minute to Win it Games – Traditional, Holiday, Group, and more! Use these fun activities in the office, classroom, or at your next birthday party.

Homemade Jolly Rancher Suckers

This post may contain affiliate links or ads. Read my privacy policy and disclosure policy here.

March 29, 2019 by Ashley at Frugal Coupon Living Filed Under: Facebook, Instagram, Pinterest, Recipe, Social Media

published date: July 28, 2018
modified datt: March 29,2019

Homemade Jolly Rancher Suckers. This lollipop recipe is easy to make for the kids.

Homemade Jolly Rancher Suckers

Homemade Jolly Rancher Suckers

Did you watch Kids Baking Championship?  Ever since the birth of that show, my girls (ages 8 and 9) have wanted to get creative in the kitchen. Sometimes we get creative in the kitchen and I give them a boxed cookie recipe plus a secret ingredient and they must get crafty. Other times, though, we go for something simple and easy like these Homemade Jolly Rancher Suckers.  The recipe requires Jolly Rancher Candies, a lollipop mold and lollipop sticks. We had fun putting one of our favorite candy’s on a stick!

Enjoy!

Homemade Jolly Rancher Lollipops

Ingredients and Supplies:

  • Jolly Rancher Candies
  • 4” Lollipop sticks
  • Coffee mug or glass measuring cup
  • Lollipop mold
  • Non-stick butter cooking spray

We used a lollipop mold found here. You will also need lollipop sticks found here.


Homemade Jolly Rancher Suckers Ingredients

Directions:

  1. Unwrap four jolly rancher candies and place them in a coffee mug (or glass measuring cup).
  2. Lightly spray a non stick cooking spray in the sucker part of the mold and wipe out with a paper towel.
  3. Microwave for 30 seconds on 60% power and then microwave for another 15-30 seconds on 80% power (your mixture should be bubbling, caution it’s very hot).
  4. Carefully and quickly pour your melted Jolly Rancher into your sucker mold.
  5. Rinse your mug with hot water until the leftover candies have melted off (this takes a minute or so).
  6. Switch colors of Jolly Ranchers and repeat steps.
  7. Place in freezer for 15 minutes and your suckers will pop right out.
Print
clock clock iconcutlery cutlery iconflag flag iconfolder folder iconinstagram instagram iconpinterest pinterest iconfacebook facebook iconprint print iconsquares squares iconheart heart iconheart solid heart solid icon

Homemade Jolly Rancher Suckers

  • Author: Ashley at Frugal Coupon Living
Print Recipe

Ingredients

  • Jolly Rancher Candies
  • 4” Lollipop sticks
  • Coffee mug
  • Lollipop mold
  • Non-stick butter cooking spray

Instructions

  1. Unwrap 4 jolly rancher candies and place them in a coffee mug.
  2. Lightly spray a non stick cooking spray in the sucker part of the mold and wipe out with a paper towel.
  3. Microwave for 30 seconds on 60% power and then microwave for another 15-30 seconds on 80% power (your mixture should be bubbling, caution it’s very hot).
  4. Carefully and quickly pour your melted Jolly Rancher into your sucker mold.
  5. Rinse your mug with hot water until the leftover candies have melted off (this takes a minute or so).
  6. Switch colors of Jolly Ranchers and repeat steps.
  7. Place in freezer for 15 minutes and your suckers will pop right out.

Did you make this recipe?

Tag @frugalcouponliving on Instagram and hashtag it #frugalcouponliving

Recipe Card powered byTasty Recipes
Homemade Jolly Rancher Suckers. This lollipop recipe is easy and requires very little ingredients! Enjoy! #recipe#frugalcouponliving Click to Tweet

Homemade Jolly Rancher Suckers


Take a look at our Cotton Candy Cupcakes! Pin to Pinterest.

This could go well with our Tasty Leftover Halloween Candy Recipes. Pin to Pinterest.


WHAT’S TRENDING? Looking for a few engaging activities? Grab Minute to Win it Games – Traditional, Holiday, Group, and more! Use these fun activities in the office, classroom, or at your next birthday party.

Peacock Cupcakes for Your Bird-Themed Party

This post may contain affiliate links or ads. Read my privacy policy and disclosure policy here.

March 29, 2019 by Ashley at Frugal Coupon Living Filed Under: Birthday, Facebook, Instagram, Pinterest, Recipe, Social Media

published date: July 26, 2018
modified datt: March 29,2019

Birds of a feather flock together! We created the cutest and easy Peacock Cupcakes for your Bird-Themed Party. Your birthday party doesn’t’ have to be for the birds! Tweet, tweet!

Peacock Cupcakes for your Bird-Themed Party

Peacock Cupcakes for Your Bird-Themed Party

Birds of a feather flock together. We have an adorable and easy peacock recipe for your flock. These cupcakes feature candy eyes, colored cake cups, premade cupcakes, candy sugar, chocolate melts and more. They would make the cutest dessert for a bird-themed birthday party.  The kids will love putting these individual desserts together with you.

Peacock Cupcakes Ingredients

Supplies to Order Ahead:

  • White Frosting
  • Blue Ice Cream Cake Cones
  • Small Edible Eyes
  • Wilton Bubble Gum Sprinkles
  • Wilton Chocolate Melts, White
  • Wilton Chocolate Melts, Light Green
  • Wilton Chocolate Melts, Turquoise
  • Purple Sanding Sugar


Bird-Themed Party Dessert - Peacock Cupcakes

Print
clock clock iconcutlery cutlery iconflag flag iconfolder folder iconinstagram instagram iconpinterest pinterest iconfacebook facebook iconprint print iconsquares squares iconheart heart iconheart solid heart solid icon

Peacock Cupcakes for your Bird-Themed Party

  • Author: Ashley at Frugal Coupon Living
  • Yield: 6 1x
Print Recipe

Description

Tweet, tweet. This birthday doesn’t have to be for the birds. Make these easy Peacock Cupcakes for your bird-themed party.


Ingredients

Scale
  • 6 Prepared Cupcakes, unfrosted
  • 1 Container White Frosting
  • 6 Blue Ice Cream Cake Cones
  • 12 Small Edible Eyes
  • Wilton Bubble Gum Sprinkles
  • 8 oz. Wilton Chocolate Melts, White
  • 8 oz. Wilton Chocolate Melts, Light Green
  • 8 oz. Wilton Chocolate Melts, Turquoise
  • Purple Sanding Sugar

Instructions

  1. Frost each cupcake with a layer of white frosting.
  2. Cut the top rim off each blue cone and discard the top rims. Set the cone parts with the opened end down on a tray so bottoms of the cones are faced up.
  3. Melt the white chocolate according to package directions and put it into a small plastic bag and snip the tip off. Put 2 dots of chocolate on each cone on the side near the top and press 2 eyeballs on. Put a dot of chocolate under the eyes and stick an orange tiny bubble gum sprinkle to those. Let the chocolate harden.
  4. Melt the other two colors of chocolate and put each of those colors in their own plastic bag and snip off an end.
  5. To make the peacock feathers, line a baking sheet with parchment paper. Pipe a feather shape of each color in a fan shape making sure the colors touch. Sprinkle the purple sugar on the white feathers. Put a little swirl of a different color chocolate on each feather to resemble the multi-color feathers of a peacock. My feather were about 3 inches long. Let these harden completely.
  6. Use the white chocolate to make 6 little “W” shapes on the parchment paper no more than an inch tall. Take each of the chocolate colors and put a dot on each end of the “W” shapes. Sprinkle some purple sugar on the little white dots. Let these harden completely. These will be the little feathers for the top of the peacock’s heads.
  7. On each cone on the opposite side of the eyes, put a dot of chocolate and stick a fan of the peacock feathers to it. It should look like the big fan of feathers is behind the cone body and the face.
  8. On top of each cone right above the eyes, put a dot of white chocolate, and stick the little feather “w” to it. Let all the chocolate harden.
  9. Put a peacock on each cupcake and press them into the frosting a little bit so they are secure.
  10. These cute cupcakes are great for any zoo or animal party!

Did you make this recipe?

Tag @frugalcouponliving on Instagram and hashtag it #frugalcouponliving

Recipe Card powered byTasty Recipes

Peacock Cupcakes Directions

If these cupcakes, make you tweet, make sure to share your tweet with others…

Tweet, tweet. This birthday doesn't have to be for the birds. Make these easy Peacock Cupcakes for your bird-themed party. Click to Tweet


Peacock Cupcakes for a Bird Birthday Party

So we sort of love creative cupcakes. I mean… who doesn’t? Take a look at some of our previous cupcake recipes and tell us your favorite!

This cupcake is so fun and tastes like the real thing – look at this Cotton Candy Cupcake Recipe. Pin to Pinterest.

You will never guess what makes these chocolate chips! Enjoy this Watermelon Cupcake Recipe. Pin to Pinterest.

What’s that swimming in the water? We love these Giant Squid Cupcakes (or Octopus) for summer or a beach party. Pin to Pinterest.

Don’t let the crabs pinch. Make these yummy Crab Beach Cupcakes also for summer or your beach-themed party. Pin to Pinterest.


WHAT’S TRENDING? Looking for a few engaging activities? Grab Minute to Win it Games – Traditional, Holiday, Group, and more! Use these fun activities in the office, classroom, or at your next birthday party.

  • « Previous Page
  • 1
  • …
  • 160
  • 161
  • 162
  • 163
  • 164
  • …
  • 272
  • Next Page »
  • Search
  • Social
  • Categories
  • Archives
Search
  • Email
  • Facebook
  • Instagram
  • Pinterest
  • Twitter
Browse By Category
Browse by Date
I am a wife, mother, daughter, blogger, teacher, friend – a woman of many different hats. My delights are my husband, my five kids, reading, shopping, and spending time with friends and family. I am a Florida girl transferred to the heart of the DC-Metro area. I'm glad you're here! Learn more about Ashley.

Daily Deals – Don’t Miss One!

December 2025
S M T W T F S
 123456
78910111213
14151617181920
21222324252627
28293031  
« Nov    

Copyright © 2025 Frugal Coupon Living | CCPA Policy | Privacy Policy | Disclosure | Disclaimer | Terms of Use | Do Not Sell My Personal Information | Email Sign Up