Frugal Coupon Living

Stretching Your Pennies, Saving Your Dollars

  • Email
  • Facebook
  • Instagram
  • Pinterest
  • Twitter
  • Home
    • Home Page
    • About Ashley at Frugal Coupon Living
    • Contact
  • Shop
    • Frugal Coupon Living Shop
    • Etsy Store
    • TPT Shop
    • Elf Printables
    • Shipping Policy
  • Printables
    • Shop
    • All Printables
    • Free Printables Library
    • Free Elf Printables
  • Games
  • Party
  • Deals
  • Seasonal
    • Easter
    • Spring
    • April Fools Day
    • Mother’s Day
    • Father’s Day
    • Summer
    • Back to School
    • Halloween
    • Thanksgiving
    • Black Friday & Cyber Monday
    • Christmas
    • New Year’s Eve
    • Valentine’s Day
    • All Seasonal
  • Christian Resources
    • Christian Resources Shop
    • TPT Christian Crafts
    • Etsy Christian Prints
    • Youth Group Games
    • Sunday School Lessons
    • Scripture Cards
    • More Christian Resources

Firecracker Cookies Red White and Blue July 4th Recipe

This post may contain affiliate links or ads. Read my privacy policy and disclosure policy here.

May 25, 2019 by Ashley at Frugal Coupon Living Filed Under: Facebook, Instagram, Pinterest, Recipe, Social Media, Summer

published date: May 25, 2019
modified datt: May 25,2019

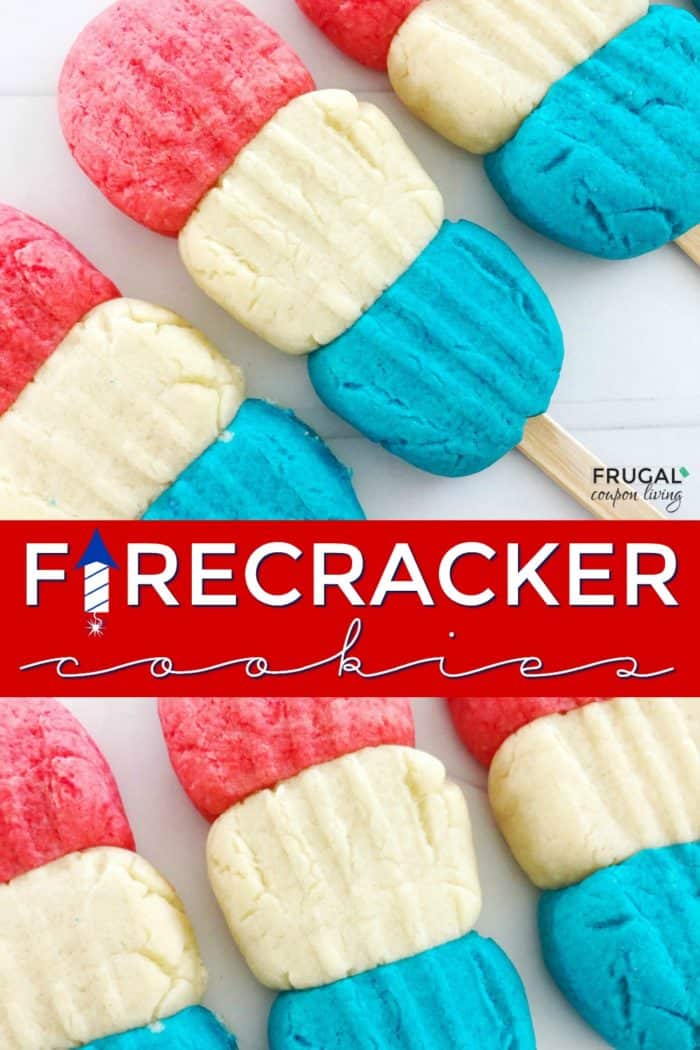
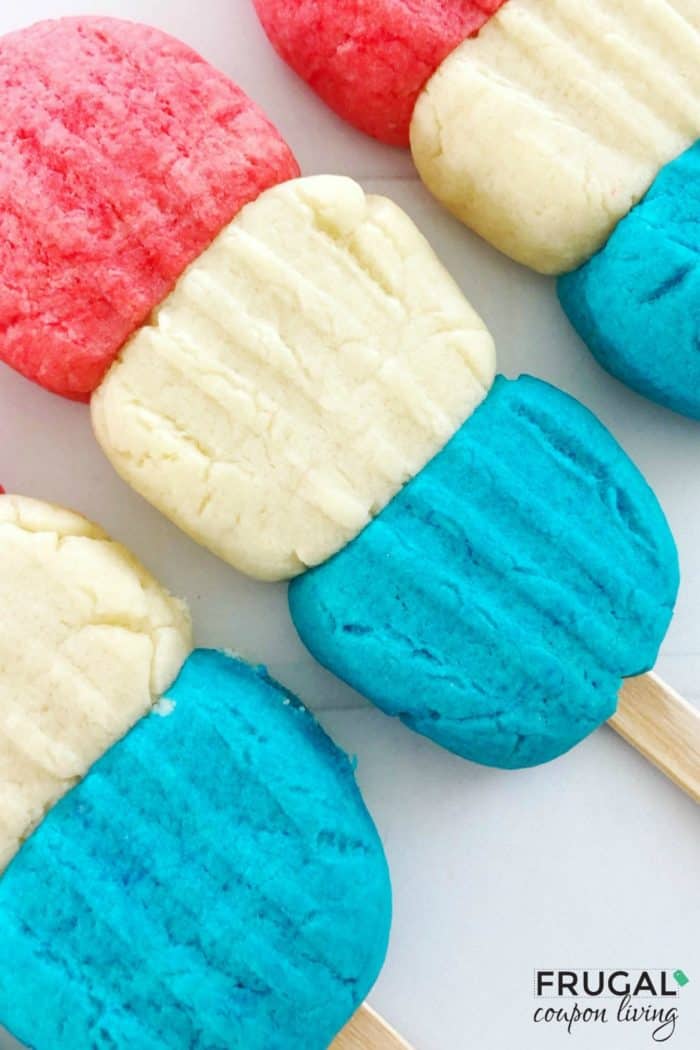
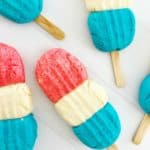
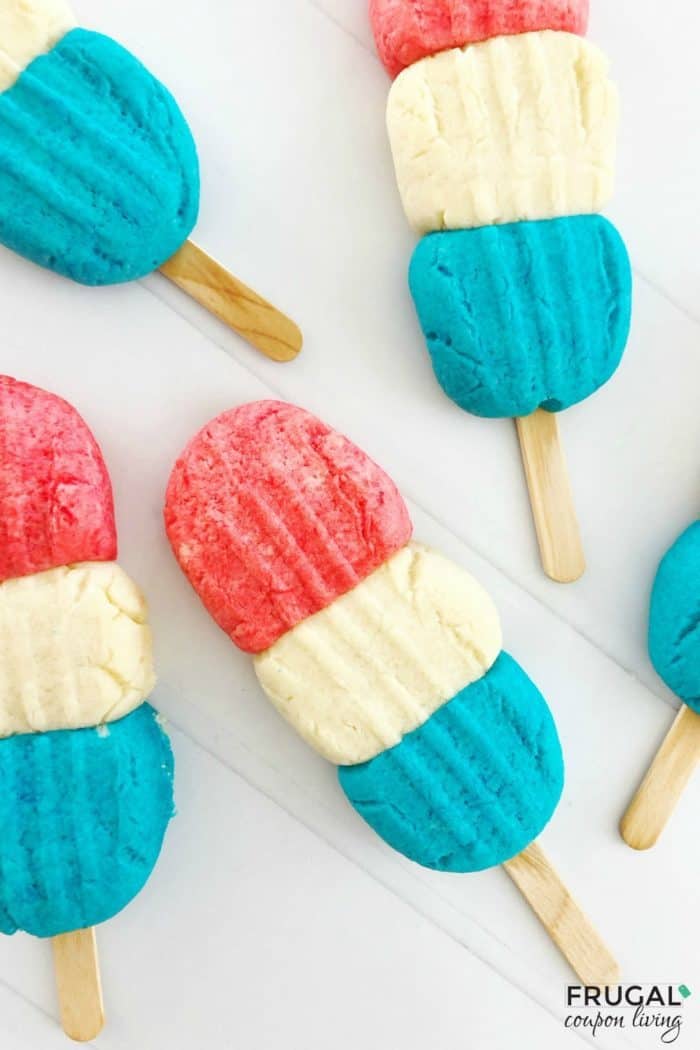
Explosively yummy, Firecracker Cookies just like the classic Popsicle. This red, white, and blue Fourth of July Recipe is a tasty dessert for picnics, the pool, parties or just because. Best of all this summer dessert on a stick can be enjoyed while on the go.

Firecracker Cookies

Living Washington, DC..

Since moving to Washington, D.C. four years ago, the Fourth of July has taken on an entirely new meaning.  First of all, every time we drive past the monuments and historic sites, I tear up. I mean tears come down my face and I have to make sure not to find myself in conversation or I begin to sound incredibly silly not being able to get words out of my mouth. There is something about being on the ground our forefather’s walked on before. The area is full of pride. A lot of the pride is political and military, but D.C. is a huge melting pot. There is pride for every blend of person and every country. In my small neighborhood of about 12 families, half of the homes are filled with international citizens. We are all displaced people and find family in one another. It’s like nothing else I have ever experienced… it’s welcoming of each other’s differences. It’s blending of different foods and cultures.

The Fourth of July

I digress… back to July 4th… Clearly, this is an area where Independence Day is huge. There are parades, huge performances with top artists (in fact you might watch our country’s fire works and performers each year on PBS in front of the United States Capitol.) The publicized performance is topped off with fireworks over the mall. A large National Park where the Lincoln Memorial and Washington Monument are located. It’s majestic. It’s beautiful. It’s warning. We are so blessed to be in a country where red, white and blue speak more than colors on a pallets.

Firecracker Cookies  

Wherever you are this July 4th, Memorial Day or Veterans Day, this cookie recipe is a must. Dessert on a stick doesn’t have to be limited to a a frozen treat! We blended together three cookies on a stick that look just like a classic Firecracker Popsicle, but, best of all, they don’t melt.

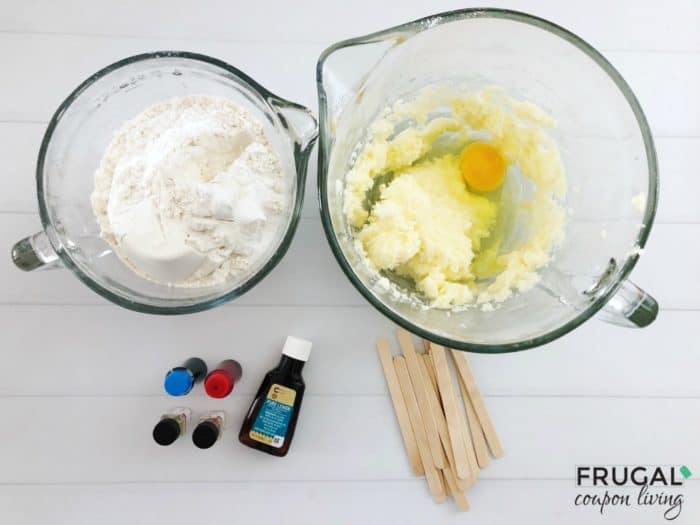
Firecracker Cookies Ingredients:

  • 1/2 cup butter, softened
  • 1/2 cup granulated sugar
  • 1/2 cup powdered sugar
  • 1/2 cup vegetable oil
  • 1 egg
  • 3 cups all purpose flour
  • 1/2 teaspoon baking soda
  • 1/2 teaspoon cream of tartar
  • 1/4 teaspoon salt
  • Lemon, blue raspberry and cherry flavoring
  • Red and blue food coloring
  • Food safe craft sticks


Print
clock clock iconcutlery cutlery iconflag flag iconfolder folder iconinstagram instagram iconpinterest pinterest iconfacebook facebook iconprint print iconsquares squares iconheart heart iconheart solid heart solid icon

Firecracker Cookies Red White and Blue July 4th Recipe

  • Author: Ashley at Frugal Coupon Living
Print Recipe

Ingredients

Scale
  • 1/2 cup butter, softened
  • 1/2 cup granulated sugar
  • 1/2 cup powdered sugar
  • 1/2 cup vegetable oil
  • 1 egg
  • 3 cups all purpose flour
  • 1/2 teaspoon baking soda
  • 1/2 teaspoon cream of tartar
  • 1/4 teaspoon salt
  • Lemon, blue raspberry and cherry flavoring
  • Red and blue food coloring
  • Food safe craft sticks

Instructions

  1. Preheat your oven to 350° in line a baking sheet with parchment paper.
  2. In a large mixing bowl combine your butter, granulated sugar and powdered sugar and mix well.
  3. Mix in one egg and vegetable oil and mix.
  4. Mix in the flour, baking soda, cream of tartar and salt (if your dough is still a little crumbly, mix in a 1-3 tablespoons of water).
  5. Separate the dough into 3 bowls, mixing blue food coloring in one with 1/2 teaspoon blue raspberry flavoring, mix one with red food coloring and 1/2 teaspoon cherry flavoring, and 1/2 teaspoon of lemon extract in the non-colored dough.
  6. Form the dough into small balls and arrange onto the sticks from red, white and blue.
  7. Press the balls together into a log and press a fork down the center of each color for an imprint.
  8. Bake at 350 degrees for 10 minutes, let cool and enjoy!

Did you make this recipe?

Tag @frugalcouponliving on Instagram and hashtag it #frugalcouponliving

Recipe Card powered byTasty Recipes

Kids Baking Championship

The best thing to hit the television of our home has been Kid Baking Championship. If your kids have not seen it, turn it on. It’s a wholesome show about kids changing each other to the best tasting, self-created recipe. This show has become the best in our home because my kids have picked up a lot. I have been cooking less in the kitchen, while they pick up recipes on their own. My girls are being creative too. One day I was served sugar cookies (using a pre-made package) with lime buttermilk cream (all created on their own!) It was really good!

This Dessert on a Stick Recipe is easy for the kids and one you can step back from and focus on other Fourth of July recipes for your picnic or party.

Our Pinterest community and I  would love to see how this worked out for you. Share your final recipe.  Leave a comment and/or add a photo here on Pinterest!

Firecracker Cookies Directions:

First, preheat your oven to 350° in line a baking sheet with parchment paper.

In a large mixing bowl combine your butter, granulated sugar and powdered sugar and mix well.

Mix in one egg and vegetable oil and mix.

Next, mix in the flour, baking soda, cream of tartar and salt (if your dough is still a little crumbly, mix in a 1-3 tablespoons of water).

Separate the dough into 3 bowls, mixing blue food coloring in one with 1/2 teaspoon blue raspberry flavoring, mix one with red food coloring and 1/2 teaspoon cherry flavoring, and 1/2 teaspoon of lemon extract in the non-colored dough.

Form the dough into small balls and arrange onto the sticks from red, white and blue.

Press the balls together into a log and press a fork down the center of each color for an imprint.

Finally, bake at 350 degrees for 10 minutes, let cool and enjoy!


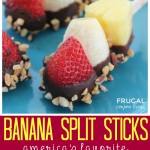
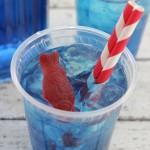
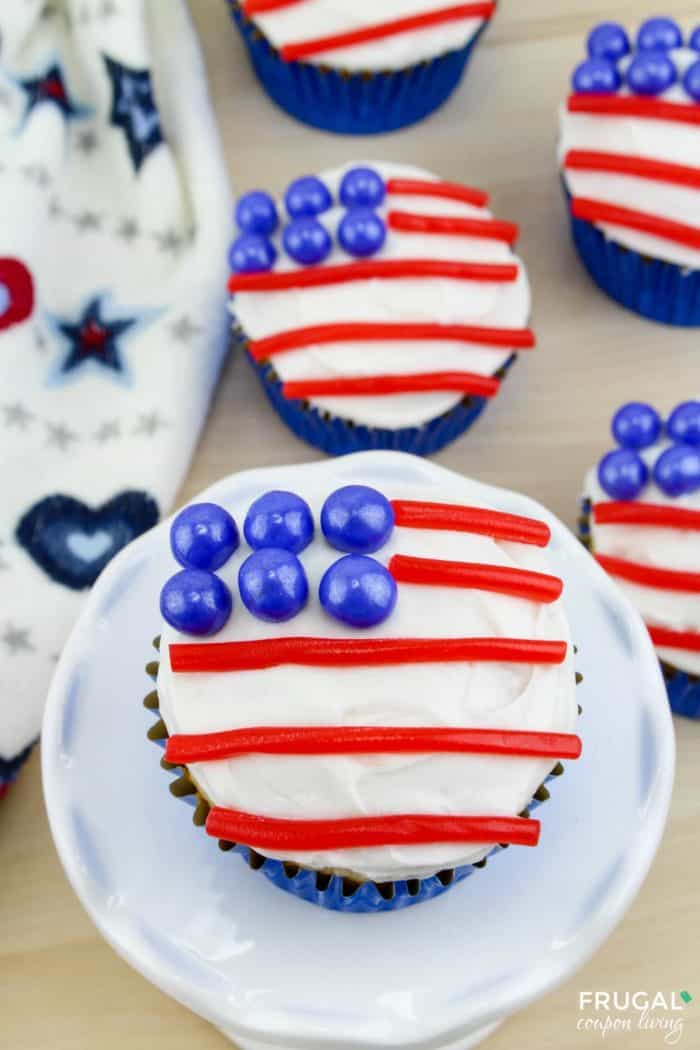
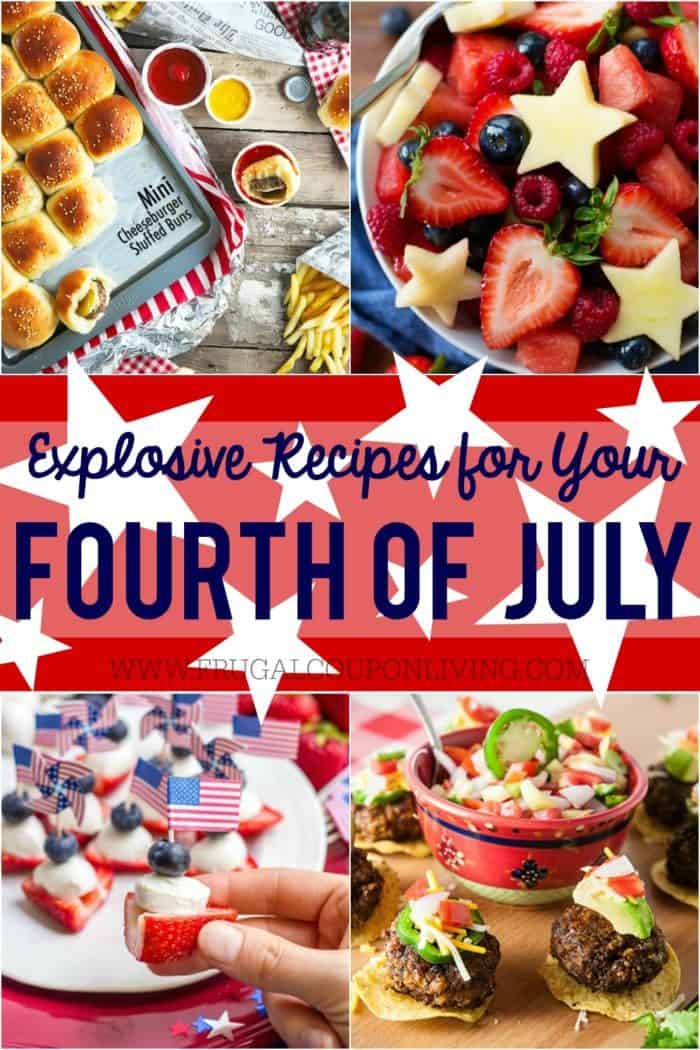
Also check out these Explosive Fourth of July Recipes. Pin to Pinterest.

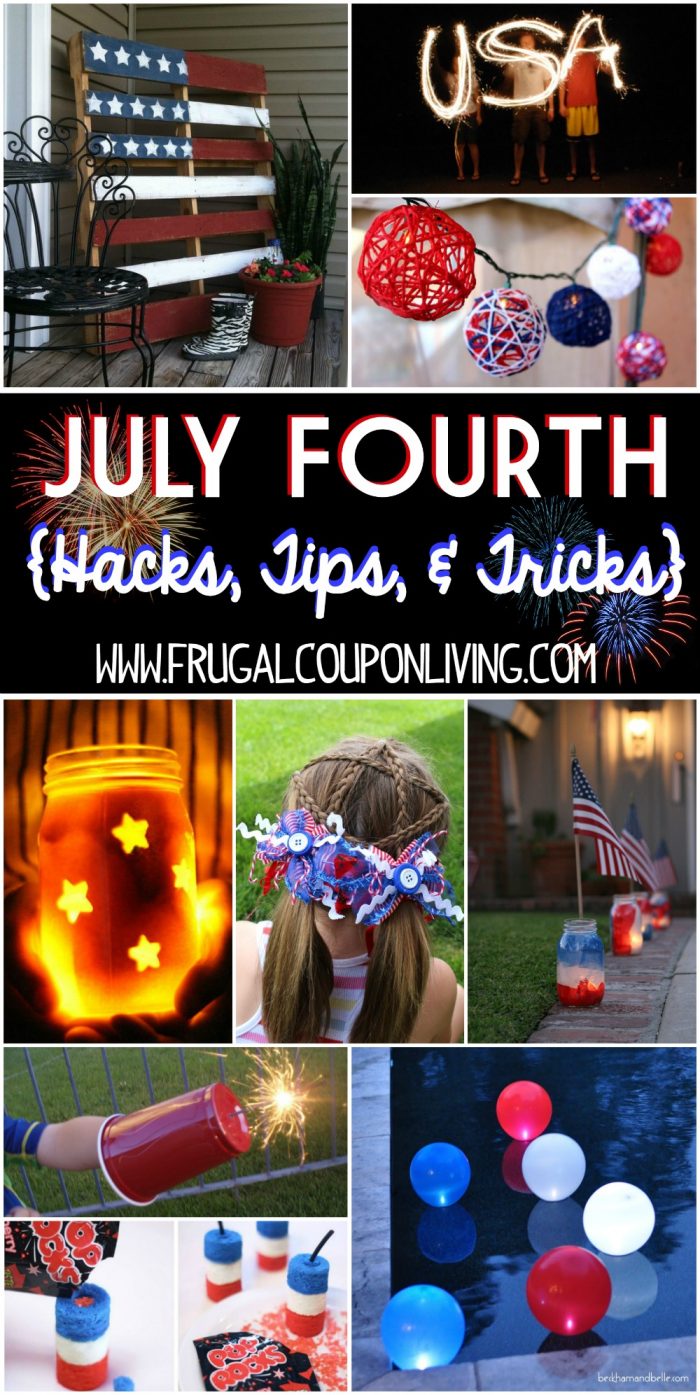
Save these July Fourth Hacks, Tips and Tricks too! Pin to Pinterest.

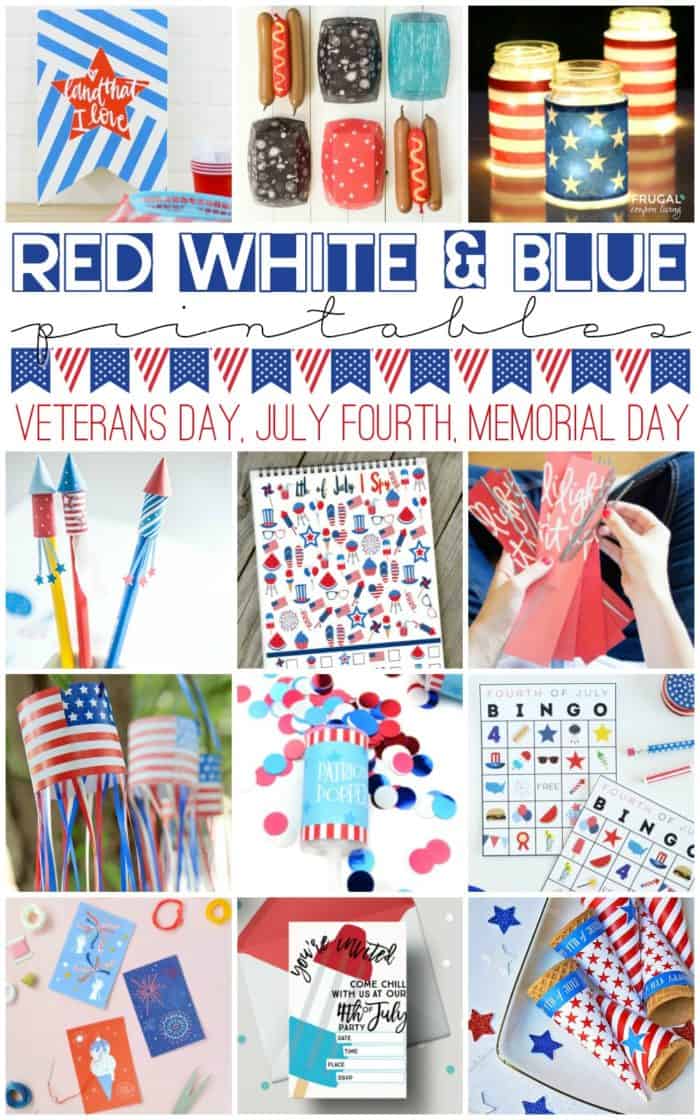
Get your print on with these Red, White and Blue Printables. Pin to Pinterest.


WHAT’S TRENDING? Looking for a few engaging activities? Grab Minute to Win it Games – Traditional, Holiday, Group, and more! Use these fun activities in the office, classroom, or at your next birthday party.

FREE Tie-riffic Tie Banner for Dad on Father’s Day

This post may contain affiliate links or ads. Read my privacy policy and disclosure policy here.

May 15, 2019 by Ashley at Frugal Coupon Living Filed Under: Father's Day, Free, Printable

published date: May 18, 2014
modified datt: May 15,2019

Look at this really cool Father’s Day Banner Printable. Spell out Happy Father’s Day in the shape of ties. This is perfect for a “TIE-RIFFIC” Dad! It looks like you need to thank Amanda’s Parties to Go for this FREE offer. While on Facebook, be sure to like Frugal Coupon Living.

Make sure you are following on Frugal Coupon Living on Pinterest where I will share other Father’s Day Crafts, Activities and Recipes.

fathers-day-simply-sprout-collage

Love the FREE Tie-riffic printable? Also grab these other Fun Daddy-O Crafts!

Free Father’s Day Printables

Father’s Day Descriptions from Kids 

Father’s Day Craft Activity for the Dad Who Loves Tools

Find more printables on Frugal Coupon Living.


WHAT’S TRENDING? Looking for a few engaging activities? Grab Minute to Win it Games – Traditional, Holiday, Group, and more! Use these fun activities in the office, classroom, or at your next birthday party.

Hot Dog Easy Beef Kabobs

This post may contain affiliate links or ads. Read my privacy policy and disclosure policy here.

May 13, 2019 by Ashley at Frugal Coupon Living Filed Under: Facebook, Instagram, Pinterest, Recipe, Social Media, Summer

published date: May 13, 2019
modified datt: May 13,2019

Hot Dog Easy Beef Kabobs. Disclosure: This post is sponsored by Tyson Foods, Inc. All opinions and the recipe are my own.

Hot Dog Easy Beef Kabobs

Cooking for five kids can be a challenge. Quantity is obviously quite difficult, but even more difficult is matching everyone’s taste buds. Because my kids all have different desires when it comes to dinner, I love kabobs. Kabobs are perfect for personalizing a recipe. One kids doesn’t prefer fruit, while another child wants a skewer loaded up with veggies (yes, I have a kid that loves their vegetables!)

In prep for a summer BBQ, we came up with an easy and tasty grilling kabob to satisfy the taste buds of your kids (and spouse!) This recipe is not only perfect for the home or a seasonal celebration, but add it to your stash of Camping Recipes for your next adventure to the great outdoors!

bamboo skewers grilling hack

Bamboo Skewers Tip: Did you know? Soak your bamboo skewers in a container of water, 30 minutes to 24 hours, before adding your food. This helps the skewer not get burnt when it’s on the grill! Good the food, not the skewer!

Love to entertain?

Sam’s Club sells a great variety of Tyson products, perfect for summer grilling, including the Ball Park® Beef Franks we used in our summer kabob recipe. Also pick up their Hillshire® Smoked Sausage and Tyson® Boneless Skinless Chicken Breasts. Stocking up at Sam’s Club on the club pack sizes makes preparing for warm weather grilling so much easier!

Hot Dog Easy Beef Kabobs Ingredients

Hot Dog Kabobs Ingredients:

  • Ball Park Beef Franks
  • Fresh pineapple rings or cubes
  • Bacon
  • BBQ sauce

Marinade Ingredients:

  • 3 tablespoons soy sauce
  • 1 tablespoon sesame oil
  • 3 tablespoons brown sugar
  • 1/2 teaspoon garlic powder

Supplies:

  • Skewers
  • Basting brush
  • Grill or fire pit
  • Freezer bag
  • Measuring cup

Save this recipe for later. Print your recipe and add it to your recipe box or recipe binder! This is my favorite Recipe Binder – I get tired of printing the same recipe over and over. A binder keeps me organized and gives me a place to store my recipes.

Print
clock clock iconcutlery cutlery iconflag flag iconfolder folder iconinstagram instagram iconpinterest pinterest iconfacebook facebook iconprint print iconsquares squares iconheart heart iconheart solid heart solid icon

Hot Dog Easy Beef Kabobs

  • Author: Ashley at Frugal Coupon Living
Print Recipe

Ingredients

Scale

Hot Dog Kabobs:

  • Ball Park® Beef Franks
  • Fresh pineapple rings or cubes
  • Bacon
  • BBQ sauce

Marinade:

  • 3 tablespoons soy sauce
  • 1 tablespoon sesame oil
  • 3 tablespoons brown sugar
  • 1/2 teaspoon garlic powder

Instructions

1. Cut your hot dogs into quarters, cut the pineapples into cubes and cut each bacon slice in half.
2. Place a hot dog onto your skewer, push it down towards the bottom but leaving enough room to hold the skewer.
3. Now place a pineapple onto the skewer next to the hot dog.
4. Fold 1/2 a piece of bacon into thirds and slide on next to the pineapple.
5. Repeat steps 2-4 until your skewers are full.
6. In a small measuring cup, mix together the soy sauce, sesame oil, brown sugar and garlic powder.
7. Place the skewers intros a freezer bag and pour the marinade onto the skewers, making sure each one is coated.
8. Grill or cook your skewers over the fire pit until the bacon is fully cooked.
9. Brush on BBQ sauce with a basting brush for the last couple minutes of cooking and enjoy!


Did you make this recipe?

Tag @frugalcouponliving on Instagram and hashtag it #frugalcouponliving

Recipe Card powered byTasty Recipes

Preparing for this recipe is incredibly easy. Make the skewers yourself or have the kids help. Kids will love laying their own kabobs. It allows them to help int he kitchen and also personalizes their dinner.

Hot Dog Beef Kabobs Instructions:

First, cut your Ball Park Beef Franks into quarters and set aside.

Next, cut the pineapples into cubes and cut each bacon slice in half. Set aside.

Place a hot dog onto your skewer, push it down towards the bottom but leaving enough room to hold the skewer.

Now place a pineapple onto the skewer next to the hot dog.

Fold 1/2 a piece of bacon into thirds and slide on next to the pineapple.

Repeat steps 2-4 until your skewers are full.

In a small measuring cup, mix together the soy sauce, sesame oil, brown sugar and garlic powder.

Place the skewers intros a freezer bag and pour the marinade onto the skewers, making sure each one is coated.

Grill or cook your skewers over the fire pit until the bacon is fully cooked.

Brush on BBQ sauce with a basting brush for the last couple minutes of cooking and enjoy!

Save on your summer needs! 

Make sure to open your Valpak envelopes for details on special offers available for Sam’s Club members.  If you join Sam’s Club, get a $20 gift card when you sign up for a $45 Sam’s Club annual membership. For a busy mom, like myself, their Club Pickup is amazing. Order online and pick up at your club. They also offer Scan & Go. Pay from your phone and skip the checkout line for a faster shopping experience!

Additionally, Ball Park Hot Dogs will be $1.50 off at Sam’s Club from 5/8 – 6/2 with Sam’s Club Instant Savings.

For camping or an outdoor summer BBQ, add these Easy Hot Dog Beef Kabobs to your list. Paired with bacon and pineapples, they are the perfect family dinner @BallParkBrand #SamsSummerSavings #TysonGrilling Click to Tweet

Our Pinterest community and I  would love to see how this worked out for you. Share your final beef kabobs recipe.  Leave a comment and/or add a photo here on Pinterest!


Also see our Camping Hacks, Tips and Tricks. Pin to Pinterest.


WHAT’S TRENDING? Looking for a few engaging activities? Grab Minute to Win it Games – Traditional, Holiday, Group, and more! Use these fun activities in the office, classroom, or at your next birthday party.

Non-Fried Fried Ice Cream Recipe

This post may contain affiliate links or ads. Read my privacy policy and disclosure policy here.

May 8, 2019 by Ashley at Frugal Coupon Living Filed Under: Facebook, Instagram, Pinterest, Recipe, Social Media, Summer

published date: June 27, 2015
modified datt: May 08,2019

non-fried-fried-ice-cream-frugal-coupon-living-small

Non-Fried Fried Ice Cream Recipe

I scream, you scream, we all scream for ice cream! This non-fried fried ice cream is a textural delight with it’s crunchy outer layer over the smooth ice cream. These would be a fantastic dessert for a BBQ! Make ahead of time and serve on a tray with toppings! Everyone will love the flavor of the cinnamon and crunch of the corn flakes and sugar. It’s the perfect Summer dessert!

Ingredients:

  • 5 cup Corn Flakes
  • 1/2 cup Butter
  • 2 tsp Cinnamon
  • 4 tsp Sugar
  • Vanilla Ice Cream

Directions:

  1. Scoop and form Ice cream into approx 2 1/2″ balls.
  2. Place in freezer for 15 minutes.
  3. Pulse corn flakes in food processor to crush.
  4. Melt butter in a medium skillet over medium heat.
  5. Stir in crushed corn flakes and cinnamon and cook, stirring constantly, about 3-5 minutes or until golden brown.
  6. Remove from heat and stir sugar into mixture.
  7. Pour into a shallow dish and allow to cool.
  8. Place ice cream ball into mixture and roll to evenly coat.
  9. Press corn flake mixture around outer surface if a thicker coating is desired.
  10. Serve topped with chocolate syrup, whipped topping and/or cherries, as desired.

Print
clock clock iconcutlery cutlery iconflag flag iconfolder folder iconinstagram instagram iconpinterest pinterest iconfacebook facebook iconprint print iconsquares squares iconheart heart iconheart solid heart solid icon

Non-Fried Fried Ice Cream Recipe

  • Author: Ashley at Frugal Coupon Living
Print Recipe

Ingredients

Scale
  • 5 cup Corn Flakes
  • 1/2 cup Butter
  • 2 tsp Cinnamon
  • 4 tsp Sugar
  • Vanilla Ice Cream

Instructions

  1. Scoop and form Ice cream into approx 2 1/2″ balls
  2. Place in freezer for 15 minutes.
  3. Pulse corn flakes in food processor to crush.
  4. Melt butter in a medium skillet over medium heat.
  5. Stir in crushed corn flakes and cinnamon and cook, stirring constantly, about 3-5 minutes or until golden brown.
  6. Remove from heat and stir sugar into mixture.
  7. Pour into a shallow dish and allow to cool.
  8. Place ice cream ball into mixture and roll to evenly coat.
  9. Press corn flake mixture around outer surface if a thicker coating is desired.
  10. Serve topped with chocolate syrup, whipped topping and/or cherries, as desired.

Did you make this recipe?

Tag @frugalcouponliving on Instagram and hashtag it #frugalcouponliving

Recipe Card powered byTasty Recipes


fried-ice-cream-Collage-frugal-coupon-living

Share-Post-on-Pinterest-Frugal-Coupon-Living

Love Ice Cream? Also check out this Cookie Monster Ice Cream. Pin to Pinterest.

Cookie-Monster-Ice-Cream-Larger-Frugal-Coupon-Living

Follow all Recipes on Frugal Coupon Living as well as FCLAsh on Pinterest.


  • Veggie Pizza with Crescent Rolls – Pin to Pinterest
  • Honeydew Cucumber Salad – Pin to Pinterest
  • Southern Strawberry Sweet Tea – Pin to Pinterest
  • Caramel Apple Nachos – Pin to Pinterest
  • Neapolitan Cheesecake Brownies – Pin to Pinterest
  • Cookie Monster Ice Cream – Pin to Pinterest
  • Peanut Butter Cup Reese’s Ice Cream – Pin to Pinterest
  • Organic Chicken Mediterranean Pita Pocket – Pin to Pinterest
  • Watermelon Cupcakes Recipe – Pin to Pinterest
  • Sweet Southern Pink Lemonade – Pin to Pinterest
  • Roasted Asparagus Bruschetta with Goat Cheese – Pin to Pinterest
  • Homemade Parmesan Crisps – Pin to Pinterest
  • Banana Split Sticks – Pin to Pinterest
  • Copycat Sonic Ocean Water – Pin to Pinterest
  • S’mores Campfire Cones – Pin to Pinterest
  • Homemade Copycat Larabars Recipe – Pin to Pinterest
  • Tropical Peach and Pineapple Slushies – Pin to Pinterest
  • Blackberry Honey Butter – Pin to Pinterest
  • Homemade Ketchup – Pin to Pinterest
  • Chocolate Dipped Cookie Dough Bites – Pin to Pinterest
  • Cherry Cheesecake Ice Cream – Pin to Pinterest
  • Homemade Cheesey Garlic Sticks with Pillsbury Dough – Pin to Pinterst
  • Mini Meatloaf Cupcakes – Pin to Pinterest
  • Grilled Chicken Pineapple Kabobs – Pin to Pinterest
  • Homemade Thin Crust Pizza Dough – Pin to Pinterest
  • Homemade Pizza Sauce Recipe – Pin to Pinterest

red-frugal-coupon-living-signature

WHAT’S TRENDING? Looking for a few engaging activities? Grab Minute to Win it Games – Traditional, Holiday, Group, and more! Use these fun activities in the office, classroom, or at your next birthday party.

American Flag Cake – Fourth of July Cupcakes

This post may contain affiliate links or ads. Read my privacy policy and disclosure policy here.

May 7, 2019 by Ashley at Frugal Coupon Living Filed Under: Facebook, Instagram, Pinterest, Recipe, Social Media, Summer

published date: May 07, 2019
modified datt: May 07,2019

Twist your traditional American Flag Cake with these Fourth of July cupcakes. Everyone gets their own dessert and you don’t have to supply a knife and plates – cleaner and individual size only means you can ask for seconds! More please!

American Flag Cake – Fourth of July Cupcakes

Fourth of July American flag Cupcakes

What is it you always make for July 4th? One traditional recipe we make is Red, White, and Blue Dipped OREOs. They are easy and who doesn’t love a good OREO recipe.

When gathering your Fourth of July Recipes, you will want to have the traditional American Flag Cake – I mean what’s more patriotic than stars and stripes. In this case, we gift you the adorable food craft of mini cakes – aka Fourth of July Cupcakes. These are the perfect touch of Red, White and Blue to add to your food table!

These American Flag Cupcakes are tasty, easy, but also add decor to your July fourth tablescape knocking two birds out with one stone!

See another American Flag Cake idea in our Red, White and Blue Foods for July 4th!

Red White and Blue American Flag Cakes

No many ingredients are necessary. We prepared our own vanilla cupcakes, but if you are feeding a crowd, most grocery stores will make vanilla cupcakes for you. Just ask them to hold the icicng and decorations.

American Flag Cupcakes Ingredients:

  • Prepared Cupcakes
  • White vanilla frosting
  • Twizzlers Pull ‘n’ Peel Candy
  • Blue Chocolate Pearl Candy (we used Navy Sixlets)

Use leftover Twizzlers to make our Go Fishing Cakes or Giant Squid Cupcakes.


Save this recipe for later. Print your recipe and add it to your recipe box or recipe binder! This is my favorite Recipe Binder – I get so tired of printed the same recipe over and over.

Print
clock clock iconcutlery cutlery iconflag flag iconfolder folder iconinstagram instagram iconpinterest pinterest iconfacebook facebook iconprint print iconsquares squares iconheart heart iconheart solid heart solid icon

American Flag Cake – Fourth of July Cupcakes

  • Author: Ashley at Frugal Coupon Living
Print Recipe

Ingredients

  • Prepared Cupcakes
  • Vanilla Frosting
  • Twizzlers Pull-n-Peel Candy
  • Blue Chocolate Pearl Candy (we used navy Sixlets)

Instructions

  1. First, frost your prepared cupcakes with the vanilla frosting.
  2. Next, place 6 blue candies on the top left corner of the cupcakes.
  3. Pull apart the pull-n-peel candy so the strings are individual. Cut five pieces to fit across one cupcake. Since the cupcake is rounded, the top two pieces will be slightly shorter.
  4. Carefully, place your rope candy so you have white frosting in-between each layer.
  5. Finally, repeat step 3 for the remaining cupcakes.

Serve and Enjoy!


Did you make this recipe?

Tag @frugalcouponliving on Instagram and hashtag it #frugalcouponliving

Recipe Card powered byTasty Recipes

Our Pinterest community and I  would love to see how this worked out for you. Share your final recipe.  Leave a comment and/or add a photo here on Pinterest!

July Fourth Recipe

American Flag Cake Directions:

First, frost your prepared cupcakes with the vanilla frosting.

Next, place 6 blue candies on the top left corner of the cupcakes.

Pull apart the pull-n-peel candy so the strings are individual. Cut five pieces to fit across one cupcake. Since the cupcake is rounded, the top two pieces will be slightly shorter.

Carefully, place your rope candy so you have white frosting in-between each layer.

Finally, repeat step 3 for the remaining cupcakes.

Serve and Enjoy!

American Flag Fourth of July Cupcakes


Celebrating? Check out the best July Fourth Hacks, Tips and Tricks. Pin to Pinterest.

Make sure to also visit our Red, White and Blue Foods for your Fourth of July Table! Pin to Pinterest.


WHAT’S TRENDING? Looking for a few engaging activities? Grab Minute to Win it Games – Traditional, Holiday, Group, and more! Use these fun activities in the office, classroom, or at your next birthday party.

Milk and Cookies Popsicles

This post may contain affiliate links or ads. Read my privacy policy and disclosure policy here.

March 29, 2019 by Ashley at Frugal Coupon Living Filed Under: Facebook, Instagram, Pinterest, Recipe, Social Media, Summer

published date: August 02, 2018
modified datt: March 29,2019

Everyone’s favorite dessert, milk and cookies, twisted into a cool tasty treat – Milk and Cookies Popsicles featuring Golden OREOs.

Milk and Cookies Popsicles

Milk and Cookies Popsicles

We twisted everyone’s favorite dessert into a yummy treat, Milk and Cookies Popsicles! This Popsicle recipe features Golden OREOs.  We did not use whole milk in this recipe, we used our secret ingredient Almond Milk. We make a lot of smoothies in our home, so Almond Milk is a pretty common staple ingredient for us. To add more flavor, we included sugar and vanilla extract.  If you need a Popsicle mold, these are like the molds we used.

Enjoy!

Milk and Cookies Popsicles Ingredients

Ingredients:

  • 2 cups Unsweetened Vanilla Almond milk
  •  ¼ cups Sugar
  • 2 tsp. Vanilla Extract
  • Golden OREOs
  • Popsicle molds – these are like the molds we used, but they have many more options!


Milk and Cookies Popsicles In Process

Directions:

  1. Pour two cups of unsweetened vanilla almond milk into a blender.
  2. Add in ¼ cup of sugar.
  3. Mix in 2 teaspoons of vanilla.
  4. Blend until the mixture is well combined.
  5. Place one whole Golden Oreo into the bottom of each Popsicle mold.
  6. Break another Golden Oreo into fourths, and layer it the rest of the way to the top of each Popsicle mold.
  7.  Pour your Popsicle mixture into each mold to fill it to the top.
  8. Place the tops on each of the Popsicle molds.
  9. Put the Popsicles in the freezer for at least 5 hours.
  10. When ready to serve, you can loosen the Popsicle in the molds with some warm running water.

Milk and Cookies Popsicle Molds

Print
clock clock iconcutlery cutlery iconflag flag iconfolder folder iconinstagram instagram iconpinterest pinterest iconfacebook facebook iconprint print iconsquares squares iconheart heart iconheart solid heart solid icon

Milk and Cookies Popsicles

  • Author: Ashley at Frugal Coupon Living
Print Recipe

Ingredients

Scale
  • 2 cups Unsweetened Vanilla Almond milk
  •  ¼ cups Sugar
  • 2 tsp. Vanilla
  • Golden OREOs
  • Popsicle molds

Instructions

  1. Pour two cups of unsweetened vanilla almond milk into a blender.
  2. Add in ¼ cup of sugar.
  3. Mix in 2 teaspoons of vanilla.
  4. Blend until the mixture is well combined.
  5. Place one whole Golden Oreo into the bottom of each Popsicle mold.
  6. Break another Golden Oreo into fourths, and layer it the rest of the way to the top of each Popsicle mold.
  7.  Pour your Popsicle mixture into each mold to fill it to the top.
  8. Place the tops on each of the Popsicle molds.
  9. Put the Popsicles in the freezer for at least 5 hours.
  10. When ready to serve, you can loosen the Popsicle in the molds with some warm running water.

Did you make this recipe?

Tag @frugalcouponliving on Instagram and hashtag it #frugalcouponliving

Recipe Card powered byTasty Recipes


Everyone's favorite dessert, milk and cookies, twisted into a cool tasty treat - Milk and Cookies Popsicles featuring Golden OREOs. #FrugalCouponLiving Click to Tweet

Milk and Cookies Popsicles


Hey Popsicle lovers! You will want to see the other Popsicle Ideas, Summertime Popsicle Recipes. Pin to Pinterest.

Enjoy our Chocolate Covered Strawberry Popsicles. Pin to Pinterest.

Also take a look at this cookie recipe – Cookie Skillet! Pin to Pinterest.


WHAT’S TRENDING? Looking for a few engaging activities? Grab Minute to Win it Games – Traditional, Holiday, Group, and more! Use these fun activities in the office, classroom, or at your next birthday party.

Chocolate Covered Strawberry Popsicles

This post may contain affiliate links or ads. Read my privacy policy and disclosure policy here.

March 29, 2019 by Ashley at Frugal Coupon Living Filed Under: Facebook, Instagram, Pinterest, Recipe, Social Media, Summer

published date: July 14, 2018
modified datt: March 29,2019

Twist up this popular dessert into a tasty treat for summer, Chocolate Covered Strawberry Popsicles. This frozen dessert features yogurt, strawberries, and a hardening chocolate sauce!

Chocolate Covered Strawberry Popsicles

Chocolate Covered Strawberry Popsicles

We our family wants to go out for dessert, we often hit a bakery. This allows everyone to get what the desire… and living in a major city, we are fortunate to have about half a dozen dessert options within a 3 miles radius… is that fortunate, or trouble? When we hit these bakeries, one of my favorite items to get for myself are chocolate covered strawberries, but sometimes it feels like an arm and a leg to get just one. I mean, two dollars for that strawberry? I think not when I know I can get a small carton of strawberries for that price! Anyways, my sweet tooth always wins and the frugal in me always falls (insert sad face.) This summer, I wanted to create a treat for the kids and I that was a fraction of what it would cost for me to hit up the bakery – Chocolate Covered Strawberry Popsicles.

These Chocolate Covered Strawberry Popsicles had my kids in mind (thus the sprinkles and Magic Shell, but you could always adapt the recipe to your own taste buds – like how about melting some Ghirardelli Chocoalte Chips with no sprinkles – we think mom, aka me, would love that!

Enjoy!

Chocolate Covered Strawberry Popsicles Ingredients

Chocolate Covered Strawberry Popsicles

Ingredients:

  • 2 cup Sliced strawberries
  • 1 cup Vanilla Greek yogurt
  • ¼ cup Sugar
  • Smucker’s Chocolate Magic Shell chocolate
  • Sprinkles
  • Popsicle molds – these are like the molds we used, but they have many more options!


Chocolate Covered Strawberry Popsicles Sprinkles

Directions:

  1. Place 2 cups of sliced strawberries into a blender.
  2. Mix in 1 cup of vanilla Greek yogurt.
  3. Add in ¼ cup of sugar.
  4. Blend the mixture until it is smooth and well combined.
  5. Pour the strawberry mixture into Popsicle molds until they are full.
  6. Place the lids on the Popsicle molds.
  7. Put the Popsicle in the freezer for no less than 5 hours.
  8. Fill a small wide-mouthed cup or jar with Magic Shell chocolate topping.
  9. Dip the frozen strawberry yogurt pops down into the chocolate. Let it sit for a second or two.
  10. Before the chocolate shell hardens, add some sprinkles so that they will stick.
  11. Place the Popsicle onto a plate or cookie sheet, and put them back in the freezer for 15 minutes.
  12. Remove the Popsicle from the freezer and serve!

Chocolate Covered Strawberry Popsicles

Print
clock clock iconcutlery cutlery iconflag flag iconfolder folder iconinstagram instagram iconpinterest pinterest iconfacebook facebook iconprint print iconsquares squares iconheart heart iconheart solid heart solid icon

Chocolate Covered Strawberry Popsicles

  • Author: Ashley at Frugal Coupon Living
Print Recipe

Description

Twist up this popular dessert into a tasty treat for summer, Chocolate Covered Strawberry Popsicles. This frozen dessert features yogurt, strawberries, and a hardening chocolate sauce!


Ingredients

Scale
  • 2 cup Sliced strawberries
  • 1 cup Vanilla Greek yogurt
  • ¼ cup Sugar
  • Magic shell chocolate
  • Sprinkles
  • Popsicle molds

Instructions

  1. Place 2 cups of sliced strawberries into a blender.
  2. Mix in 1 cup of vanilla Greek yogurt.
  3. Add in ¼ cup of sugar.
  4. Blend the mixture until it is smooth and well combined.
  5. Pour the strawberry mixture into Popsicle molds until they are full.
  6. Place the lids on the Popsicle molds.
  7. Put the Popsicle in the freezer for no less than 5 hours.
  8. Fill a small wide-mouthed cup or jar with Magic Shell chocolate topping.
  9. Dip the frozen strawberry yogurt pops down into the chocolate. Let it sit for a second or two.
  10. Before the chocolate shell hardens, add some sprinkles so that they will stick.
  11. Place the Popsicle onto a plate or cookie sheet, and put them back in the freezer for 15 minutes.
  12. Remove the Popsicle from the freezer and serve!

Did you make this recipe?

Tag @frugalcouponliving on Instagram and hashtag it #frugalcouponliving

Recipe Card powered byTasty Recipes


Twist up this popular dessert into a tasty treat for summer, Chocolate Covered Strawberry Popsicles. This frozen dessert features yogurt, strawberries, and a hardening chocolate sauce! Click to Tweet

Chocolate Covered Strawberry Popsicles Pinterest


Hey Popsicle lover! You will want to see the other Popsicle Ideas, Summertime Popsicle Recipes. Pin to Pinterest.

We also love these Milk and Cookies Popsicles. Pin to Pinterest.

Looking for other summer recipes? We love these Picnic Food Ideas – recipes that can be eaten outdoors. Pin to Pinterest.


WHAT’S TRENDING? Looking for a few engaging activities? Grab Minute to Win it Games – Traditional, Holiday, Group, and more! Use these fun activities in the office, classroom, or at your next birthday party.

Ridiculously Easy Chocolate Pudding Bowls Made with Balloons

This post may contain affiliate links or ads. Read my privacy policy and disclosure policy here.

March 29, 2019 by Ashley at Frugal Coupon Living Filed Under: Easter, Facebook, Instagram, Pinterest, Recipe, Social Media, Spring, Summer

published date: June 21, 2018
modified datt: March 29,2019

Ridiculously easy chocolate pudding bowls made with melting chocolate and the shape of balloons. You won’t believe how easy this ice cream balloon bowl tutorial is with a few simple steps and ingredients.

Chocolate Pudding Bowls Made with Balloons

Ridiculously Easy Chocolate Pudding Bowls Made with Balloons

Want a creative and cute dessert idea for the kids? Make the chocolate dipped balloon bowls. They are so easy, take a few simple ingredients and the kids will have a blast blowing up the balloon (okay, how are we kidding, you will be doing this) and dipping in in the chocolate.

Follow these simple steps. We served with vanilla pudding, but you could try other flavor puddings or even ice cream – I suggest serving on a plate or in a bowl as the chocolate will quick crack when you use a spoon to scoop out the yummy insides. Best of all, you get to eat you chocolate bowl!

Enjoy!

Chocolate Dipped Balloon Bowls

Ingredients:

  • 12 Small Round Balloons (water balloons work well)
  • 8 oz Melting/Dipping Chocolate Candy (your choice of color)
  • 1 box Pudding Mix
  • 2 cup Milk
  • Candy Decorations (optional)


Chocolate Balloon Bowls

Directions:

  1. Make pudding according to box directions and allow to cool.
  2. Line a cookie sheet with parchment or wax paper.
  3. Melt chocolate by microwaving 45 seconds, stirring and repeating until melted and smooth.
  4. Inflate each balloon just until slightly larger than an tennis ball and tie off.
  5. Dip and roll balloon in chocolate until covered about half way.
  6. Place on tray and set tray in freezer for 10 minutes until set.
  7. Dip and roll each balloon a second tip to thicken chocolate shell.
  8. Return to tray and return tray to freezer for 15 minutes.
  9. Snip top of each balloon to release air.
  10. Gently slide your finger and pull balloon away from shell working your way around the edge.
  11. If shell starts to soften, return to freezer for 10 minutes and continue after it firms.
  12. If there are in holes in bottom, carefully fill with melted chocolate to patch and freeze to set.
  13. Fill each egg with pudding and sprinkle with decorations if desired.
  14. Refrigerate until served.
Print
clock clock iconcutlery cutlery iconflag flag iconfolder folder iconinstagram instagram iconpinterest pinterest iconfacebook facebook iconprint print iconsquares squares iconheart heart iconheart solid heart solid icon

Ridiculously Easy Chocolate Pudding Bowls Made with Balloons

  • Author: Ashley at Frugal Coupon Living
Print Recipe

Ingredients

Scale
  • 12 Small Round Balloons (water balloons work well)
  • 8 oz Melting/Dipping Chocolate Candy (your choice of color)
  • 1 box Pudding Mix
  • 2 cup Milk
  • Candy Decorations (optional)

Instructions

  1. Make pudding according to box directions and allow to cool.
  2. Line a cookie sheet with parchment or wax paper.
  3. Melt chocolate by microwaving 45 seconds, stirring and repeating until melted and smooth.
  4. Inflate each balloon just until slightly larger than an tennis ball and tie off.
  5. Dip and roll balloon in chocolate until covered about half way.
  6. Place on tray and set tray in freezer for 10 minutes until set.
  7. Dip and roll each balloon a second tip to thicken chocolate shell.
  8. Return to tray and return tray to freezer for 15 minutes.
  9. Snip top of each balloon to release air.
  10. Gently slide your finger and pull balloon away from shell working your way around the edge.
  11. If shell starts to soften, return to freezer for 10 minutes and continue after it firms.
  12. If there are in holes in bottom, carefully fill with melted chocolate to patch and freeze to set.
  13. Fill each egg with pudding and sprinkle with decorations if desired.
  14. Refrigerate until served.

Did you make this recipe?

Tag @frugalcouponliving on Instagram and hashtag it #frugalcouponliving

Recipe Card powered byTasty Recipes
Ridiculously easy chocolate pudding bowls made with melting chocolate and the shape of balloons. You won't believe how easy this ice cream balloon bowl tutorial is with a few simple steps and ingredients. Click to Tweet

Ridiculously Easy Chocolate Pudding Bowls Made with Balloons


Take a look at these other extra ordinary treats! Pop ’til You Drop Popcorn Recipes – Pin to Pinterest.

Also enjoy these Popsicle Recipes. Pin to Pinterest.

Finally think outside the box and inside the cup with these Individual Dessert Mug Recipes. Pin to Pinterest.


WHAT’S TRENDING? Looking for a few engaging activities? Grab Minute to Win it Games – Traditional, Holiday, Group, and more! Use these fun activities in the office, classroom, or at your next birthday party.

  • « Previous Page
  • 1
  • …
  • 9
  • 10
  • 11
  • 12
  • 13
  • …
  • 31
  • Next Page »
  • Search
  • Social
  • Categories
  • Archives
Search
  • Email
  • Facebook
  • Instagram
  • Pinterest
  • Twitter
Browse By Category
Browse by Date
I am a wife, mother, daughter, blogger, teacher, friend – a woman of many different hats. My delights are my husband, my five kids, reading, shopping, and spending time with friends and family. I am a Florida girl transferred to the heart of the DC-Metro area. I'm glad you're here! Learn more about Ashley.

Daily Deals – Don’t Miss One!

December 2025
S M T W T F S
 123456
78910111213
14151617181920
21222324252627
28293031  
« Nov    

Copyright © 2025 Frugal Coupon Living | CCPA Policy | Privacy Policy | Disclosure | Disclaimer | Terms of Use | Do Not Sell My Personal Information | Email Sign Up