Frugal Coupon Living

Stretching Your Pennies, Saving Your Dollars

  • Email
  • Facebook
  • Instagram
  • Pinterest
  • Twitter
  • Home
    • Home Page
    • About Ashley at Frugal Coupon Living
    • Contact
  • Shop
    • Frugal Coupon Living Shop
    • Etsy Store
    • TPT Shop
    • Elf Printables
    • Shipping Policy
  • Printables
    • Shop
    • All Printables
    • Free Printables Library
    • Free Elf Printables
  • Games
  • Party
  • Deals
  • Seasonal
    • Easter
    • Spring
    • April Fools Day
    • Mother’s Day
    • Father’s Day
    • Summer
    • Back to School
    • Halloween
    • Thanksgiving
    • Black Friday & Cyber Monday
    • Christmas
    • New Year’s Eve
    • Valentine’s Day
    • All Seasonal
  • Christian Resources
    • Christian Resources Shop
    • TPT Christian Crafts
    • Etsy Christian Prints
    • Youth Group Games
    • Sunday School Lessons
    • Scripture Cards
    • More Christian Resources

Gluten-free Thanksgiving Recipes

This post may contain affiliate links or ads. Read my privacy policy and disclosure policy here.

September 17, 2019 by Ashley at Frugal Coupon Living Filed Under: Facebook, Instagram, Pinterest, Recipe, Social Media, Thanksgiving

published date: September 08, 2019
modified datt: September 17,2019

No guilt. No gluten. Find a full list of Gluten-free Thanksgiving Recipes including turkey, sides, casseroles, veggies, breads and pies.

Gluten-free Thanksgiving Recipes

Gluten-free Thanksgiving Recipes

Almost 40 and I still have yet to make a Thanksgiving turkey. I can master almost any Thanksgiving side, but a large bird in my oven is so intimidating.  Thanksgiving is either a major holiday for us with close to 100 people gathered or it is very small. I have a family of seven and one year it was only four of us (granted the twins were in my belly and not on the outside)! Does this holiday sway back and forth for any other family? I think because of this, the turkey has always been covered. If we have a large gathering, the more seasoned chefs cook. If we have a very small gathering, we go out to eat.

That being said, sometimes our small gatherings lead to Friendsgiving Thanksgiving. In this situation, where there are many dietary needs, I try to accommodate everyone with my Thanksgiving recipes. This includes, being Keto-friendly and/or Gluten-free. This got me researching gluten-free Thanksgiving recipes that are tasty for all dietary restrictions!


Gluten-free Thanksgiving Turkey

The center of the table is always the Thanksgiving Turkey. Find your favorite gluten-free Thanksgiving Turkey recipe.

… and for the best Thanksgiving turkey follow these easy tips and tricks on how to make the perfect turkey for your family this Thanksgiving. | Life Made Sweeter

Also take a look at this Thanksgiving turkey recipe. | Yellow Bliss Road

With turkey comes gravy. Pour this gluten-free gravy over your Thanksgiving turkey. | Leelalicious

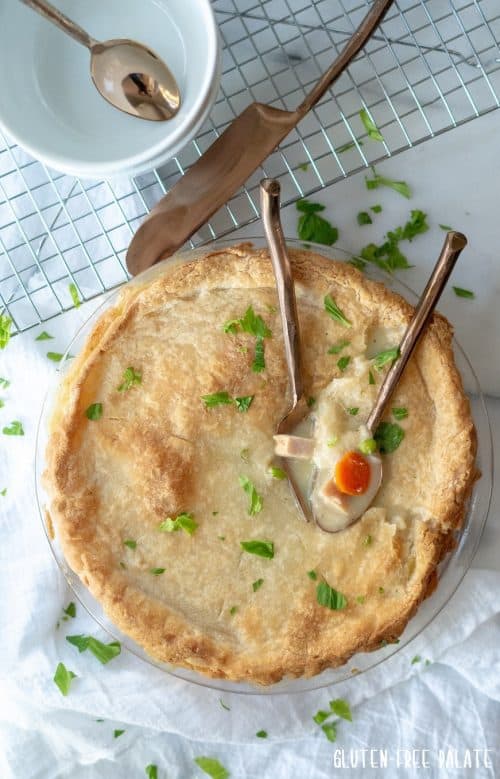
Use those leftovers to create a comforting gluten-free turkey pot pie made from scratch using turkey, carrots, onion, peas and a creamy, smooth gravy like sauce. | Gluten-free Palate

Gluten-free Thanksgiving Casseroles & Sides

When it comes to casseroles and sides, this is where my plate becomes incredibly heavy. Satisfy dietary needs with these gluten-free Thanksgiving casseroles and sides.

A gluten-free stuffing that’s a paleo spin on traditional cornbread dressing. | Cook Eat Paleo

Another twist on the classic recipe is this classic gluten-free stuffing. | One Lovely Life

This Mushroom & Wild Rice Stuffed Acorn Squash is filled with caramelized onions, cauliflower florets, spinach, dried cranberries, and pecans. | Bakerita

This healthy, sugar-free cranberry sauce recipe requires only 4 ingredients. Made with fresh cranberries (and no sugar), it’s also low carb, paleo, and gluten-free. | Wholesome Yum

Corn Pudding is a favorite gluten free casserole recipe that is a delicious side dish. Add this easy corn casserole to your table. | Cupcakes and Kale Chips.

Gluten-free Thanksgiving Bread

Bread and butter without the guilt. Which is your favorite gluten-free Thanksgiving bread?

Easy gluten-free Thanksgiving dinner rolls that will satisfy cravings for soft and tasty bread. The recipe also has a dairy-free option. | Mama Knows Gluten-free

This gluten-free cranberry bread is super moist, lightly sweet and only just a bit tart. It’s the perfect quick bread for your holiday table! | Gluten-free on a Shoestring

From thanksgiving table to the morning after, these gluten-free biscuits are a perfect side. Serve the next morning with butter and leftover cranberry sauce. | Your Homebased Mom

Nothing goes with Thanksgiving more than pumpkin. Add a sweet bread to your table like this gluten-free pumpkin bread. | Veggie Balance

Gluten-free Thanksgiving Vegetables

You have to have a green on your plate. These gluten-free Thanksgiving vegetables will make you feel incredibly healthy (even if they are saturated in brown sugar and butter!)

Ten minutes and only 4 ingredients (asparagus, olive oil, S &P) and you have yourself the best asparagus ever. | Yummy Healthy Easy

Enjoy this family recipe from Tish, her Nana’s Famous Green Beans! Made with just a handful of ingredients, this easy green bean recipe make a delicious addition to any meal! | Mom on Time Out

These glazed carrots have butter and brown sugar – sign me up for more! | Yummy Healthy Easy

This Paleo Sweet Potato Casserole is the perfect Thanksgiving side dish. Smooth, creamy sweet potatoes with a sweet crunchy pecan topping that is gluten free, dairy free, and naturally sweetened. | Real Food with Jessica

Gluten-free Thanksgiving Pies

As sweet as pie – pumpkin, apple, pecan – which is your favorite gluten-free Thanksgiving pie?

This mama knows gluten-free… and pie! This recipe has simple crust made with gluten-free Chex cereal and spiced pumpkin filling. It also has a dairy-free option. | Mama Knows Gluten Free

This gorgeous pecan pie is made without corn syrup and is gluten-free, dairy-free, and amazing! | One Lovely Life

A buttery crust and thinly sliced juicy apples laced with cinnamon and nutmeg make this a perfect fall gluten-free apple pie. | Lexi’s Clean Kitchen

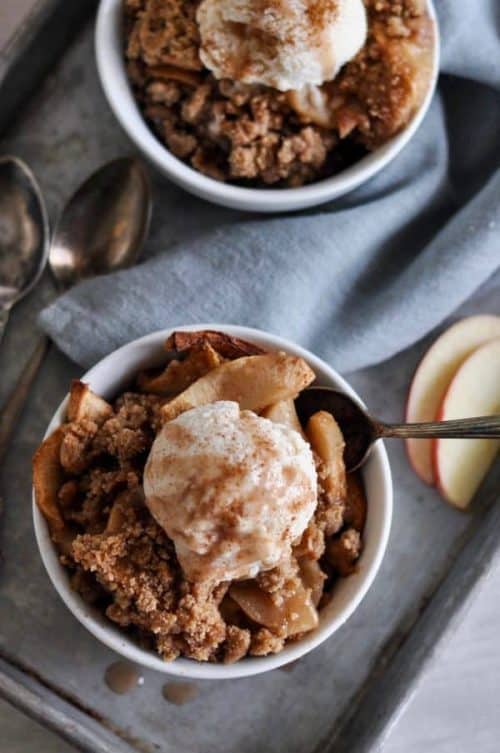
Twist the dessert up with pie in a bowl (this counts as a pie right?) You can’t go wrong with this gluten-free harvest apple crisp. | The Real Food Dietitians


Thanksgiving Gluten Free Recipes

Also take a look at our Friendsgiving Thanksgiving Ideas. Pin to Pinterest.

These Mouthwatering Side Dishes are something to save! Pin to Pinterest.


WHAT’S TRENDING? Looking for a few engaging activities? Grab Minute to Win it Games – Traditional, Holiday, Group, and more! Use these fun activities in the office, classroom, or at your next birthday party.

Easy Orange Jack-O-Lantern Floats for Halloween

This post may contain affiliate links or ads. Read my privacy policy and disclosure policy here.

September 14, 2019 by Ashley at Frugal Coupon Living Filed Under: Facebook, Halloween, Instagram, Pinterest, Recipe, Social Media

published date: September 14, 2019
modified datt: September 14,2019

What goes better with our Jack O’ Lantern Fruit Cups than these easy Orange Jack-O-Lantern Floats? Only two ingredients in this Halloween recipe and food craft. Make it as a kid’s party drink for your next gathering!

Orange Jack-O-Lantern Floats

Jack-O-Lantern Orange Floats for Halloween

We wanted to add a drink to go with our popular Jack O’ Lantern Fruit Cups. Our fruit cups are great Halloween treats because they are healhty. Send the kids out with something good before they come home full of sugar!

If you are hosting a party, however, these Easy Orange Jack-O-Lantern Floats are great for filling a crowd. They are really easy to make with only two ingredients – you’re welcome. Of course you can twist it up with changing your beverage to something Root Beer or even Mountain Dew as a base, but you then need to change your face. Maybe to a fun Frankenstein or goofy face.

For more good party ideas, don’t forget our other Halloween Food Crafts.

Orange Jack-O-Lantern Floats Recipe

Orange Jack-O-Lantern Floats Ingredients

Two ingredients. That’s it. This float should be made immediately before serving.

  • Vanilla ice cream
  • Orange soda
  • Optional: Sliced oranges

Drink Supplies

  • Clear plastic cups
  • Black permanent marker
  • Black and white straws

If you want a party favor for your guests, you also could order these Plastic Jack-O’-Lantern Cups. Your party-goers can bring them home after the gathering.


Printable Orange Jack-O-Lantern Floats Recipe

Save this recipe for later. Print your recipe and add it to your recipe box or recipe binder! This is my favorite Recipe Binder – I get tired of printing the same recipe over and over. A binder keeps me organized and gives me a place to store my recipes.

Print
clock clock iconcutlery cutlery iconflag flag iconfolder folder iconinstagram instagram iconpinterest pinterest iconfacebook facebook iconprint print iconsquares squares iconheart heart iconheart solid heart solid icon

Easy Orange Jack-O-Lantern Floats for Halloween

  • Author: Ashley at Frugal Coupon Living
Print Recipe

Ingredients

  • Vanilla ice cream
  • Orange soda
  • Clear drinking cups
  • Permanent marker
  • Straws
  • Optional: Sliced oranges

Instructions

If you are decorating your own cups, first prep them. You can do this days before as you do not want a fresh coat of permanent marker when you are serving a cold beverage.

First, using the black permanent marker, draw jack o lantern faces on the cups. (Here are some inspiring Jack-o-Lantern Faces.)

When you are ready to serve, place two scoops of vanilla ice cream in each cup.

Pour refrigerated orange soda over the top of the ice cream until the cup is full.

Serve and enjoy!


Did you make this recipe?

Tag @frugalcouponliving on Instagram and hashtag it #frugalcouponliving

Recipe Card powered byTasty Recipes

Orange Jack-O-Lantern Floats Directions

If you are decorating your own cups, first prep them. You can do this days before as you do not want a fresh coat of permanent marker when you are serving a cold beverage.

First, using the black permanent marker, draw jack o lantern faces on the cups. (Here are some inspiring Jack-o-Lantern Faces.)

When you are ready to serve, place two scoops of vanilla ice cream in each cup.

Pour refrigerated orange soda over the top of the ice cream until the cup is full.

Serve and enjoy!

Our Pinterest community and I would love to see how this worked out for you. Share your final Orange Jack-O-Lantern Floats recipe.  Leave a comment and/or add a photo here on Pinterest!

Halloween orange soda floats recipe


We have so many other Halloween Food Crafts you can make for your next party! Pin to Pinterest.

Hosting a party? Make sure you serve these Poison Drinks with these Halloween Party Bottle Labels. Pin to Pinterest.


WHAT’S TRENDING? Looking for a few engaging activities? Grab Minute to Win it Games – Traditional, Holiday, Group, and more! Use these fun activities in the office, classroom, or at your next birthday party.

Orange Jack-O-Lantern Fruit Cups – Healthy Treat Bowls

This post may contain affiliate links or ads. Read my privacy policy and disclosure policy here.

September 14, 2019 by Ashley at Frugal Coupon Living Filed Under: Halloween, Instagram, Pinterest, Recipe

published date: September 13, 2019
modified datt: September 14,2019

Frugal Coupon Living’s Orange Jack-O-Lantern Fruit Bowls Recipe – Orange Pumpkin Cups made with Fruit. A healthy fall treat idea. Serve these Jack o Lantern Oranges at your next Halloween Party! 

Orange Jack-O-Lantern Fruit Cups

Orange Jack-O-Lantern

When it comes to holiday parties, the sugar that often loads the table is a lot. We have some amazing Halloween Food Craft Ideas, but in our most recent recipe, I wanted to provide a healthy snack option.

Have fun with this one and take a twist on the orange. Crave out a Jack O’ Lantern using an orange, hallow out and fill with fruit. It is the perfect healthy treat to a Halloween Class Party or even an afternoon snack.

Jack-O-Lantern Oranges

Just a few simple ingredients make these Jack-O-Lantern Oranges. Fruit and mixed fruit. I really love berries, but it is your choice. If you scoop out the oranges well, you can even use that to toss in your fruit salad!

You will need a sharp knife to help you cut out your face. We loved this highly rated kitchen carving knife (I have this in my home), we also used Kitchen Sheers to cut out some of the shape. If you worry about using a knife or scissors around kids, crate your adorable Jack-O-Lantern Fruit Cup using a Sharpie Maker! We did this with our Orange Jack-O-Lantern Floats.

Jack-O-Lantern Fruit Cups Ingredients

  • 3 Medium Navel Oranges
  • 1 cup Mixed Fruit – Your choice, I prefer berries

Yield: 3 Jack-o-Lanterns. Multiple as needed.


Orange Jack-O-Lantern

How to Make Orange Pumpkin Fruit Cups

This recipe is not too challenging. While the recipe is great for kids, an adult needs to be present for the slicing!

Slice off the tops of the oranges.

Using a spoon, scoop out the pulp and insides of the oranges. You can place those aside for your fruit salad or toss them. They could make some fresh orange juice!

Using a knife, careful cut out faces on each orange to resemble a Jack O Lantern orange.

Fill each orange with mixed fruit and serve.

Orange Pumpkin Fruit Cups Tip: Don’t want to carve with a knife? That is okay. Use a sharpie and draw the face on the front – that works too and is safe for little hands!

Save this recipe for later. Print your recipe and add it to your recipe box or recipe binder! This is my favorite Recipe Binder – I get tired of printing the same recipe over and over. A binder keeps me organized and gives me a place to store my recipes.

Print
clock clock iconcutlery cutlery iconflag flag iconfolder folder iconinstagram instagram iconpinterest pinterest iconfacebook facebook iconprint print iconsquares squares iconheart heart iconheart solid heart solid icon

Orange Jack-O-Lantern Fruit Cups – Healthy Treat Bowls

  • Author: Ashley at Frugal Coupon Living
Print Recipe

Description

Frugal Coupon Living’s Orange Jack-O-Lantern Fruit Bowls Recipe – Pumpkin Cups made with Fruit. A healthy fall treat idea, perfect for a Halloween Party!


Ingredients

Scale
  • 3 Medium Navel Oranges
  • 1 cup Mixed Fruit – Your choice, I prefer berries

Instructions

Directions:

  1. Slice off the tops of the oranges.
  2. Using a spoon, scoop out the pulp of the oranges.
  3. Cut out faces on each orange to resemble a Jack O Lantern.
  4. Fill each orange with mixed fruit and serve.

Did you make this recipe?

Tag @frugalcouponliving on Instagram and hashtag it #frugalcouponliving

Recipe Card powered byTasty Recipes

Our Pinterest community and I would love to see how this worked out for you. Share your final Jack-O-Lantern Orange Fruit Cups recipe.  Leave a comment and/or add a photo here on Pinterest!

Halloween Treat Ideas for Kids

If you loved these Easy Jack o Lantern Oranges, also enjoy these other Fall Halloween Food Craft Ideas. Pin to Pinterest on your Food and Halloween Boards.

One of the most popular recipes in this round-up is our Halloween Jalepeno Popper Mummies. It’s a great way to add something savory to the table. These Mummy Poppers make a tasty appetizer or dinner entree and it is so cute with candy eyes.

Tip: Always have candy eyes on hand! We add it everywhere! Go ahead and get ALL THE SIZES!

Follow all Recipes on Frugal Coupon Living as well as FCLAsh on Pinterest.

red-frugal-coupon-living-signature

WHAT’S TRENDING? Looking for a few engaging activities? Grab Minute to Win it Games – Traditional, Holiday, Group, and more! Use these fun activities in the office, classroom, or at your next birthday party.

Edible Fake Blood Cupcakes Recipe

This post may contain affiliate links or ads. Read my privacy policy and disclosure policy here.

September 8, 2019 by Ashley at Frugal Coupon Living Filed Under: Facebook, Halloween, Instagram, Pinterest, Recipe, Social Media

published date: August 17, 2019
modified datt: September 08,2019

Making Edible Fake Blood is easier than you think – only two ingredients. Pour your bloody drizzle on our homemade cupcakes for the perfect Halloween Food Craft.

Edible Fake Blood Cupcakes

We love when the fall season hits – Halloween,Thanksgiving and Christmas. We are kicking off our Halloween ideas with our Edible Fake Blood Cupcakes Recipe. This fits perfectly with our Halloween Food Crafts for the Kids. Be sure to pair this sweet recipe with our salty and tasty Halloween Jalapeño Popper Mummies.

We supplied a homemade vanilla cupcake recipe, but you can use a box mix or you could pick up cupcakes from your local bakery. Just ask them not to ice the cupcakes. Sometimes I do that when I don’t have time for all the steps (aka baking the cupcakes) but I still want to personalize, home make cupcakes. No one ever knows (well they do, because I tell them. They find it as genius as I do!)

This cupcake recipe also goes perfectly with our trailer park murder mystery party!

Cupcake Ingredients:

  • 2 cup flour
  • 1 cup granulated sugar
  • 1 teaspoon baking soda
  • 1/2 teaspoon salt
  • 1 teaspoon vinegar
  • 2 teaspoon vanilla
  • 1/3 cup oil
  • 1 cup water
  • 1 container of your favorite white frosting

Edible Blood Ingredients

  • ½ cup corn syrup
  • 10-20 drops red gel food coloring
  • optional: edible knives/meat cleavers


Save this recipe for later. Print your recipe and add it to your recipe box or recipe binder! This is my favorite Recipe Binder – I get tired of printing the same recipe over and over. A binder keeps me organized and gives me a place to store my recipes.

Print
clock clock iconcutlery cutlery iconflag flag iconfolder folder iconinstagram instagram iconpinterest pinterest iconfacebook facebook iconprint print iconsquares squares iconheart heart iconheart solid heart solid icon

Edible Fake Blood Cupcakes Recipe

  • Author: Ashley at Frugal Coupon Living
Print Recipe

Ingredients

Scale

Cupcake Ingredients:

  • 2 cup flour
  • 1 cup granulated sugar
  • 1 teaspoon baking soda
  • 1/2 teaspoon salt
  • 1 teaspoon vinegar
  • 2 teaspoon vanilla
  • 1/3 cup oil
  • 1 cup water
  • 1 can of your favorite white frosting

Edible Blood Ingredients

  • ½ cup corn syrup
  • 10–20 drops red gel food coloring

Instructions

  1. First, reheat oven to 350-degrees.
  2. Mix dry cupcake ingredients together in a medium bowl.
  3. Mix wet cupcake  ingredients together in a medium bowl.
  4. Add wet ingredients to dry ingredients in 1/3 cup increments and mix until smooth.
  5. Next, fill muffin cups almost full as this recipe does not rise a significant amount.
  6. Place in the oven and cook for 30 minutes until a toothpick inserted in the center comes out clean.
  7. Remove from heat and cool on a wire rack for 10 minutes.
  8. While your cupcakes are cooling, make the fake blood by combining the corn syrup and food coloring into a bowl and stirring until the color is consistent throughout.
  9. Using a decorating tip, make a hole in the top of each cupcake, saving the remnants from each hole for use filling the hole in a moment.
  10. Place 1 teaspoon of the fake blood in each cupcake hole.
  11. Replace the top of each cupcake hole.
  12. Using your largest star tip and a piping bag, frost the cupcakes in a circular fashion.
  13. Drizzle each cupcake with ample amounts of fake blood.

Enjoy!


Did you make this recipe?

Tag @frugalcouponliving on Instagram and hashtag it #frugalcouponliving

Recipe Card powered byTasty Recipes

Edible blood is so easy to make. Only two ingredients – corn syrup and red gel food coloring. You could add some flavoring like vanilla or cherry, but be sure to not change the thick consistency the corn syrup provides. Drizzle over the cupcakes until you get the right look. You could also pickup these edible knives (meat cleavers) for spooky cupcake decor.

Print
clock clock iconcutlery cutlery iconflag flag iconfolder folder iconinstagram instagram iconpinterest pinterest iconfacebook facebook iconprint print iconsquares squares iconheart heart iconheart solid heart solid icon

Edible Fake Blood Cupcakes Recipe

  • Author: Ashley at Frugal Coupon Living
Print Recipe

Description

Very easy to make, only two ingredients for fake blood!


Ingredients

Scale
  • ½ cup corn syrup
  • 10–20 drops red GEL food coloring

Instructions

Make the fake blood by combining the corn syrup and food coloring into a bowl and stirring until the color is consistent throughout.


Did you make this recipe?

Tag @frugalcouponliving on Instagram and hashtag it #frugalcouponliving

Recipe Card powered byTasty Recipes

Our Pinterest community and I  would love to see how this worked out for you. Share your final bloodly cupcakes recipe.  Leave a comment and/or add a photo here on Pinterest!

Bloody Cupcakes Directions:

First, reheat oven to 350-degrees.

Mix dry cupcake ingredients together in a medium bowl.

Mix wet cupcake  ingredients together in a medium bowl.

Add wet ingredients to dry ingredients in 1/3 cup increments and mix until smooth.

Next, fill muffin cups almost full as this recipe does not rise a significant amount.

Place in the oven and cook for 30 minutes until a toothpick inserted in the center comes out clean.

Remove from heat and cool on a wire rack for 10 minutes.

While your cupcakes are cooling, make the fake blood by combining the corn syrup and food coloring into a bowl and stirring until the color is consistent throughout.

As seen above, using a decorating tip, make a hole in the top of each cupcake, saving the remnants from each hole for use filling the hole in a moment.

Place 1 teaspoon of the fake blood in each cupcake hole.

Replace the top of each cupcake hole.

Using your largest star tip and a piping bag, frost the cupcakes in a circular fashion.

Drizzle each cupcake with ample amounts of fake blood.

Enjoy!


Also enjoy our 31+ Edible Kid’s Halloween Food Crafts. Pin to Pinterest.

Save your candy with these Leftover Halloween Candy Recipes. Pin to Pinterest.

Take your bloody cupcake recipe to a Trailer Park Murder Mystery Party. Pin to Pinterest.


WHAT’S TRENDING? Looking for a few engaging activities? Grab Minute to Win it Games – Traditional, Holiday, Group, and more! Use these fun activities in the office, classroom, or at your next birthday party.

Halloween Poison Apple Dip Party Recipe

This post may contain affiliate links or ads. Read my privacy policy and disclosure policy here.

September 8, 2019 by Ashley at Frugal Coupon Living Filed Under: Facebook, Halloween, Instagram, Pinterest, Recipe, Social Media

published date: September 07, 2019
modified datt: September 08,2019

Hosting an October gathering? This Halloween Poison Apple Dip makes the perfect party recipe. Only four simple ingredients including cream cheese and caramel. Plus learn how to make our Poison Apple Halloween Food Craft to display on your table.

Halloween Poison Apple Dip

We have an incredibly cute and easy Halloween Food Craft and plus a bonus Halloween Craft for your October Halloween tablescape. Pair this sweet recipe with our salty and tasty Halloween Jalapeño Popper Mummies.

Halloween Poison Apple History

The first rotten apple we know of comes from the Bible. It was never rotten but rather an attractive piece of fruit. When Adam and Eve ate the apple from the Tree of Knowledge, they were instantly aware of good and evil. Immediately the apple built a bad reputation and it becomes a fruit often selected for the symbolism of evil.

We are introduced to the Poisoned Apple in the fairy tale, Snow White. When the Evil Queen gives Snow White a poison apple to kill her, it immediately causes her fall into an eternal sleep.  In the Disney version, Snow White is saved by “true loves kiss” when a prince kisses her causing her to wake.

To carry on the tradition of this the poison apple, we put together a fun Halloween Food Craft; an incredibly easy poison apple craft and poison apple dip.

Cream Cheese & Caramel Apple Dip Ingredients

Cream Cheese & Caramel Apple Dip Ingredients

Luckily, the ingredients in this recipe contain no poison. The thought sure is fun, though, for the Holiday season. Rather this recipe is quite sweet and so good with sliced apples or graham crackers.

  • 8 oz cream cheese, softened
  • 1 cup powdered sugar
  • 1/2 cup apple butter
  • 13.5 oz caramel sauce
  • sliced red and green apples
  • optional: graham crackers


Printable Poison Apple Dip Recipe

Save this recipe for later. Print your recipe and add it to your recipe box or recipe binder! This is my favorite Recipe Binder – I get tired of printing the same recipe over and over. A binder keeps me organized and gives me a place to store my recipes.

Print
clock clock iconcutlery cutlery iconflag flag iconfolder folder iconinstagram instagram iconpinterest pinterest iconfacebook facebook iconprint print iconsquares squares iconheart heart iconheart solid heart solid icon

Halloween Poison Apple Dip with Cream Cheese & Caramel

  • Author: Ashley at Frugal Coupon Living
Print Recipe

Ingredients

Scale
  • 8 oz cream cheese, softened
  • 1 cup powdered sugar
  • 1/2 cup apple butter
  • 13.5 oz caramel sauce
  • sliced red and green apples
  • optional: graham crackers

Instructions

1. In a large bowl, use a hand mixer to whip your cream cheese.
2. Mix in the powdered sugar, apple butter and caramel until smooth.
3. Pour into a serving bowl and refrigerate for 2 hours.
4. Top with caramel sauce and enjoy with apples or graham crackers.


Did you make this recipe?

Tag @frugalcouponliving on Instagram and hashtag it #frugalcouponliving

Recipe Card powered byTasty Recipes

Cream Cheese & Caramel Apple Dip Directions

You can prep this recipe before your next gathering. Make hours before or the day before.

First, In a large bowl, use a hand mixer to whip your cream cheese.

Next, mix in the powdered sugar, apple butter and caramel until smooth.

Pour into a serving bowl and refrigerate for 2 hours.

Finally top with caramel sauce and enjoy with apples or graham crackers.

Halloween Poison Apple Craft

Poison Apple Halloween Craft Supplies

  • Green apples
  • Red apples
  • Colored staples

Poison Apple Halloween Craft Directions

Guys, I don’t have much for you. This poison apple craft is incredibly easy. You could look at the picture and instantly create the craft.

First, get two apples of similar shape and sizes. Cut each apple in half and fit them together.

Second, grab colored tables. We used blue staples but you could also use other colored staples, traditional silver staples or gold staples.  Separate individual staples.

With your apple lined up, you will press individual staples until your green and red apple holding them two halves together and forming one apple. Continue this process up the seam of the apple.

Once your apple holds nicely together, you are done.

Warning: Do not use this craft for consumption or eating. Display it on your tablescape or high up for Halloween decor but keep it away from small hands and little kids.

Our Pinterest community and I would love to see how this worked out for you. Share your final Poison Apple Dip Party Recipe.  Leave a comment and/or add a photo here on Pinterest!


We have so many other Halloween Food Crafts you can make for your next party! Pin to Pinterest.

Hosting a party? Make sure you serve these Poison Drinks with these Halloween Party Bottle Labels. Pin to Pinterest.


WHAT’S TRENDING? Looking for a few engaging activities? Grab Minute to Win it Games – Traditional, Holiday, Group, and more! Use these fun activities in the office, classroom, or at your next birthday party.

Ready-To-Print Free Fern Botanical Printables

This post may contain affiliate links or ads. Read my privacy policy and disclosure policy here.

August 31, 2019 by Ashley at Frugal Coupon Living Filed Under: Crafts, DIY, Facebook, Instagram, Pinterest, Printable, Social Media

published date: August 31, 2019
modified datt: August 31,2019

Add a touch of greenery to your home with these ready-to-print free fern botanical prints. 

Fern Botanical Printables

You know the Abba song Fernando? I know it, perhaps better than most. My father, Fernando, was born and raised in Cuba. He came to here as a young teen without his parents. A Peter Pan child with the new name American nick name of Fern (for short.) I think about my father’s journey often but I can never go too deep in my mind. It must have been incredibly scary leaving your home country, unable to speak a foreign language, and leaving home without your parents. If I put myself there, emotionally, I cannot handle it. I pull back in my head… anyone else a first generation American with a heroing account of their parents leaving their home country?

Now on to fern prints. I realize I got off topic. Ferns remind me of non other, my dad. These resilient plants are lush, beautiful and stand out. They grow best in tropical, moist climates or they can grow beautifully in your home with this freebie!  These fern prints are for your own use. I had a few spots in my home that needed some green and these prints were an excellent touch. Print them for your wall frame or print hem and use them on a bookshelf frame as an added pop of green.

Not many supplies are needed for this project.

Fern Botanical Printables Supplies:

  • Cardstock
  • Set of 3 fern botanical printables (see below)

You also will want some adorable frames. These are 8.5 x 11 vertical prints but can be trimmed to 8 x 10. I would recommend getting a nice farmhouse wooden frame or hanging them on letter size clipboards for a different look.

To download our free fern botanical printables, enter your name and email address. Confirm your entry with your first inbox email. Next, we will send you access to all of our free printables via link and password in your inbox.

By downloading you are accepting the terms that this is for personal, non-commercial use. Please contact Frugal Coupon Living with any questions.

I am happy to share printables. When sharing with others, please lead them to my website instead of emailing them the file(s). It takes time, effort and money to put the freebies forth and I earn when you visit. Thanks for visiting and thanks for sharing with others!

Our Pinterest community and I would love to see how this worked out for you. Share your final Fern Botanical Prints with us.  Leave a comment and/or add a photo here on Pinterest!

To Order Your Fern Botanical Printables at Staples*:

  1. Download and save your image from this post.  (Please note these images are for personal use only and cannot be sold or used for commercial use.)
  2. Sign in or create a Staples account on their print service page.
  3. Return to Staples print service page.
  4. Go to Start Project.
  5. Go to Documents Printing. Select Browse.
  6. Select the Buy Now Button under color.
  7. On the left column, choose add file.
  8. Select upload.
  9. Select done.
  10. Give your job a name.
  11. Make sure your project is single sided. The orientation should be portrait (vertical).
  12. I changed my media to 8.5×10 and the media to 67 lb cover stock (I prefer a card stock feel over printer paper feel.)
  13. Select add to cart.
  14. Proceed to checkout. You can choose to ship to your home or to pick up at your local store. Pay online and show your invoice when you pick up (I just show the order number on my phone at pick-up.) The order invoice will arrive in your email inbox.
  15. Enjoy!

*Note: these Staple print service steps were added in Summer 2019 The directions may change as the website changes. They should give you a general outline of how to upload and order a print on Staples.com.


Want another quick activity? Take a look at these Weekend DIY Farmhouse Projects. Pin to Pinterest.

Do you love Chip and Joanna Gaines? These Inspirational Fixer Upper Farmhouse Style Ideas might be your next project! Pin to Pinterest.


WHAT’S TRENDING? Looking for a few engaging activities? Grab Minute to Win it Games – Traditional, Holiday, Group, and more! Use these fun activities in the office, classroom, or at your next birthday party.

RAK Delivery Christmas Sign for UPS, FedEx and USPS

This post may contain affiliate links or ads. Read my privacy policy and disclosure policy here.

August 29, 2019 by Ashley at Frugal Coupon Living Filed Under: Crafts, DIY, Facebook, Instagram, Pinterest, Printable, Social Media

published date: December 06, 2018
modified datt: August 29,2019

Tis the season for Random Acts of Kindness RAK. Pay it forward this printable Delivery Christmas Sign for UPS, FedEx and USPS. Share with snacks and drinks in a bucket at your front door.

Delivery Christmas Sign for UPS, FedEx and USPS

I don’t know about you by the UPS, FedEx and USPS driver are at my door multiple times a week! During the Christmas season, their visits become even more often, as much as multiple times a day!

A few years ago I shared with you one of the most creative Random Acts of Kindness idea from Cara at The First Grade Parade – She is pretty awesome! It’s a great way to pay it forward to your UPS, FedEx or USPS drivers! She probably is one of the best Hand Lettering artists I know!

Since not many people are as talented as Cara when it comes to Hand Lettering, I wanted to share with you a free printable so you can do the same random act of kindness at your front door, even though you might lack the calligraphy talent!

Christmas Sign for UPS, FedEx and USPS Supplies:

  • Outdoor Bucket or Outdoor Bucket Stand
  • Printable: Delivery Christmas Sign for UPS, FedEx and USPS (see below)
  • Snacks
  • Drinks


Christmas Sign for UPS, FedEx and USPS Directions:

Not many directions needed for this tutorial. Fill your outdoor bucket with drinks and snacks. Print our Delivery Christmas Sign for UPS, FedEx and USPS and tape to the front of the bucket. Replenish snacks and drinks as needed.

Download our Random Acts of Kindness Printable and all of Frugal Coupon Living’s free printables. Enter your name and email address and we will send you a link and password for access to your free downloads.


By downloading you are accepting the terms that this is for personal, non-commercial use. Please contact Frugal Coupon Living with any questions.

I am happy to share printables. When sharing with others, please lead them to my website instead of emailing them the file(s). It takes time, effort and money to put the freebies forth and I earn when you visit. Thanks for visiting and thanks for sharing with others!

Christmas Random Acts of Kindness Mailman, FedEx, USPS, UPS

I like to order my prints at Staples. It saves on ink and is only a few short miles from my home. I pick-up at the store, but of course you can upload them online and then have them shipped to your home.

Tis the season for Random Acts of Kindness. Pay it forward this printable Delivery Christmas Sign for UPS, FedEx and USPS. Share with snacks and drinks in a bucket at your front door. #FrugalCouponLiving #RAK #PayitForward #Christmas Click to Tweet

To Order Your Printables at Staples for Under $1*:

  1. Download and save your image from this post.  (Please note these images are for personal use only and cannot be sold or used for commercial use.)
  2. Sign in or create a Staples account on their print service page.
  3. Return to Staples print service page.
  4. Go to Start Project.
  5. Go to Documents Printing.
  6. Select the Buy Now Button under color.
  7. On the left column, select your file.
  8. Select upload.
  9. Select done.
  10. Give your job a name.
  11. Make sure your project is single sided. The orientation should be portrait.
  12. I changed my media to 8.5×10 and the media to 67 lb coverstock (I prefer a cardstock feel over printer paper feel.)
  13. Select add to cart.
  14. Proceed to checkout. My total was $0.17 for one print. You can choose to ship to your home or to pick up at your local store. Pay online and show your invoice when you pick up (I just show the order number on my phone at pick-up.) The order invoice will arrive in your email inbox.
  15. Enjoy!

*Note: these Staple print service steps were added in Fall 2018. The directions may change as the website changes. They should give you a general outline of how to upload and order a print on Staples.com.

Also check out this creative printable from Teaching Madness! She has her link in her Instagram profile. (It is probably better ot access it on a desktop computer so you can copy and paste the link!)


Also enjoy these Christmas Traditions to Begin Now. Pin to Pinterest on your Christmas Boards.

Pay it forward to the neighborhood as well. Enjoy these Christmas Gift Ideas for Your Neighbors. Pin to Pinterest on your Gift and Christmas Boards.


WHAT’S TRENDING? Looking for a few engaging activities? Grab Minute to Win it Games – Traditional, Holiday, Group, and more! Use these fun activities in the office, classroom, or at your next birthday party.

Easy Chicken Parmesan Bread

This post may contain affiliate links or ads. Read my privacy policy and disclosure policy here.

August 16, 2019 by Ashley at Frugal Coupon Living Filed Under: Facebook, Instagram, Pinterest, Recipe, Social Media

published date: July 29, 2019
modified datt: August 16,2019

Easy-to-make Chicken Parmesan Bread with RAGÚ Simply Sauce. This Alfredo style french loaf uses a RAGÚ Simply Sauce with half the fat and calories made with cauliflower and milk. Disclosure: This post is sponsored by Mizkan. All comments and opinions are my own.

Easy Chicken Parmesan Bread

Chicken Parmesan Bread

I need easy dinners. I need easy dinners that please a diverse group. I need easy dinners, that please a diverse group and fill bellies.

As you all know, I am a mother of five. With are family with a large spread of ages, the twins being 19 months old and myself (the oldest) being a number that I will not share.  When cooking, my goal is to please everyone with one recipe. Baby food went out the window rather quickly in replacement of “what the family eats, you eat!” In addition to creating happy taste buds, I also look to fill tummies. Full bellies = happy kids (and a happy husband!) For example, the twins were barely on the growth chart when they were born. They went form 5 lb preemies to soaring above average on height and weight. This home fills stomachs. And don’t let the 19 month old age fool you; these growing boys can eat more than my 11 year old.

This recipe came to me from a friend and I quickly adapted to my easy, efficient lifestyle. Not many ingredients are required and I can quickly put the meal on the table getting the recipe form kitchen to plate in under an hour with very little prep. I don’t mind cook times, just don’t make me too involved in the preparation of the meal!

RAGU Simply Garlic Parmesan at Walmart

Did you know?

I have a secret ingredient – don’t tell the kids. We had the opportunity to work with RAGÚ Simply Creamy sauces and I was eager to create our own family version of my friend’s Chicken Parmesan Bread recipe.  I personally found it appealing that these sauces were made with milk and cauliflower, replacing traditional heavy cream.  It contains half the fat of RAGÚ’s Classic Alfredo Sauce, with the same delicious taste and texture. That sounds like a win to me!

Look at these simple ingredients.

Chicken Parmesan Bread Ingredients:

  • 1 jar of RAGÚ Simply Creamy Garlic Parmesan Sauce
  • Seasoned chicken (we used extra virgin olive oil, Italian seasoning, salt and pepper)
  • French bread
  • 1/4 Cup butter, melted
  • 1 Tablespoon minced garlic
  • 2 Cups mozzarella cheese

Chicken Parmesan Bread Ingredients

You will need to precook your chicken, but I have no problem with that. As long as there is little prep from me in the kitchen. Look at these easy dinner recipe directions.

Chicken Parmesan Bread Directions:

Begin by preheating your oven to 375 degrees.

Add a tablespoon of extra virgin olive oil (EVOO) to the bottom of a baking dish, place the chicken on top and top with a drizzle of EVOO.

Sprinkle Italian seasoning, salt and pepper onto the chicken and bake for 30-40 minutes or until the chicken is fully cooked.

Once the chicken is cooked, reduce your oven temp to 350 degrees.

Cut your chicken into small bite sized pieces.

Next, cut your French bread in half and then cut each half into half again ( a total of four pieces.)

Place each French bread piece with the crust side down onto a parchment paper lined baking sheet.

Mix your butter and garlic together and heat for 30 seconds in the microwave.

Brush the garlic butter evenly on the bread.

Add about 3 spoonfuls of RAGÚ Simply Creamy Garlic Parmesan with Cauliflower Sauce of each piece of bread and spread out evenly.

Add cut chicken breasts on top of the sauce.

Top each loaf with 1/2 cup of mozzarella cheese.

Bake for 30-35 minutes at 350 and enjoy!

Eager to try this Chicken Parmesan Bread recipe yourself?

Save money with your Valpak envelopes. Look for a 75¢ coupon for RAGÚ Simply Creamy sauce and redeem it at your local at Walmart store. At $1.66, that brings the price of this secret ingredient to only 91¢. So half the calories and almost have the price! Sweet.

You could also try another one of the new RAGÚ Simply Creamy sauce flavors. We used Garlic Parmesan but feel free to replace that with their Alfredo sauce.

Pair your Chicken Parmesan Bread with a veggie.

I suggest serving with broccoli or another green. Cook the broccoli in the oven with your bread (350, 30 to 35 minutes) prepping with a drizzle of olive oil, salt and pepper. You could use any extra sauce to serve over the broccoli, as well.

Print
clock clock iconcutlery cutlery iconflag flag iconfolder folder iconinstagram instagram iconpinterest pinterest iconfacebook facebook iconprint print iconsquares squares iconheart heart iconheart solid heart solid icon

Chicken Parmesan Bread with Ragu

  • Author: Ashley at Frugal Coupon Living
Print Recipe

Ingredients

Scale
  • 1 jar of RAGÚ Simply Creamy Garlic Parmesan with Cauliflower Sauce
  • Seasoned Chicken (we used extra virgin olive oil, Italian seasoning, salt and pepper)
  • French bread
  • 1/4 Cup butter, melted
  • 1 Tablespoon minced garlic
  • 2 Cups mozzarella cheese

Instructions

  1. Preheat your oven to 375 degrees.
  2. Add a tablespoon of extra virgin olive oil (EVOO) to the bottom of a baking dish, place the chicken on top and top with a drizzle of EVOO.
  3. Sprinkle Italian seasoning, salt and pepper onto the chicken and bake for 30-40 minutes or until the chicken is fully cooked.
  4. Once the chicken is cooked, reduce your oven temp to 350 degrees.
  5. Cut your chicken into small bite sized pieces.
  6. Cut your French bread in half and then cut each half into half again ( a total of four pieces.)
  7. Place each French bread piece with the crust side down onto a parchment paper lined baking sheet.
  8. Mix your butter and garlic together and heat for 30 seconds in the microwave.
  9. Brush the garlic butter on the bread.
  10. Add about 3 spoonfuls of  RAGÚ Simply Creamy Garlic Parmesan with Cauliflower Sauce of each piece of bread and spread out evenly.
  11. Add cut chicken breasts on top of the sauce.
  12. Top each loaf with 1/2 cup of mozzarella cheese.
  13. Bake for 30-35 minutes at 350 and enjoy!

Did you make this recipe?

Tag @frugalcouponliving on Instagram and hashtag it #frugalcouponliving

Recipe Card powered byTasty Recipes

We want you to save this family recipe for a long time? Print this crowd favorite and add it to your recipe binder!

This is my favorite Recipe Binder – I get tired of printing the same recipe over and over. A binder keeps me organized and gives me a place to store all the recipes that I love.

Share the love and this recipe with others.

Our Pinterest community and I would love to see how this worked out for you. Share your final Chicken Parmesan Bread Recipe.  Leave a comment and/or add a photo here on Pinterest! Tell us what you thought, be sure to pin to your dinner recipes board so others can make it, as well.

Easy-to-make Chicken Parmesan Bread with RAGÚ Simply Sauce. This Alfredo style french loaf uses a cauliflower based sauce with half the fat and calories @ragusauce #FrugalCouponLiving #RaguSimplyCreamy Click to Tweet

Chicken Parmesan Bread with Ragu Simply


WHAT’S TRENDING? Looking for a few engaging activities? Grab Minute to Win it Games – Traditional, Holiday, Group, and more! Use these fun activities in the office, classroom, or at your next birthday party.

  • « Previous Page
  • 1
  • …
  • 145
  • 146
  • 147
  • 148
  • 149
  • …
  • 251
  • Next Page »
  • Search
  • Social
  • Categories
  • Archives
Search
  • Email
  • Facebook
  • Instagram
  • Pinterest
  • Twitter
Browse By Category
Browse by Date
I am a wife, mother, daughter, blogger, teacher, friend – a woman of many different hats. My delights are my husband, my five kids, reading, shopping, and spending time with friends and family. I am a Florida girl transferred to the heart of the DC-Metro area. I'm glad you're here! Learn more about Ashley.

Daily Deals – Don’t Miss One!

December 2025
S M T W T F S
 123456
78910111213
14151617181920
21222324252627
28293031  
« Nov    

Copyright © 2025 Frugal Coupon Living | CCPA Policy | Privacy Policy | Disclosure | Disclaimer | Terms of Use | Do Not Sell My Personal Information | Email Sign Up