Frugal Coupon Living

Stretching Your Pennies, Saving Your Dollars

  • Email
  • Facebook
  • Instagram
  • Pinterest
  • Twitter
  • Home
    • Home Page
    • About Ashley at Frugal Coupon Living
    • Contact
  • Shop
    • Frugal Coupon Living Shop
    • Etsy Store
    • TPT Shop
    • Elf Printables
    • Shipping Policy
  • Printables
    • Shop
    • All Printables
    • Free Printables Library
    • Free Elf Printables
  • Games
  • Party
  • Deals
  • Seasonal
    • Easter
    • Spring
    • April Fools Day
    • Mother’s Day
    • Father’s Day
    • Summer
    • Back to School
    • Halloween
    • Thanksgiving
    • Black Friday & Cyber Monday
    • Christmas
    • New Year’s Eve
    • Valentine’s Day
    • All Seasonal
  • Christian Resources
    • Christian Resources Shop
    • TPT Christian Crafts
    • Etsy Christian Prints
    • Youth Group Games
    • Sunday School Lessons
    • Scripture Cards
    • More Christian Resources

Upcycled Egg Carton Craft – DIY Flower String Lights

This post may contain affiliate links or ads. Read my privacy policy and disclosure policy here.

March 29, 2019 by Ashley at Frugal Coupon Living Filed Under: Crafts, DIY, Facebook, Instagram, Pinterest, Social Media

published date: November 10, 2018
modified datt: March 29,2019

You likely have all the supplies needed for this upcycled egg carton craft. DIY Flower String Lights can be made in a few short hours and make adorable bedroom decor for a teen or dorm room.

DIY Flower String Lights Tutorial

DIY Flower String Lights

We have a fun craft for you. Best of all, you likely have all of these supplies in your home – Christmas Lights and an Egg Carton. Open up your Christmas box and grab a strand of Christmas lights. We used white lights, but colorful lights will be cute too. We used a green light strand, but a white strand will work as well. For your egg carton, you will want to use a cardboard cotton as plastic or Styrofoam carton will not paint well.  We chose to paint with one paint color but consider getting creative with your strand. You can add many colors to make a rainbow or use a darker color on the outside and a lighter color on the inside. Whatever your technique, this craft is easy, affordable and adorable – three adjectives I love to hear!

These lights can be placed teen bedroom, an outdoor enclosed patio, or even used in a college dorm room for accent lighting. However you use, be sure to share your ideas but adding your image to  our Pinterest Pin under “tried this!” We love to see your creativity too!

Feeling crafty? Don’t forget our Upcycled Christmas Lights.

Upcycled Egg Carton Craft

Supplies:

  • An empty cardboard egg carton (from a dozen eggs)
  • Scissors
  • X-ACTO knife
  • Pink craft paint
  • Small bowl
  • Water
  • Paint brush
  • Wooden skewer
  • Strand of lights
  • Glue gun or E600 glue


Instructions:

To begin, get your cardboard egg carton and cut down the center of the egg carton.

You will then want to cut each individual section/cup from the carton.

To form a petal, cut 4 upside down triangle shapes evenly spaced around each “cup”. Cut the sections that are sticking up into round petal shapes to form your flower.

Once your flowers are formed, add paint and water to the small bowl. We used a 50/50 ratio of paint to water. We used one color but this is where you can get creative with your own technique.

Paint each flower inside and out. Consider doing a darker color on the outside and lighter on the inside for more of an ombre look. Let each petal dry completely before moving on to your next step.

After your petals are dry, use an X-ACTO knife or a skewer to make a small hole in the center of each flower. (This step should be performed by an adult.)

Lastly, press the flowers onto the lights using the glue gun to secure each flower. For a stronger hold, you can use E600 craft glue.

Hang and Enjoy!

TIP: You can repeat this process to make as many flowers as you want to make a longer strand of lights.

You likely have all the supplies needed for this upcycled egg carton craft. DIY Flower String Lights can be made in a few short hours and look adorable lit up! Click to Tweet

DIY Flower String Lights Tutorial


Looking for other ideas with your Christmas lights? Take a look at these Upcycled Christmas Lights. Pin to Pinterest.

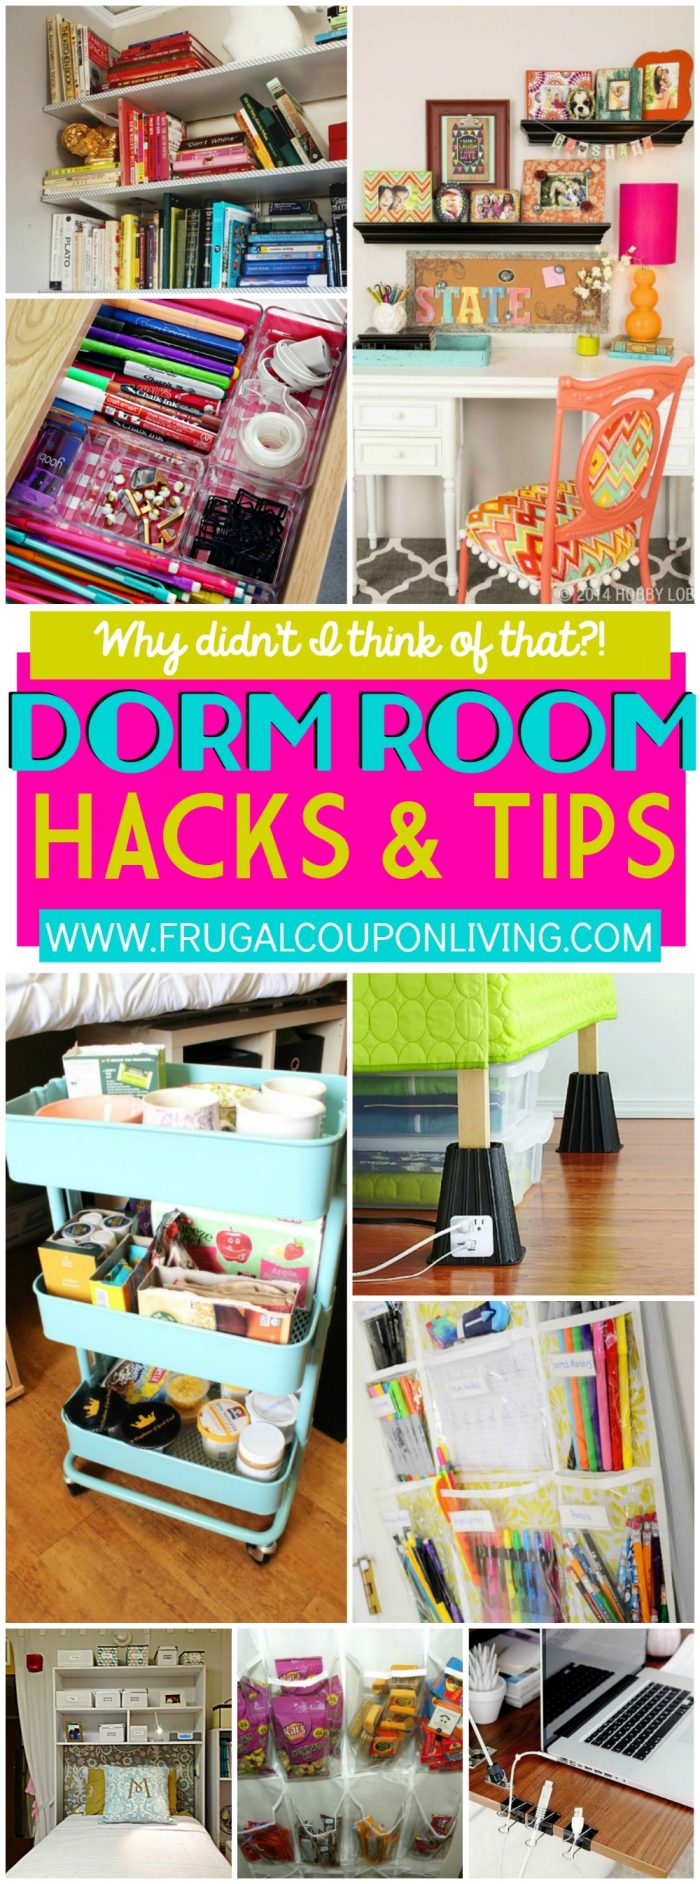
We love this idea for a dorm room. Take a look at these other ideas for your college bedroom – Dorm Room Hacks and Tips.  Pin to Pinterest.

Have a younger child? These Teenage Bedroom Ideas are the best. Pin to Pinterest.


WHAT’S TRENDING? Looking for a few engaging activities? Grab Minute to Win it Games – Traditional, Holiday, Group, and more! Use these fun activities in the office, classroom, or at your next birthday party.

Halloween Mason Jar Snow Globe

This post may contain affiliate links or ads. Read my privacy policy and disclosure policy here.

March 29, 2019 by Ashley at Frugal Coupon Living Filed Under: Crafts, DIY, Facebook, Halloween, Instagram, Pinterest, Social Media

published date: September 29, 2018
modified datt: March 29,2019

Create your own DIY Halloween Mason Jar Snow Globes. These homemade snow globes go outside the traditional winter craft and convert into a spooky Halloween Craft.

Halloween Mason Jar Snow Globe

Halloween Mason Jar Snow Globe

We had so much fun with our DIY Hallwoeen Potion Bottles, that we wanted to share with you another creative craft for the October Season. Take a look at these DIY Halloween Mason Jar Snow Globes. By upcycling a few products, you likely have laying around these house, you can have this out of the box Halloween craft.

We had glue and small Halloween decor on hand and a few Mason Jars leftover from our Christmas Gifts last season.  At the Dollar store we picked up glitter and clear candle holders (plastic or glass is fine, grabbing a colored or mercury glass candle stick holder could be nice too!) We picked up Vegetable glycerin online.

Below our our step by step directions to make your DIY Halloween Snow Globes. You can step it up a notch. Consider spray painting your tops black. Add some Mod Podge and dip in glitter so your top shines too. Our decor was less spooky with a spider inside, but you could also add a skull or some bones for a creepier look!

Have fun and happy crafting.

Halloween Snow Globe Supplies and Snow Globe Ingredients

Supplies:

  • Mason jars of different sizes
  • Plastic or Glass candle holders
  • Metal spiders (or other Halloween decor)
  • Glitter
  • E6000 Glue
  • Water
  • Vegetable glycerin (optional)
  • Craft sticks


Halloween Snow Globes

Directions:

  1. Carefully glue your spiders to the bottom or sides of jar or glue to a craft stick and let dry.
  2. Fill the bottom of your jars with a couple teaspoons of glitter.
  3. Carefully glue a jar to the top of your candlestick holder and let dry.
  4. Fill your jars with water and a tablespoon of vegetable glycerin.
  5. Screw the lids back on tightly.
  6. Shake and let the glitter fall.
Create your own DIY Halloween Mason Jar Snow Globes. These homemade snow globes go outside the traditional winter craft and convert into a spooky Halloween Craft. Click to Tweet

Halloween Mason Jar Snow Globe Tutorial and Snow Glob Ingredients


Take a look at this other Halloween Craft – make your own DIY Hallwoeen Potion Bottles. Pin to Pinterest on your Halloween and Craft Boards.

We also love these Halloween Party Drinks. Download your free Halloween Shocktails Bottle Labels for 2-Liter Sodas. Pin to Pinterest on your Halloween and Party Boards.

You will find many creative ideas in this list of 31 Days of Halloween Hacks and Tips. Pin to Pinterest on your Home and Halloween Boards.


WHAT’S TRENDING? Looking for a few engaging activities? Grab Minute to Win it Games – Traditional, Holiday, Group, and more! Use these fun activities in the office, classroom, or at your next birthday party.

Handmade Terracotta Place Settings for the Holiday Table

This post may contain affiliate links or ads. Read my privacy policy and disclosure policy here.

March 29, 2019 by Ashley at Frugal Coupon Living Filed Under: Christmas, Crafts, DIY, Facebook, Home Improvement, Instagram, Pinterest, Social Media, Thanksgiving

published date: September 20, 2018
modified datt: March 29,2019

Handmade Terracotta Place Settings for your Christmas and Thanksgiving Tablescapes. This clay pot plant saucers craft is easy and add the cutest touch to the holiday table. 

Handmade Terracotta Place Settings for the Holidays

I love using alternative supplies to make cute crafts for the home. This time, I challenged myself to make something functional from the terracotta pot saucers that I had left over from spring. I’ve broken the pots themselves, so I was stuck wondering what to do with the leftover saucers!

But luckily, I thought of the perfect use for them – Handmade Terracotta Place Settings!

The 4-inch pot saucers that I have are perfect for place settings or even for coasters. If you’ll be using the pots as coasters, apply a clear waterproof sealer over the paint so it doesn’t chip.

These are so versatile, they can be used to make any holiday place setting more special! And since the pot saucers are free (I also saw them for sale at a hardware store for about 50 cents each), you can make them for every member of your family or friends list for every holiday!

Supplies:

  • Stencil stickers
  • Acrylic paint
  • Foam Paintbrush
  • Terracotta Plant Saucers


Directions:

Clean the pot saucers with a damp cloth and let dry completely.

Stick the stickers onto the center of each saucer, using either each person’s name, cute sayings, or a person’s initials. Choose an option based on the size of your stencil stickers.

Paint over the entire pot saucer with acrylic paint. Let the paint dry. If your colors are light, you may need to apply a second or third coat. Wait until the paint is completely dry before moving to the next step.

Carefully peel off the stencil stickers. You may need to use a craft knife to get the stencils to come off the pot. If you have any bleed-through on the paint, cover any drips with a paint color that matches your saucer color.

Use these place settings in your fall and winter tablescapes! I made red, green, and orange to work with both fall and winter celebrations. Use just red and green for Christmas, and red, green, and orange for the fall!

Handmade Terracotta Place Settings for your Christmas and Thanksgiving Tablescapes. This clay pot plant saucers craft is easy and add the cutest touch to the holiday table. #FrugalCouponLiving #Thanksgiving #Christmas #tablescape Click to Tweet


Hosting for the holiday? Take a look at these Inspiring Thanksgiving Tablescapes. Pin to Pinterest on your Home and Thanksgiving Boards.

Also enjoy these Party and Hosting Tips for the Holidays. Pin to Pinterest.


WHAT’S TRENDING? Looking for a few engaging activities? Grab Minute to Win it Games – Traditional, Holiday, Group, and more! Use these fun activities in the office, classroom, or at your next birthday party.

Frankenstein Halloween Preschool Craft

This post may contain affiliate links or ads. Read my privacy policy and disclosure policy here.

March 29, 2019 by Ashley at Frugal Coupon Living Filed Under: Crafts, DIY, Facebook, Halloween, Instagram, Pinterest, Social Media

published date: September 13, 2018
modified datt: March 29,2019

A Halloween Preschool Craft perfect for the kids. Make a paper plate Frankenstein Monster with simple supplies. This is a kid-friendly, easy, October craft that can be done at home on a rainy day, in a pre-k classroom, or appropriate for any young artist – enjoy!

Frankenstein Halloween Preschool Craft

Frankenstein Halloween Preschool Craft

Are you a teacher of a preschool classroom or elementary school? We have an adorable, not-so-scary monster craft for you and your young artists. Chances are you have most of these supplies already on hand, just pick up some Apple Green Paper Plates.  We did this craft with a glue stick but if an adult is on hand, you could use a Hot Glue Gun to ensure a stronger hold. Hang on a window or bulletin board and enjoy!

Frankenstein Halloween Preschool Craft Supplies

Supplies:

  • Apple/Lime Green Paper Plates
  • Black Foam Sheets
  • Black Vinyl Electrical Tape
  • Glue Stick or Hot Glue Gun
  • Googly Eyes


Frankenstein Halloween Preschool Craft Tutorial

Directions:

  1. Take your black foam paper and cut out Frankenstein’s Hair. This makes a perfect cutting exercise for little ones! Just have them cut out triangles. You can pre-trace with a pencil.
  2. Once you have hair, take your glue stick and swipe it a few times on the back side of the black foam paper hair also suggest gluing around the edging of the plate where you will place the hair. To ensure a strong setting, have an adult use a glue gun.
  3. Place the glued black foam paper hair onto your green paper plate.
  4. Next use your glue stick (or hot glue gun) to place on your eyes. We used eyes that were the same size, but using different size eyes might create a creepier monster.
  5. Once your eyes are set, take your black electrical tape and cut a piece long enough for Frankenstein’s mouth. Then cut that piece of electrical tape in half making a thinner mouth.
  6. Tape the electrical tape mouth onto your green paper plate. We placed ours at an angle.
  7. With your leftover electrical tape, cut the remaining tape into a bandage for Frankenstein’s head.

Now you have your own Paper Plate Frankenstein!

A Halloween Preschool Craft perfect for the kids. Make a paper plate Frankenstein Monster with simple supplies. Kid-friendly, easy craft for October. #FrugalCouponLiving #Frankenstein #Halloween #PreschoolCraft Click to Tweet

Green Monster Halloween Preschool Craft


Need Halloween Costume Ideas? These Baby Halloween Costumes Ideas are adorable? What’s your favorite? Pin to your Halloween Pinterest Board.

Also enjoy these 31 Days of Kid’s Halloween Food Crafts. Pin to Pinterest on your food, kids and Halloween board.

Love rock painting. Take a look at these Halloween Rock Painting Ideas. Pin to Pinterest on your kids and Halloween board.


WHAT’S TRENDING? Looking for a few engaging activities? Grab Minute to Win it Games – Traditional, Holiday, Group, and more! Use these fun activities in the office, classroom, or at your next birthday party.

DIY Weekly Dorm Room Calendar Craft

This post may contain affiliate links or ads. Read my privacy policy and disclosure policy here.

March 29, 2019 by Ashley at Frugal Coupon Living Filed Under: Back To School, Crafts, DIY, Facebook, Instagram, Pinterest, Social Media

published date: August 20, 2018
modified datt: March 29,2019

Do it yourself Weekly Dorm Room Calendar. This easy Paint Chip Craft can be done in a matter of minutes and aids in organizing daily home and school life.

DIY Weekly Dorm Room Calendar Craft

DIY Weekly Dorm Room Calendar Craft

As a former teacher and a mom of pre-teens, one of my favorite posts on Frugal Coupon Living was Dorm Room Hacks and Tips. I loved putting together ideas for the dorm room without having to send one of my girls off to school. I also loved the college organizing ideas that could easily be transformed into Teen Bedroom Ideas.

As any mom knows, keeping teens organized can be a huge challenge, particularly when they go off to college! College kids need all the help they can get when organizing their dorm rooms. Most dorms are tiny spaces with barely any room to move- much less space for organizing supplies! With this cute paint chip dorm room organizer calendar, kids will be prepared to face whatever college has to throw at them. This craft was easy. It took some of our preexisting Paint Chips and turned them into a weekly calendar for college.

Younger kids will also love this cute paint chip calendar, and after you make the first one, you just might have to make one for everyone in the family! This calendar can be placed in a home bedroom, a home command center, and maybe even inside a teen locker for school. Wherever you place your calendar, this is a super inexpensive way to stay organized, and it doubles as cute wall art at the same time!

Happy crafting.

Weekly Dorm Room Calendar Craft Tutorial

Supplies:

  • Laminator and laminating pockets
  • Paint chips in rainbow colors
  • Clothespins in rainbow colors
  • Twine
  • Scissors
  • Permanent markers
  • Dry erase markers


Directions:

  1. Cut the paint chips to the desired size. I rounded the corners on my paint chips to give them a softer appearance.
  2. Place the paint chips into a laminating pocket and run through the laminating machine. Cut the paint chips out of the plastic.
  3. Use a permanent marker to write the days of the week onto the clothespins. If your clothespins are small, use abbreviations for the days of the week. Decide if you want a 7-day or 5-day calendar.
  4. Use a dry erase marker to write the daily tasks onto the paint chips. If your to-do list gets too long, add another paint chip to that day.
  5. Hang the twine string somewhere in a dorm room or on a bulletin board. Use clothespins to secure the paint chips to the string in daily order.
  6. As you complete each task, wipe it off the paint chip. The next week, you can reuse each paint chip to write that day’s tasks.
Do it yourself Weekly Dorm Room Calendar. This easy Paint Chip Craft can be done in a matter of minutes and aids in organizing daily home and school life. Click to Tweet

DIY Weekly Calendar Craft Using Paint Chips


We found some other helpful ideas for college life. Take a look at these Dorm Room Hacks and Tips. Pin to Pinterest.

Have extra paint chips?  Take a look at these Paint Chip Crafts. Add to Pinterest on your Craft Board.

Organize yourself with these Home Command Centers (and Homework Center Ideas) – also great for college life! Pin to Pinterest on your Home and School Boards.


WHAT’S TRENDING? Looking for a few engaging activities? Grab Minute to Win it Games – Traditional, Holiday, Group, and more! Use these fun activities in the office, classroom, or at your next birthday party.

Easy Glow in the Dark Rainbow Lantern Craft

This post may contain affiliate links or ads. Read my privacy policy and disclosure policy here.

March 29, 2019 by Ashley at Frugal Coupon Living Filed Under: Crafts, DIY, Facebook, Instagram, Pinterest, Social Media

published date: July 19, 2018
modified datt: March 29,2019

Hosting a glow party? Going in the outdoors and need a kids lantern? This glow-in-the-dark rainbow lantern craft has easy step by step instructions to make a camping lantern for the kids with glow sticks. Also an adorable craft for glow party lighting!

Easy Glow in the Dark Rainbow Lantern Craft

Easy Glow in the Dark Rainbow Lantern Craft

Has anyone else been on full speed since the last school bell rang this summer? This house of seven has been very busy. We have hit every museum, gone to numerous pools, stayed up late catching fire flies, chased splash pads around the city, and watched all the movies we can handle. While the creativity this mamma has had has been pretty top notch,  I must admit, I am frequently referring back to the calendar counting down the days until the first school bell rings… can anyone else hear that faint sound?

If you are trying to fill the gaps between the last bell and first bell or whether you are still winning at checking off the summer bucket list, both sides of the mom camp will enjoy this creative and VERY EASY Rainbow Lantern Craft. Pull out the remainder glow sticks you didn’t use over the Fourth of July, grab your excess mason jars, and pick up these affordable mason jar wire hangers.  You can go camping in the great outdoors or you can avoid the misquotes and make it something special for the kids to read their book by at night (in their bedroom, in the AC, while you sip wine in the other room!)

You are still winning mom! You got this. Happy rest of the summer break!

Glow in the Dark Rainbow Lantern Craft Supplies

Supplies:

  • 1 pack 8 count glow bracelets
  • 8 oz mason jar
  • Mason jar wire hangers


Camping Rainbow Lantern Craft for the Kids

Directions:

  1. When you are ready to enjoy your lantern, “crack” each glow stick down it’s entire length to that the light is activated.
  2. One at a time form each glow stick into a bracelet shape and push the glow stick down into the mason jar so it hugs the jar from the inside.
  3.  Repeat step 2 until all 8 glow sticks are inside your jar hugging the inside. If your jar is taller, add more glow sticks until your desire length is reached.
  4. Screw your lids back on and place the mason jar wire handle around the rod and lock in place.
  5. Use to light up a walkway, a tent, a bedroom, back yard or many more ideas! We love this for a glow party!
This glow-in-the-dark rainbow lantern craft has easy step by step instructions to make a camping lantern for the kids with glow sticks. Also an adorable craft for glow party lighting! Click to Tweet

Easy Glow in the Dark Rainbow Lantern Craft for Glow Party Lighting


Tackling this idea over summer? We have more ideas for you.  Take a look at this Visual Summer Bucket List for the kids. Pin to Pinterest.

We have other creative ways to use lights. Take a look at these Upcycled Christmas Lights (for ideas year-round!). Pin to Pinterest.

Looking for lighting ideas to brighten your back yard? Check out these Midsummer Nights Patio Ideas with Lights. Pin to Pinterest.

Taking the lantern out in the great outdoors? Take a look at these other Camping Hacks and Tips. Pin to Pinterest.


WHAT’S TRENDING? Looking for a few engaging activities? Grab Minute to Win it Games – Traditional, Holiday, Group, and more! Use these fun activities in the office, classroom, or at your next birthday party.

Altoid Tin Craft | Tic Tac Toe Travel Game

This post may contain affiliate links or ads. Read my privacy policy and disclosure policy here.

March 29, 2019 by Ashley at Frugal Coupon Living Filed Under: Crafts, DIY, Facebook, Instagram, Pinterest, Social Media, Travel

published date: June 30, 2018
modified datt: March 29,2019

How fun is this Altoid Tin Craft? We created a  Tic Tac Toe Travel Game using an upcycled Altoids Tin Box.

Altoid Tin Craft – Tic Tac Toe Travel Game

Altoid Tin Craft

Are we there yet?! Familiar with the tune of this common question? We put together a cute DIY Altoids Tin Game you can make with your child. Not only is this  a great rainy day activity for the kids, it could result in some bought time on your next car ride and help you avoid the age old question – Are we there yet?!

Using supplies you likely have around the home – card stock, washi tape, buttons, glue and magnets, create your own DIY Tic-Tac-Toe Travel Game! This is a very simple craft and requires a little supervision from an adult. It oculd be a fun DIY gift to give a friend. Pair with some other Travel Game Ideas and make a Road Trip Bucket as a birthday present.

Are you the one traveling? You will want to check out these posts as well!

  • Airplane Bingo Printable (or Tic-Tac-Toe)
  • Road Trip Bingo Printable (or Tic-Tac-Toe)
  • Airplane Activities for Kids
  • Road Trip Hacks and Tips

Tic Tac Toe Travel Game

Supplies:

  • Altoids tin
  • Colorful cardstock
  • Colorful buttons (at least two colors)
  • Small magnets
  • 1/4” washi tape
  • Scissors
  • Pen/pencil
  • E6000 glue
  • Glue stick


Altoid Tin Craft - Tic Tac Toe Travel Game Supplies

Directions:

  1. Trace the bottom of your Altoids container on two different colorful cardstock sheets. ( We did a solid for the bottom and a colorful pattern for the top).
  2. Cut out your traced Altoids container card stock paper.
  3. Use your washi tape to make a tic tac toe pattern onto the solid sheet.
  4. Glue the colorful pattern to the inside top of the Altoids tin and the solid color to the bottom with your glue stick.
  5. Carefully glue one magnet to the bottom of each button until you have 2 sets of the same 5 color button magnets.
  6. Let your magnets dry overnight.
  7. Store your magnets in the tin, they will stick to the inside top or bottom for a great travel tic tac toe game.

*Keep magnets away from small children, always supervise while using

How fun is this Altoid Tin Craft? DIY tutorial on a Tic Tac Toe Travel Game using an upcycled Altoids Tin Box. #FrugalCouponLiving #travel #tictactoe Click to Tweet

Altoid Tin Craft - Tic Tac Toe Travel Game


Also enjoy these Upcycled Altoids Tin Ideas. Pin to Pinterest.

This Altoids Game Idea goes great with our Airplane Activities for Kids. Pin to Pinterest.

Going on the road? Instead check out these Road Trip Hacks and Tips. Pin to Pinterest.

Mom might want to flag these! Winning Car Hacks for Moms. Pin to Pinterest.


WHAT’S TRENDING? Looking for a few engaging activities? Grab Minute to Win it Games – Traditional, Holiday, Group, and more! Use these fun activities in the office, classroom, or at your next birthday party.

Christmas in July – Creative Ways to Upcycle Christmas Lights

This post may contain affiliate links or ads. Read my privacy policy and disclosure policy here.

March 29, 2019 by Ashley at Frugal Coupon Living Filed Under: Crafts, Facebook, Home Improvement, Instagram, Pinterest, Social Media

published date: June 24, 2018
modified datt: March 29,2019

Want creative ways to celebrate Christmas in July? Take a look at these craft ideas to Upcycle Christmas Lights. 

Christmas in July – Creative Ways to Upcycle Christmas Lights

Christmas in July – Creative Ways to Upcycle Christmas Lights

It’s beginning to look a lot like Christmas!… or July. Haha, in this heat, one can dream! We could creative ways to Upcycle Christmas Lights for the winter season for for the dead of summer!  From adorable ways to add flair to your garden to cute ideas for your Christmas mantle! Save these ideas for all year long.

Enjoy!

Upcycled Egg Carton Craft – DIY Flower String Lights

Adorable for a birthday, turn party hats and Christmas lights into Birthday String Lights | Creme de La Craft

Make a flameless fire pit! This is adorable for a summer campout.  (Also need in our Glamping Ideas.) | Free People

So there isn’t a tutorial on this whimsical dream catcher, but it might be something you can create on your own or purchase online! | Ling’s Moment Feather Dream Catcher


Drill a hole in the bottom of an empty wine bottle and thread the cord through, then fill the bottle with string lights. You can also use battery operated lights! | Source Unknown

Feeling likes festive party? Turn your Christmas Lights into DIY Candy Lights. | Oh Happy Day

I really love this one! Create a Hula Hoop Chandelier. We suggest spray paining the hoola hoop first with gold or another coordinating color for your home! | Sarah with an H

Another idea with a warm ambiance is to wrap trees in Christmas lights. (Also seen in our Midsummer Night Patio Ideas.) | Weddings by Lilly and Steven Michael Photography

I am obsessed with these Ping Pong Ball Christmas light strands – cute for a teen bedroom, college door, or screened porch. | The Surznick Common Room

Upcycle Christmas lights into more beautiful DIY Christmas Mantle Lights! | A Beautiful Mess

Create a walkway with Christmas Lights and Recycled Beer Bottles. (Also seen in our Midsummer Night Patio Ideas.) | Snacker Doodles

Need we say more?  Cactus Shrinky Dinks Lights. You will need this for making your cactus. | We’re Going to Make It

Turn your lights into a light up rug – how cute! | Sans Limites Crochet

Wrap hula hoops to make this light up feature. | Deborah Silver

Create party lights with upcycled old bottles and stringed lights. | Crafts for All Seasons

Gather those Dixie Cups and make this Christmas Light Garland. | Rhiannon Bosse

This is a sweet touch for an outdoor patio or fence. We are having trouble finding the original source but it looks like mason jars with cork tops, maybe hot glue the tops in the jar and insert the light! | Original Pin

Want creative ways to celebrate Christmas in July? Take a look at these fun ways to Upcycle Christmas Lights Click to Tweet

This space is totally personalized with photographs and so magical with the additional lighting – a perfect teen bedroom or dorm room makeover! This is a great Instagram craft idea. (Also seen in our Teen Bedroom Ideas.) | Urban Outfitters Blog

Why touch the lighter. Toss some Christmas lights over wood for this Glamping Hack!  (Also need in our Glamping Ideas.) | Source Unknown

Grab some origami paper and make boxes to create this festive Christmas light strand. | Guusje’s Appeltaart

Biking this summer? Get festive with Christmas Lights on your Bicycle. | Eleanor’s NYC

Fun for the holidays but can be used any time of the year, create burlap garland. | Create Craft Love


Christmas in July – Creative Ways to Upcycle Christmas Lights

We have other ideas for creating a warm ambiance with light. Take a look at these Midsummer Night Patio Ideas. Pin to Pinterest.

And if you are celebrating Christmas in July or in December, enjoy these Christmas Traditions (to begin now!) Pin to Pinterest.


WHAT’S TRENDING? Looking for a few engaging activities? Grab Minute to Win it Games – Traditional, Holiday, Group, and more! Use these fun activities in the office, classroom, or at your next birthday party.

  • « Previous Page
  • 1
  • …
  • 55
  • 56
  • 57
  • 58
  • 59
  • …
  • 103
  • Next Page »
  • Search
  • Social
  • Categories
  • Archives
Search
  • Email
  • Facebook
  • Instagram
  • Pinterest
  • Twitter
Browse By Category
Browse by Date
I am a wife, mother, daughter, blogger, teacher, friend – a woman of many different hats. My delights are my husband, my five kids, reading, shopping, and spending time with friends and family. I am a Florida girl transferred to the heart of the DC-Metro area. I'm glad you're here! Learn more about Ashley.

Daily Deals – Don’t Miss One!

May 2026
S M T W T F S
 12
3456789
10111213141516
17181920212223
24252627282930
31  
« Apr    

Copyright © 2026 Frugal Coupon Living | CCPA Policy | Privacy Policy | Disclosure | Disclaimer | Terms of Use | Do Not Sell My Personal Information | Email Sign Up