Frugal Coupon Living

Stretching Your Pennies, Saving Your Dollars

  • Email
  • Facebook
  • Instagram
  • Pinterest
  • Twitter
  • Home
    • Home Page
    • About Ashley at Frugal Coupon Living
    • Contact
  • Shop
    • Frugal Coupon Living Shop
    • Etsy Store
    • TPT Shop
    • Elf Printables
    • Shipping Policy
  • Printables
    • Shop
    • All Printables
    • Free Printables Library
    • Free Elf Printables
  • Games
  • Party
  • Deals
  • Seasonal
    • Easter
    • Spring
    • April Fools Day
    • Mother’s Day
    • Father’s Day
    • Summer
    • Back to School
    • Halloween
    • Thanksgiving
    • Black Friday & Cyber Monday
    • Christmas
    • New Year’s Eve
    • Valentine’s Day
    • All Seasonal
  • Christian Resources
    • Christian Resources Shop
    • TPT Christian Crafts
    • Etsy Christian Prints
    • Youth Group Games
    • Sunday School Lessons
    • Scripture Cards
    • More Christian Resources

Boo-tiful Porch Halloween Ideas and Patio Inspiration

This post may contain affiliate links or ads. Read my privacy policy and disclosure policy here.

August 23, 2017 by Ashley at Frugal Coupon Living Filed Under: Crafts, DIY, Facebook, Halloween, Home Improvement, Instagram, Pinterest, Social Media

published date: August 20, 2017
modified datt: August 23,2017

Inspiring Porch Halloween Ideas and Patio Inspiration for the October season. Outdoor Home Decorating Ideas to give you a friendly or scary Halloween home.

Boo-tiful Porch Halloween Ideas

Pin to Pinterest

I am ready for the season to cool off. Not only ready for the cooler weather, but for warm fires, the turn of the leaves, and displays of pumpkins. We pulled together some of the most creative Halloween Ideas for your porch and patio this season.  From scary skeletons, to scenes straight out of a magazine, we have something inspirational for all tastes this October season.

Hobby Lobby never fails to inspire and impress me. If you have a white home, I think this mix of black, green, and purple is perfect for Halloween – and how about that Halloween garland? | Hobby Lobby

Need some Halloween Pottery Barn Inspiration, I mean we all could! Right? – The real question is, are you willing to paint your door Orange this October? | Pottery Barn

If anyone knows how to create fun Halloween Ideas on the front porch, it has to be Party City. I love the twigs hangings out of the colanders. | Party City


This front porch sitter has been waiting for you (for along time!)… Hay, White Pumpkins, and Scarecrows, what’s not to love about these inspiring Halloween porch ideas? | Nob Hill Design

Does anyone else love when the color pink is blended into Halloween decor? I love this porch with the pink mums and the corn husk to cover the porch columns. | The Yellow Cape Code

Decorate your storm door – we love this spider web Halloween idea made with extra thick white yarn | Jane Can

Linda had so much fun with bats. It looks like some of the bats made it into the home on this Halloween Home Tour | It All Started with Paint

Even skeletons can have a little fun! Look how mischievous these guys are! Secure with invisible fishing line. | BHG

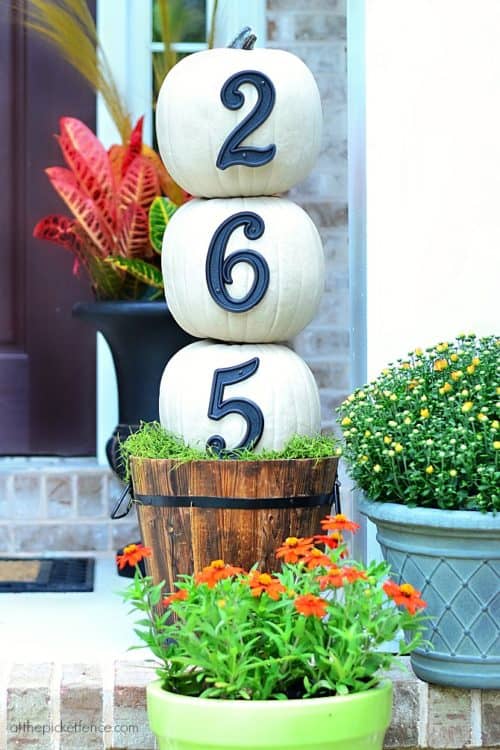
This is an out of the box Halloween Idea! How beautiful are these House Number Halloween Topiaries? | At the Picket Fence

Turn your door into a Jack-o-Lantern using gift wrap! | Woman’s Day

I love this Halloween Vignette, this skeleton is just chilling and the entire porch is not too scary for the kids! | Design Improvised

How cute is this Halloween Porch Decor? I love the 31 pillows on the bench. | Tater Tots and Jello

Simple and fun, how creative is this googly eye door? I love what she used to not destroy the door – you have to take a look! | Caftaholics Anonymous

This decorator used Christmas garland as her base – you would never know with how elaborate this Halloween Garland is! | Show Me Decorating

They did it again with Christmas garland, look at this Monster Halloween Garland Idea – love the colors! | Show Me Decorating

For the perfect Halloween Ideas, lighting is everything… create an eerie glow with these orange Halloween lights | 365 days of Halloween

What a tangled web we weave – make your own spider web out of this tutorial using rope | My Untangled Life

This is such a creative Halloween Idea. Add a bit of whimsy to your Halloween Porch decor this year with these Floating Witch Hat luminaries! They even light up, making them a fun and only slightly eerie Halloween decorating idea. | Polka Dot Chair

So here’s a real affordable, frugal Halloween idea – have you ever thought to turn Trash Bags into Spider Webs? We haven’t either but I juts love this idea and how it transforms the porch! |The It’s Girls

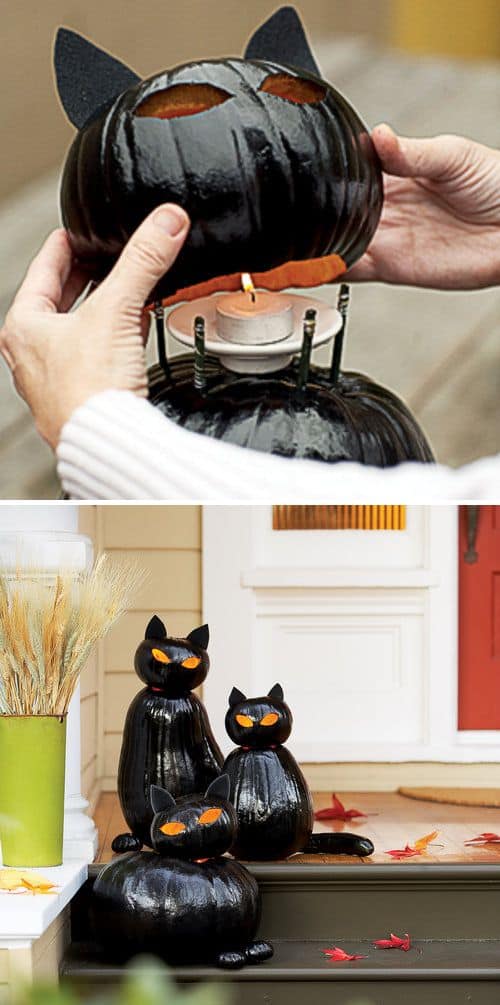
Make your entry glow with fat cat Halloween idea made from stacked pumpkins (and mini-pumpkin paws) – Meow! | Sunset


More Halloween Ideas on Frugal Coupon Living…

Decorating your home? We love these 31 Halloween Mantles and Tablescapes. Pin to Pinterest.

Also enjoy these 31 Printables for Halloween. Pin to Pinterest.

We think these 31 Halloween Hacks & Tips are pretty fun too! Pin to Pinterest.


WHAT’S TRENDING? Looking for a few engaging activities? Grab Minute to Win it Games – Traditional, Holiday, Group, and more! Use these fun activities in the office, classroom, or at your next birthday party.

LEGO Store Monthly Mini Build – FREE LEGO Dinosaur

This post may contain affiliate links or ads. Read my privacy policy and disclosure policy here.

August 15, 2017 by Ashley at Frugal Coupon Living Filed Under: Crafts, Free, Kids

published date: August 15, 2017
modified datt: August 15,2017

Registration opened 8/15/17 at 9 AM ET.

Visit your local LEGO Store on the first Tuesday or Wednesday of each month  for the LEGO Store Monthly Mini Build.  Kids will Learn how to build a cool LEGO mini model and the best part,  when you are finished,  you can take it home for FREE!  A new model will be available each month and will be specially themed to that month.  Mini Model Build events are a blast and a wonderful FREEBIE your little guy or gal will love.

The upcoming Mini Model Build is a FREE LEGO Dinosaur. Event is scheduled for Tuesday, September 5 or Wednesday, September 6 and is open to children ages 6 to 14 only. Show up early as quantities are limited, approximately 250 per store.


Don’t forget your FREE LEGO Magazine!

WHAT’S TRENDING? Looking for a few engaging activities? Grab Minute to Win it Games – Traditional, Holiday, Group, and more! Use these fun activities in the office, classroom, or at your next birthday party.

Back to School Apple Cupcakes

This post may contain affiliate links or ads. Read my privacy policy and disclosure policy here.

August 3, 2017 by Ashley at Frugal Coupon Living Filed Under: Back To School, Back to School Series, Crafts, Instagram, Pinterest, Recipe

published date: August 15, 2015
modified datt: August 03,2017

apple-cupcakes-back-to-school-frugal-coupon-living-tall-larger

Apple Cupcakes

Pin to Pinterest

Can you believe we are already talking back to school?! Beyond supplies and everything else that comes with starting school again, getting teachers a little treat to begin the school year is a great idea! Why not make them something? Any teacher would love these adorable cupcakes made to look like an apple! Make a tray of them and put in the Teacher’s Lunchroom or Main Office. They’re so easy to make and will be a huge hit! My kids would agree that a few set aside to enjoy after school on the first day is a good idea too!

Cake Ingredients:

  • 1 box White Cake Mix + box ingredients
  • Red Cupcake Liners

Frosting Ingredients:

  • 1 cup softened Butter
  • 3 cup Powdered Sugar
  • 3 tbsp Milk
  • 1 tsp Vanilla
  • Red Food Coloring
  • Red Sparkling Sugar
  • 12 Tootsie Roll Midgies
  • Green Fruit Rollups or Green M&Ms

Directions:

  1. Preheat oven and line muffin tins with paper liners.
  2. Prepare batter according to box directions.
  3. Fill liners 2/3 full and bake according to box directions for cupcakes.
  4. Allow to cool completely.
  5. Whip butter and vanilla for until fluffy.
  6. Gradually add powdered sugar.
  7. Add milk until you reach desired consistency.
  8. Add food coloring to acheive pink/red color.
  9. Frost each cupcake.
  10. Sprinkle with red sparkling sugar.
  11. Insert Tootsie Roll in middle to make stem.
  12. If using Rollups, cut 2 leaves for each cupcake and put in place or if using M&Ms, place 2 M&Ms to represent leaves.
Print
clock clock iconcutlery cutlery iconflag flag iconfolder folder iconinstagram instagram iconpinterest pinterest iconfacebook facebook iconprint print iconsquares squares iconheart heart iconheart solid heart solid icon

Back to School Apple Cupcakes

  • Author: Ashley from Frugal Coupon Living
Print Recipe

Ingredients

Scale
  • 1 box White Cake Mix + box ingredients
  • Red Cupcake Liners
  • 1 cup softened Butter
  • 3 cup Powdered Sugar
  • 3 tbsp Milk
  • 1 tsp Vanilla
  • Red Food Coloring
  • Red Sparkling Sugar
  • 1 cup softened Butter
  • 3 cup Powdered Sugar
  • 3 tbsp Milk
  • 1 tsp Vanilla
  • Red Food Coloring
  • Red Sparkling Sugar

Instructions

  1. Preheat oven and line muffin tins with paper liners.
  2. Prepare batter according to box directions.
  3. Fill liners 2/3 full and bake according to box directions for cupcakes.
  4. Allow to cool completely.
  5. Whip butter and vanilla for until fluffy.
  6. Gradually add powdered sugar.
  7. Add milk until you reach desired consistency.
  8. Add food coloring to acheive pink/red color.
  9. Frost each cupcake.
  10. Sprinkle with red sparkling sugar.
  11. Insert Tootsie Roll in middle to make stem.
  12. If using Rollups, cut 2 leaves for each cupcake and put in place or if using M&Ms, place 2 M&Ms to represent leaves.

Did you make this recipe?

Tag @frugalcouponliving on Instagram and hashtag it #frugalcouponliving

Recipe Card powered byTasty Recipes


back-to-school-apple-cupcakes-Collage-frugal-coupon-living

Share-Post-on-Pinterest-Frugal-Coupon-Living

first-day-of-school-back-to-school-kids-snack-ideas-frugal-coupon-living

Don’t forget these Back to School Kid’s Snack Ideas.  Pin to Pinterest.

taco-bento-box-recipe-frugal-coupon-living-free-lunch-notes

Want another back to school idea – we love this Taco Bento Box with FREE Printable Lunch Notes!  Pin to Pinterest.

Just to add a touch of fun – grab these FREE Printable Lunch Notes. I think the best way to allow these to last is to laminate them at the start of the school year. This is my favorite laminator (by far) – so worth the low price!


Check out these other Back to School Frugal Coupon Living FREEBIES and Crafts:

More in our Back to School Series – Project Lunchbox!

  • Project Lunchbox Intro – Pin It
  • ABC School Days Theme – Pin It
  • Shark Week Lunch Theme – Pin It
  • Camping Theme Lunch – Pin It
  • Chicka Chicka Boom Boom Theme – Pin It
  • Bug Lunch Theme – Pin It
  • Birthday Lunch Theme – Pin It
  • FREE Printable Lunch Notes – Pin It
  • Keep Calm and Teach On FREE Printable and Pencil Vase – Pin It
  • Face Fruit and Food Stickers and FREE Lunch Notes – Pin It
  • FREE First day of School Printables – Pin It
  • FREE Last Day of School too – Pin It)
  • DIY Welcome Back to School Apple Lunch Sack Craft – Pin It
  • DIY Uncrustables Sandwiches – Pin It

Also check out Back to School Deals on Frugal Coupon Living.

green-signature


WHAT’S TRENDING? Looking for a few engaging activities? Grab Minute to Win it Games – Traditional, Holiday, Group, and more! Use these fun activities in the office, classroom, or at your next birthday party.

Finding Dory Homemade Squirt Playdough

This post may contain affiliate links or ads. Read my privacy policy and disclosure policy here.

July 26, 2017 by Ashley at Frugal Coupon Living Filed Under: Crafts, DIY, Facebook, Frugal Living, Instagram, Pinterest, Social Media

published date: June 28, 2016
modified datt: July 26,2017

finding-dory-homemade-squirt-playdough-long

Finding Dory Homemade Squirt Playdough

Pin to Pinterest

Who doesn’t love Finding Nemo or Finding Dory. These are two popular movies in our home and we are a bit obsessed. In an effort to work on our Summer Bucket List this summer, we wanted to tackle this fun Finding Dory Homemade Squirt Playdough.

Supplies Needed:

  • 2 cup of plain white flour
  • 3/4 cup of salt
  • 1 tbs oil (also consider an essential oil)
  • 1 cup of cold water
  • 2-3 drops of green food coloring
  • Fine crafting glitter (optional)

Directions:

  1. In a large bowl mix the flour, salt, oil, and cold water together. You will notice the ingredients begin to clump up. Continue mixing until a soft dough forms.
  2. Because you are using less salt than most play dough recipes, you will notice that the dough stays clumpy. This is what will give it the coral effect. If you wish for smoother dough, add an extra ¼ cup of salt.
  3. Add 2-3 drops of food coloring to the dough. Continue to knead the dough until the color spreads to your liking.
  4. Finish off your dough by adding an optional sprinkle of glitter.Your coral play dough can now be enjoyed. When not in use, place it in an airtight container. It should last for several weeks as long as it doesn’t have the chance to dry out.
Print
clock clock iconcutlery cutlery iconflag flag iconfolder folder iconinstagram instagram iconpinterest pinterest iconfacebook facebook iconprint print iconsquares squares iconheart heart iconheart solid heart solid icon

Finding Dory Homemade Squirt Playdough

  • Author: Ashley at Frugal Coupon Living
Print Recipe

Description

[url href=”undefined”][/url]


Ingredients

Scale
  • 2 cup of plain white flour
  • 3/4 cup of salt
  • 1 tbs oil
  • 1 cup of cold water
  • 2–3 drops of green food coloring
  • Fine crafting glitter (optional)

Instructions

  1. In a large bowl mix the flour, salt, oil, and cold water together. You will notice the ingredients begin to clump up. Continue mixing until a soft dough forms.
  2. Because you are using less salt than most play dough recipes, you will notice that the dough stays clumpy. This is what will give it the coral effect. If you wish for smoother dough, add an extra ¼ cup of salt.
  3. Add 2-3 drops of food coloring to the dough. Continue to knead the dough until the color spreads to your liking.
  4. Finish off your dough by adding an optional sprinkle of glitter.Your coral play dough can now be enjoyed. When not in use, place it in an air tight container. It should last for several weeks as long as it doesn’t have the chance to dry out.

Did you make this recipe?

Tag @frugalcouponliving on Instagram and hashtag it #frugalcouponliving

Recipe Card powered byTasty Recipes

finding-dory-homemade-squirt-playdough


Share-Post-on-Pinterest-Frugal-Coupon-Living

Also check out our Aromatherapy Play-Doh. Pin to Pinterest.

Aromatherapy Playdoh on Frugal Coupon Living Smaller

signature-cursive-frugal-coupon-living

WHAT’S TRENDING? Looking for a few engaging activities? Grab Minute to Win it Games – Traditional, Holiday, Group, and more! Use these fun activities in the office, classroom, or at your next birthday party.

Peanut Butter, Banana, Apple, Cinnamon, & Raisin Face Sandwich

This post may contain affiliate links or ads. Read my privacy policy and disclosure policy here.

July 26, 2017 by Ashley at Frugal Coupon Living Filed Under: Back To School, Crafts, DIY, Facebook, Instagram, Online Shopping, Pinterest, Recipe, Social Media

published date: December 29, 2015
modified datt: July 26,2017

Sandwich-Faces-Collage-Frugal-Coupon-Living

Peanut Butter, Banana, Apple, Cinnamon, & Raisin Face Sandwich

Pin to Pinterest

Give your little ones a giggle at lunchtime when you serve them these super cute sandwich faces! They are so easy to make and will be a huge hit! Even better, get the kiddos involved and have them make their own. With just a few simple ingredients you can have a healthy lunch ready in minutes! Have fun!

Time: 20 minutes
Servings: 8

Ingredients:

  • 8 Slices of Nature’s Harvest Honey Wheat Bread or bread of your choice
  • 1 Banana (sliced)
  • ½ Apple (diced)
  • 1 small box Raisins
  • 4 tbsp. Creamy Peanut Butter
  • 1½ tbsp. Honey
  • ¼ tsp. Ground Cinnamon
  • We used a small dough press for our shapes.

Directions:

  1. Preheat oven at 350 degrees F.
  2. In a small bowl, stir together peanut butter, honey, cinnamon, and raisins.
  3. Add 1 tbsp. peanut butter mixture to one side of bread slice.
  4. Add banana slices and diced apple on top of peanut butter mixture.
  5. Place bread slice with mixture on small dough press and slowly close the press tightly around the bread as it folds in half. While holding the press closed, slowly trim away the excess bread with your fingers. Open the press and remove the sandwich.
  6. Place sandwiches on cookie sheet covered with aluminum foil. Bake in oven for approximately 8 minutes. Remove.
  7. As an added bit of fun, decorate your sandwiches with Wilton candy eyes and lips. Use raisins and backing behind each candy eye and secure edible pieces with a touch of peanut butter!
  8. Serve and enjoy!
Print
clock clock iconcutlery cutlery iconflag flag iconfolder folder iconinstagram instagram iconpinterest pinterest iconfacebook facebook iconprint print iconsquares squares iconheart heart iconheart solid heart solid icon

Peanut Butter, Banana, Apple, Cinnamon, & Raisin Face Sandwich

  • Author: Ashley at Frugal Coupon Living
  • Prep Time: 20 mins
  • Total Time: 20 minutes
  • Yield: 8 1x
Print Recipe

Description

[url href=”undefined”][/url]


Ingredients

Scale
  • 8 Slices of Nature’s Harvest Honey Wheat Bread or bread of your choice
  • 1 Banana (sliced)
  • ½ Apple (diced)
  • 1 small box Raisins
  • 4 tbsp. Creamy Peanut Butter
  • 1½ tbsp. Honey

Instructions

  1. Preheat oven at 350 degrees F.
  2. In a small bowl, stir together peanut butter, honey, cinnamon, and raisins.
  3. Add 1 tbsp. peanut butter mixture to one side of bread slice.
  4. Add banana slices and diced apple on top of peanut butter mixture.
  5. Place bread slice with mixture on small dough press and slowly close the press tightly around the bread as it folds in half. While holding the press closed, slowly trim away the excess bread with your fingers. Open the press and remove the sandwich.
  6. Place sandwiches on cookie sheet covered with aluminum foil. Bake in oven for approximately 8 minutes. Remove.
  7. As an added bit of fun, decorate your sandwiches with Wilton candy eyes and lips. Use raisins and backing behind each candy eye and secure edible pieces with a touch of peanut butter!
  8. Serve and enjoy!

Did you make this recipe?

Tag @frugalcouponliving on Instagram and hashtag it #frugalcouponliving

Recipe Card powered byTasty Recipes

Share-Post-on-Pinterest-Frugal-Coupon-Living

Ready to send the kids back to school? Don’t forget these Back to School Kid’s Snack Ideas.  Pin to Pinterest.

first-day-of-school-back-to-school-kids-snack-ideas-frugal-coupon-living

We also love these creative lunchbox ideas!


  • ABC School Days Theme – Pin It
  • Shark Week Lunch Theme – Pin It
  • Camping Theme Lunch – Pin It
  • Chicka Chicka Boom Boom Theme – Pin It
  • Bug Lunch Theme – Pin It
  • Birthday Lunch Theme – Pin It


Print

clock clock iconcutlery cutlery iconflag flag iconfolder folder iconinstagram instagram iconpinterest pinterest iconfacebook facebook iconprint print iconsquares squares iconheart heart iconheart solid heart solid icon

Print Recipe

Ingredients


Did you make this recipe?

Tag @frugalcouponliving on Instagram and hashtag it #frugalcouponliving

Recipe Card powered byTasty Recipes


WHAT’S TRENDING? Looking for a few engaging activities? Grab Minute to Win it Games – Traditional, Holiday, Group, and more! Use these fun activities in the office, classroom, or at your next birthday party.

Star Wars BB-8 Droid Quesadillas

This post may contain affiliate links or ads. Read my privacy policy and disclosure policy here.

July 26, 2017 by Ashley at Frugal Coupon Living Filed Under: Crafts, DIY, Facebook, Instagram, Pinterest, Recipe, Social Media

published date: October 20, 2015
modified datt: July 26,2017

Star Wars Droid Quesadillas on Frugal Coupon Living

Star Wars BB-8 Droid Quesadillas

Pin to Pinterest

Awaken your little Jedi’s taste buds with this Droid Quesadilla! Total comfort food from such simple ingredients in the shape of your favorite droid. Imagine the smiles when their lunchbox opens to find this. Add a clever touch to a Star Wars birthday party by making a tray full of these to enjoy! May the force be with you.

Ingredients:

  • 2 flour tortillas (soft taco size)
  • 2 oz softened cream cheese
  • 2 cheddar cheese sandwich slices
  • 1 cup shredded Mexican cheese blend
  • black food coloring

Additionally you will need a  white wine glass, pairing knife and ziplock bag.


Directions:

  1. In a small bowl, mix your softened cream cheese with a dab of black food coloring until you get a silver grey color.
  2. Turn a ziplock bag inside out over your hand and scoop up the silver cream cheese reserving a small amount in the bowl.
  3. Turn the bag right side in and press the cream cheese mixture into one corner of the bag.
  4. With a sharp knife, cut the corner of the sandwich bag off so that you have a small hole from which you can pipe the cream cheese. The smaller the better.
  5. Add more black food coloring to the reserved silver grey cream cheese until you get a jet black color.

For the body:

  1. Take one cheddar cheese slice and place it on a cutting board. Invert your wine glass and use it to cut a solid circle in the center of the slice.
  2. Take that solid circle of cheese and with a pairing knife freehand another small circle in the center. It should now look like a cheese doughnut.
  3. With your pairing knife, cut four concentric sections from the inside hole leaving four small interior spokes. This will form the center mechanism of your droid’s body.
  4. Take your other slice of cheddar cheese and place it on the cutting board. Invert your wine glass and use it to cut a solid circle in the center of the second slice.
  5. Take that second solid circle of cheese and with a pairing knife cut it into four equal pie pieces.
  6. With your pairing knife, cut the rounded edge of each pie piece forming four equal quarter rounds, about the same thickness of your center mechanism piece. These will form the four side pieces of your droid’s body.

For the head:

  1. Take the remainder of one cheddar cheese slice and with your pairing knife cut a section from around the edge of the rounded hole for the droid’s head stripe. This should be about a quarter inch in width.
  2. From the remainder of the other cheese slice cut various size squares and rectangles to attach as decorative pieces along the bottom grey head stripe.
  3. Cut your second flour tortilla in half across the diameter.
  4. With your knife cut the corners of the tortilla to round them up a bit.
  5. Cut one of the scrap pieces of tortilla to form the antenna that will go on top of the droid’s head.

Assembly:

  1. Place your droid’s round quesadilla body on a microwave safe plate.
  2. Sprinkle with 2/3 of the Mexican cheese blend.
  3. Top shredded cheese with the other round tortilla.
  4. Microwave for one minute.
  5. Repeat this process with the droid’s tortilla head. You should now have two cheese quesadillas.
  6. Place all cheddar cheese sliced pieces on your BB-8 Droid as pictured and pipe silver grey cream cheese in areas shown.
  7. With the tip of your knife, place a small dab of black cream cheese on your droids head and an even smaller dab below and to the right of it as shown.
  8. Pipe a silver rim around the smaller dot of black cream cheese.
  9. Place your droid’s head on its body and top with the tortilla antenna piece.

Enjoy!

Print
clock clock iconcutlery cutlery iconflag flag iconfolder folder iconinstagram instagram iconpinterest pinterest iconfacebook facebook iconprint print iconsquares squares iconheart heart iconheart solid heart solid icon

Star Wars BB-8 Droid Quesadillas

  • Author: Ashley at Frugal Coupon Living
Print Recipe

Description

[url href=”undefined”][/url]


Ingredients

Scale
  • 2 flour tortillas (soft taco size)
  • 2 oz softened cream cheese
  • 2 cheddar cheese sandwich slices
  • 1 cup shredded Mexican cheese blend
  • black food coloring
  • Additionally you will need a white wine glass, pairing knife and ziplock bag

Instructions

  1. In a small bowl, mix your softened cream cheese with a dab of black food coloring until you get a silver grey color.
  2. Turn a ziplock bag inside out over your hand and scoop up the silver cream cheese reserving a small amount in the bowl.
  3. Turn the bag right side in and press the cream cheese mixture into one corner of the bag.
  4. With a sharp knife, cut the corner of the sandwich bag off so that you have a small hole from which you can pipe the cream cheese. The smaller the better.
  5. Add more black food coloring to the reserved silver grey cream cheese until you get a jet black color.
  6. For the body:
  7. Take one cheddar cheese slice and place it on a cutting board. Invert your wine glass and use it to cut a solid circle in the center of the slice.
  8. Take that solid circle of cheese and with a pairing knife freehand another small circle in the center. It should now look like a cheese doughnut.
  9. With your pairing knife, cut four concentric sections from the inside hole leaving four small interior spokes. This will form the center mechanism of your droid’s body.
  10. Take your other slice of cheddar cheese and place it on the cutting board. Invert your wine glass and use it to cut a solid circle in the center of the second slice.
  11. Take that second solid circle of cheese and with a pairing knife cut it into four equal pie pieces.
  12. With your pairing knife, cut the rounded edge of each pie piece forming four equal quarter rounds, about the same thickness of your center mechanism piece. These will form the four side pieces of your droid’s body.
  13. For the head:
  14. Take the remainder of one cheddar cheese slice and with your pairing knife cut a section from around the edge of the rounded hole for the droid’s head stripe. This should be about a quarter inch in width.
  15. From the remainder of the other cheese slice cut various size squares and rectangles to attach as decorative pieces along the bottom grey head stripe.
  16. Cut your second flour tortilla in half across the diameter.
  17. With your knife cut the corners of the tortilla to round them up a bit.
  18. Cut one of the scrap pieces of tortilla to form the antenna that will go on top of the droid’s head.
  19. Assembly:
  20. Place your droid’s round quesadilla body on a microwave safe plate.
  21. Sprinkle with 2/3 of the Mexican cheese blend.
  22. Top shredded cheese with the other round tortilla.
  23. Microwave for one minute.
  24. Repeat this process with the droid’s tortilla head. You should now have two cheese quesadillas.
  25. Place all cheddar cheese sliced pieces on your BB-8 Droid as pictured and pipe silver grey cream cheese in areas shown.
  26. With the tip of your knife, place a small dab of black cream cheese on your droids head and an even smaller dab below and to the right of it as shown.
  27. Pipe a silver rim around the smaller dot of black cream cheese.
  28. Place your droid’s head on its body and top with the tortilla antenna piece.

Did you make this recipe?

Tag @frugalcouponliving on Instagram and hashtag it #frugalcouponliving

Recipe Card powered byTasty Recipes


Share-Post-on-Pinterest-Frugal-Coupon-Living

Don’t forget these Disney Star Wars Half Marathon. Pin to Pinterest.

Disney Star Wars Half Marathon Frugal Coupon Living

green-signature

WHAT’S TRENDING? Looking for a few engaging activities? Grab Minute to Win it Games – Traditional, Holiday, Group, and more! Use these fun activities in the office, classroom, or at your next birthday party.

Easy Marshmallow JELL-O Pinwheels Recipe

This post may contain affiliate links or ads. Read my privacy policy and disclosure policy here.

July 26, 2017 by Ashley at Frugal Coupon Living Filed Under: Crafts, DIY, Facebook, Instagram, Pinterest, Recipe, Social Media

published date: July 21, 2015
modified datt: July 26,2017

monster-tongues-jello-pinwheels-frugal-coupon-living

Easy Marshmallow JELL-O Pinwheels

Pin to Pinterest

Get ready to have fun with this Kids Food Craft! These Jell-O Pinwheels are the perfect treat for a birthday party, playdate and holidays. It’s an easy kitchen activity for the kids to help with. Not only could you make them in custom colors to match any theme but, how cute would they be as ‘Monster Tongues’ for a Monster party!! Mix marshmallows and chilled gelatin for these fun wiggly pinwheels. 3 ingredients is all you need to make a tray full. A tray of red and green Jell-O pinwheels will be lovely for Christmas!

Ingredients:

  • 3 oz package Flavored Gelatin
  • 1/2 cup Water
  • 1 1/2 cup Mini Marshmallows

Directions:

  1. Lightly spray 8″ square glass baking dish with non-stick spray. Wipe off excess.
  2. Whisk together water and gelatin in microwave safe bowl.
  3. Microwave for 1 minute.
  4. Whisk contents well, add marshmallows and stir.
  5. Microwave for 30 seconds and stir until marshmallows are dissolved. If they do not completely dissolve microwave another 15 seconds.
  6. Pour contents into prepared dish and refrigerate for 30-45 minutes.
  7. Use a butter knife to loosen around edges. Roll up and place seam side down on cutting board.
  8. Use dental floss or twine to cut into slices by sliding under roll, wrapping over top and pulling ends.
  9. Refrigerate slices until ready to serve.
Print
clock clock iconcutlery cutlery iconflag flag iconfolder folder iconinstagram instagram iconpinterest pinterest iconfacebook facebook iconprint print iconsquares squares iconheart heart iconheart solid heart solid icon

Easy Marshmallow JELL-O Pinwheels Recipe

  • Author: Ashley at Frugal Coupon Living
  • Prep Time: 10 mins
  • Cook Time: 55 mins
  • Total Time: 1 hour 5 minutes
  • Yield: 8 1x
Print Recipe

Description

[url href=”undefined”][/url]


Ingredients

Scale
  • 3 oz package Flavored Gelatin
  • 1/2 cup Water
  • 1 1/2 cup Mini Marshmallows

Instructions

  1. Lightly spray 8″ square glass baking dish with non-stick spray. Wipe off excess.
  2. Whisk together water and gelatin in microwave safe bowl.
  3. Microwave for 1 minute.
  4. Whisk contents well, add marshmallows and stir.
  5. Microwave for 30 seconds and stir until marshmallows are dissolved. If they do not completely dissolve microwave another 15 seconds.
  6. Pour contents into prepared dish and refrigerate for 30-45 minutes.
  7. Use a butter knife to loosen around edges. Roll up and place seam side down on cutting board.
  8. Use dental floss or twine to cut into slices by sliding under roll, wrapping over top and pulling ends.
  9. Refrigerate slices until ready to serve.

Did you make this recipe?

Tag @frugalcouponliving on Instagram and hashtag it #frugalcouponliving

Recipe Card powered byTasty Recipes

marshmallow-jello-Collage-frugal-coupon-living-finished

You can see a fun video tutorial below!

3.2.2925

Share-Post-on-Pinterest-Frugal-Coupon-Living

Don’t forget this fun JELL-O Playdough Recipe. Pin to Pinterest.

Frugal-Coupon-Living-Simply_Sprout_Jell-o-Playdough

Follow all Recipes on Frugal Coupon Living as well as FCLAsh on Pinterest.


  • Morning Egg & Asparagus Breakfast – Pin to Pinterest
  • Sweet Fried Banana Bites – Pin to Pinterest
  • Brown Sugar Recipe – Pin to Pinterest
  • Bacon and Fresh Corn Ditalini Pasta Salad – Pin to Pinterest
  • Ground Pork Lean Stuffed Tomatoes – Pin to Pinterest
  • Non-Fried Fried Ice Cream Recipe – Pin to Pinterest
  • Veggie Pizza with Crescent Rolls – Pin to Pinterest
  • Honeydew Cucumber Salad – Pin to Pinterest
  • Caramel Apple Nachos – Pin to Pinterest
  • Neapolitan Cheesecake Brownies – Pin to Pinterest
  • Cookie Monster Ice Cream – Pin to Pinterest
  • Peanut Butter Cup Reese’s Ice Cream – Pin to Pinterest
  • Homemade Copycat Larabars Recipe – Pin to Pinterest
  • Organic Chicken Mediterranean Pita Pocket – Pin to Pinterest
  • S’mores Campfire Cones – Pin to Pinterest
  • Watermelon Cupcakes Recipe – Pin to Pinterest
  • Sweet Southern Pink Lemonade – Pin to Pinterest
  • Roasted Asparagus Bruschetta with Goat Cheese – Pin to Pinterest
  • Homemade Parmesan Crisps – Pin to Pinterest
  • Banana Split Sticks – Pin to Pinterest
  • Copycat Sonic Ocean Water – Pin to Pinterest
  • Tropical Peach and Pineapple Slushies – Pin to Pinterest
  • Blackberry Honey Butter – Pin to Pinterest
  • Homemade Ketchup – Pin to Pinterest
  • Chocolate Dipped Cookie Dough Bites – Pin to Pinterest

red-frugal-coupon-living-signature

WHAT’S TRENDING? Looking for a few engaging activities? Grab Minute to Win it Games – Traditional, Holiday, Group, and more! Use these fun activities in the office, classroom, or at your next birthday party.

Sweet Fried Banana Bites

This post may contain affiliate links or ads. Read my privacy policy and disclosure policy here.

July 26, 2017 by Ashley at Frugal Coupon Living Filed Under: Crafts, DIY, Facebook, Instagram, Pinterest, Recipe, Social Media

published date: July 11, 2015
modified datt: July 26,2017

Fried-Banana-Bites-Frugal-Coupon-Living-smaller

Sweet Fried Banana Bites

Pin to Pinterest

Growing up, these were always a treat for my Cuban Family – fried bananas. We actually never used it as a dessert, it was a side to our entree almost every meal. The slightly crunchy outside wrapped around a soft, tangy, almost melted banana. It’s true comfort food. This version gives it a sweet twist that is perfect as a treat for after your meal. We might suggest you play with the recipe adding brown sugar or cinnamon – so many flavors you can consider blending. Serve with caramel sauce, chocolate sauce or ice cream. Your family will love them!

Ingredients:

  • 3 Bananas
  • 1 cup Pancake Mix
  • 1 cup Milk
  • 1 Egg
  • 1/4 cup Powdered Sugar
  • Vegetable Oil (for frying)

Directions:

  1. Slice bananas into 1/2″ slices.
  2. Combine pancake mix, milk and egg. Beat until blended.
  3. Line a plate with paper towels. Set aside.
  4. FIll a pan with oil 1/2″ deep and heat to 350 to 375 degrees.
  5. Dip each banana slice in batter and allow excess to drip off.
  6. Place in oil and fry for about 1-2 minutes on each side or until golden brown.
  7. Remove to prepared plate.
  8. Dust finished bites with powdered sugar.
  9. Serve with caramel sauce, chocolate sauce or ice cream.
Print
clock clock iconcutlery cutlery iconflag flag iconfolder folder iconinstagram instagram iconpinterest pinterest iconfacebook facebook iconprint print iconsquares squares iconheart heart iconheart solid heart solid icon

Sweet Fried Banana Bites

  • Author: Ashley at Frugal Coupon Living
Print Recipe

Description

[url href=”undefined”][/url]


Ingredients

Scale
  • 3 Bananas
  • 1 cup Pancake Mix
  • 1 cup Milk
  • 1 Egg
  • 1/4 cup Powdered Sugar
  • Vegetable Oil (for frying)

Instructions

  1. Slice bananas into 1/2″ slices.
  2. Combine pancake mix, milk and egg. Beat until blended.
  3. Line a plate with paper towels. Set aside.
  4. FIll a pan with oil 1/2″ deep and heat to 350 to 375 degrees.
  5. Dip each banana slice in batter and allow excess to drip off.
  6. Place in oil and fry for about 1-2 minutes on each side or until golden brown.
  7. Remove to prepared plate.
  8. Dust finished bites with powdered sugar.
  9. Serve with caramel sauce, chocolate sauce or ice cream.

Did you make this recipe?

Tag @frugalcouponliving on Instagram and hashtag it #frugalcouponliving

Recipe Card powered byTasty Recipes

fried-banana-bites-Collage-frugal-coupon-living

Share-Post-on-Pinterest-Frugal-Coupon-Living

Also check out this Brown Sugar Recipe – Make Your Own Brown Sugar at Home! Pin to Pinterest!

homemade-brown-sugar-frugal-coupon-living-larger

Follow all Recipes on Frugal Coupon Living as well as FCLAsh on Pinterest.


  • Brown Sugar Recipe – Pin to Pinterest
  • Bacon and Fresh Corn Ditalini Pasta Salad – Pin to Pinterest
  • Ground Pork Lean Stuffed Tomatoes – Pin to Pinterest
  • Non-Fried Fried Ice Cream Recipe – Pin to Pinterest
  • Veggie Pizza with Crescent Rolls – Pin to Pinterest
  • Honeydew Cucumber Salad – Pin to Pinterest
  • Caramel Apple Nachos – Pin to Pinterest
  • Neapolitan Cheesecake Brownies – Pin to Pinterest
  • Cookie Monster Ice Cream – Pin to Pinterest
  • Peanut Butter Cup Reese’s Ice Cream – Pin to Pinterest
  • Homemade Copycat Larabars Recipe – Pin to Pinterest
  • Organic Chicken Mediterranean Pita Pocket – Pin to Pinterest
  • Watermelon Cupcakes Recipe – Pin to Pinterest
  • Sweet Southern Pink Lemonade – Pin to Pinterest
  • S’mores Ice Cream Cones – Pin to Pinterest
  • Roasted Asparagus Bruschetta with Goat Cheese – Pin to Pinterest
  • Homemade Parmesan Crisps – Pin to Pinterest
  • Banana Split Sticks – Pin to Pinterest
  • Copycat Sonic Ocean Water – Pin to Pinterest
  • Tropical Peach and Pineapple Slushies – Pin to Pinterest
  • Blackberry Honey Butter – Pin to Pinterest
  • Homemade Ketchup – Pin to Pinterest
  • Chocolate Dipped Cookie Dough Bites – Pin to Pinterest

red-frugal-coupon-living-signature

WHAT’S TRENDING? Looking for a few engaging activities? Grab Minute to Win it Games – Traditional, Holiday, Group, and more! Use these fun activities in the office, classroom, or at your next birthday party.

  • « Previous Page
  • 1
  • …
  • 59
  • 60
  • 61
  • 62
  • 63
  • …
  • 98
  • Next Page »
  • Search
  • Social
  • Categories
  • Archives
Search
  • Email
  • Facebook
  • Instagram
  • Pinterest
  • Twitter
Browse By Category
Browse by Date
I am a wife, mother, daughter, blogger, teacher, friend – a woman of many different hats. My delights are my husband, my five kids, reading, shopping, and spending time with friends and family. I am a Florida girl transferred to the heart of the DC-Metro area. I'm glad you're here! Learn more about Ashley.

Daily Deals – Don’t Miss One!

December 2025
S M T W T F S
 123456
78910111213
14151617181920
21222324252627
28293031  
« Nov    

Copyright © 2025 Frugal Coupon Living | CCPA Policy | Privacy Policy | Disclosure | Disclaimer | Terms of Use | Do Not Sell My Personal Information | Email Sign Up