Frugal Coupon Living

Stretching Your Pennies, Saving Your Dollars

  • Email
  • Facebook
  • Instagram
  • Pinterest
  • Twitter
  • Home
    • Home Page
    • About Ashley at Frugal Coupon Living
    • Contact
  • Shop
    • Frugal Coupon Living Shop
    • Etsy Store
    • TPT Shop
    • Elf Printables
    • Shipping Policy
  • Printables
    • Shop
    • All Printables
    • Free Printables Library
    • Free Elf Printables
  • Games
  • Party
  • Deals
  • Seasonal
    • Easter
    • Spring
    • April Fools Day
    • Mother’s Day
    • Father’s Day
    • Summer
    • Back to School
    • Halloween
    • Thanksgiving
    • Black Friday & Cyber Monday
    • Christmas
    • New Year’s Eve
    • Valentine’s Day
    • All Seasonal
  • Christian Resources
    • Christian Resources Shop
    • TPT Christian Crafts
    • Etsy Christian Prints
    • Youth Group Games
    • Sunday School Lessons
    • Scripture Cards
    • More Christian Resources

Dollar Tree Halloween Decor – Decorate with Spooky Candles on a Budget

This post may contain affiliate links or ads. Read my privacy policy and disclosure policy here.

August 9, 2014 by Ashley at Frugal Coupon Living Filed Under: Crafts, Halloween, Pinterest

published date: September 28, 2013
modified datt: August 09,2014

Dollar-Tree-Halloween-Candle-Decor-frugal-coupon-living-url

Pin to Pinterest

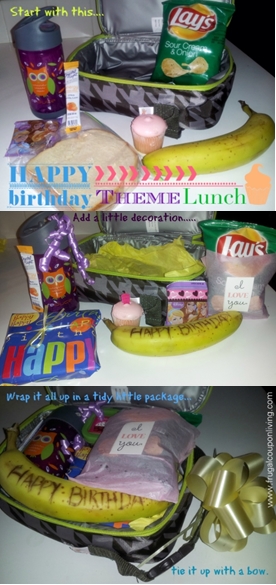
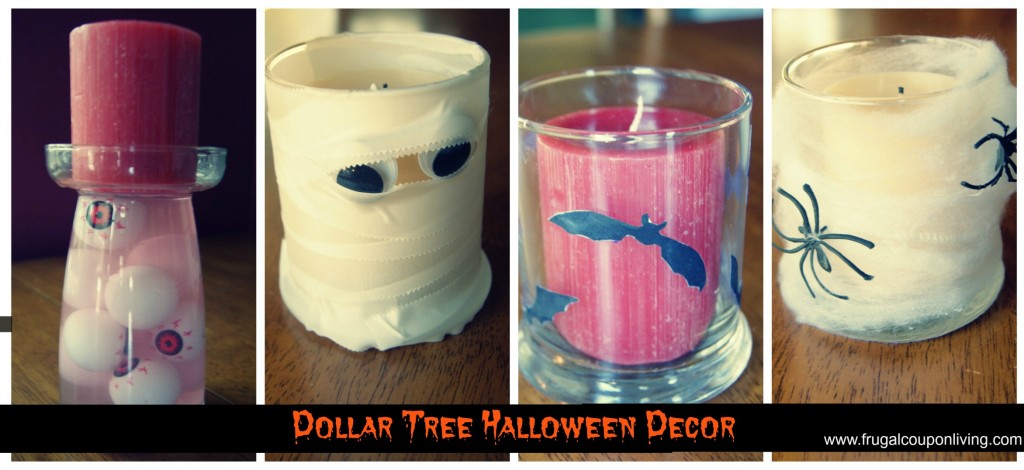
Sometimes your décor calls for a touch of the spooky. If you want to add a little macabre to your decorations try out one or all of these ghoulishly fun candle holder ideas. Simple and inexpensive to make- all items were picked up at Dollar Tree or found around the home. Festive and fun decorating can be frugal too with a little imagination, and a trip or two to your local dollar store.

Dollar Tree Halloween Decor

The Eyes Have It Candle Holder

I used less than half a pack of eyeballs from Dollar tree to create this eerie candle holder. You could easily get 3-4 of these to place around your home or for your Halloween party. Fill Candle holders with eye balls, fill remaining space with water and 1-2 drops red food coloring. Place candle on top to complete the look. They also have rubber bloody fingers and toes you can use to make another similar candle holder, using the same method with the water.

spider-collage-candle-frugal-coupon-living-halloween-dollar-store-craft

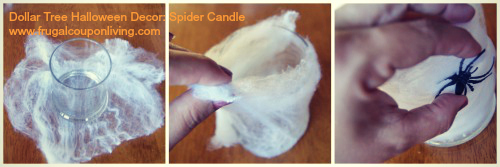
The Creepy Crawly Spider Climbed Up the Candle Holder

A pack of spider web and 5 spider rings were only $1 at of course Dollar Tree, I used a very small portion of the webbing and only 2 spiders per candle holder. To recreate: pinch off about a golf ball sized portion of webbing, stretch to flatten into an approximate circle shape, place candle holder in center of webbing, pull up and stretch over candle-the webbing will stick to itself pretty well. Clip the ring portion off spiders, and attach to web.

bat-candle-frugal-coupon-living-dollar-tree-crafts

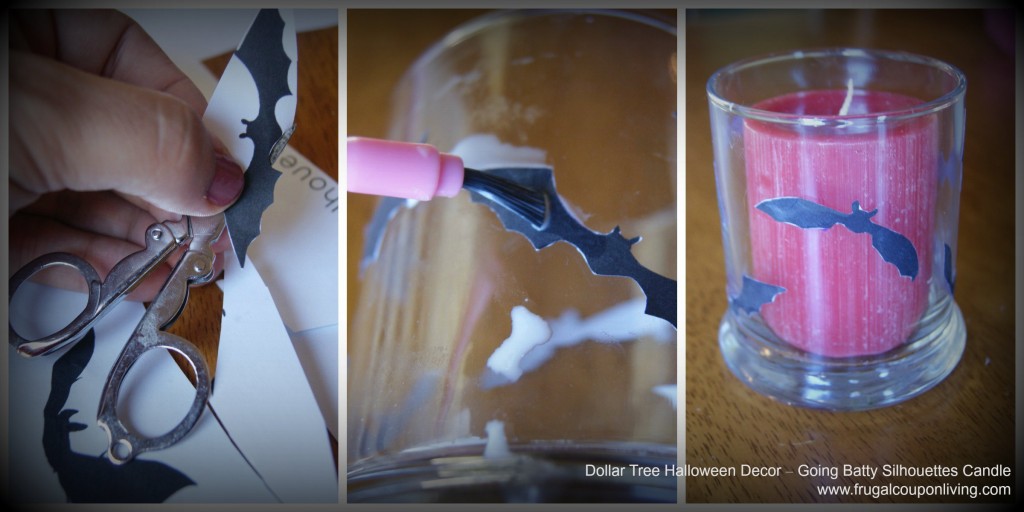
Going Batty Silhouettes

Print out THESE bat shapes or free hand cut your own bat shapes from black construction paper. In a small bowl mix a combination of equal parts water and Elmer’s glue to create a modge podge. With a paint brush apply a thin even coat of modge podge to candle holder, and the back of bat cutouts. Apply cutout to desired position on candle holder. Apply a layer of modge podge over the top of bat. Allow to dry 24 hours. This will cast delightful bat shapes on your wall when you place a votive candle to shine from behind it, place in a shadowy corner.

mummified-Dollar-tree-halloween-Decor-Frugal-Coupon-Living

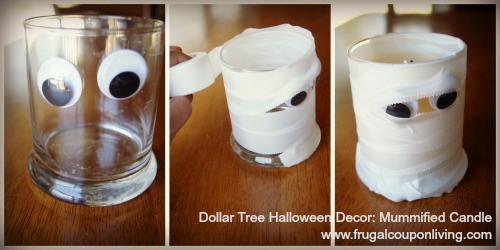
Mummified Candle Holder

Too cute to be frightening this candle holder will add a touch of Halloween whimsy to your counter top, table, or shelf. Begin by hot gluing large googly eyes on a glass candle holder. Apply a thin bead of hot glue to the base of candle holder. Press the tip of a roll of gauze bandage into the glue and smooth. Wrap gauze around the candle holder, leaving openings around the eyes. Press down with a small bead of hot glue. Alternatively you can use medical tape ( that’s what I did) Then you don’t have to mess with hot glue or any other adhesive, the kids can get in on this too!

Don’t forget these other fun Fall FREEBIES and Deals!

  • FREE Trick or Treat Printable
  • 100 FREE Halloween Printables – Great for Kids
  • FREE Personalized Trick-Or-Treat Bag from York Photo
  • DIY Halloween Crafts and Decorations
  • Halloween Craft Activities – Round-Up of Dozens of Fun Halloween Treats and Crafts.
  • FREE Halloween Treat Bag
  • FREE Halloween Bingo Download
  • FREE Pumpkin Bar Recipe with Cream Cheese Frosting
  • Glow in the Dark Pumpkins – Ideas to Make Your Pumpkin Glow with Paint, Stickers and more
  • DIY Halloween Ghost in a Bottle – Great Ghostbuster Activity
  • FREE Halloween Pumpkin Carving Patterns – 75 FREE Templates!
  • Dollar Tree Fall Decor – Decorate with Autumn Candles on a Frugal Budget
  • Halloween Trick Or Treat Tote for $2.77 Shipped

Love the Dollar Tree Halloween Decor? Find more Halloween Craft Ideas and the Dollar Tree Fall Decor – Decorate with Autumn Candles on a Frugal Budget!

WHAT’S TRENDING? Looking for a few engaging activities? Grab Minute to Win it Games – Traditional, Holiday, Group, and more! Use these fun activities in the office, classroom, or at your next birthday party.

Pumpkin Spice Doughnuts Recipe

This post may contain affiliate links or ads. Read my privacy policy and disclosure policy here.

August 9, 2014 by Ashley at Frugal Coupon Living Filed Under: Crafts, Pinterest, Recipe

published date: September 21, 2013
modified datt: August 09,2014

Pumpkin-Spice-doughnuts-recipe-frugal-coupon-living

Pumpkin Spice Doughnuts Recipe
Pin to Pinterest

Fall is filled with time at the pumpkin patch, apple picking and whipping up plenty of yummy treats! Doughnuts are one of those irresistible treats that easily change with every season, and pumpkin spice doughnuts are at the top of our list. It’s easy to whip up a fresh batch of doughnuts with ingredients you already have on hand and a couple seasonal treats.

Before you get started, read through the instructions entirely because frying doughnuts is a fast paced process. There are also several items that need to be prepped ahead of time to make the cooking easier.

Pumpkin Spice Doughnuts
Makes 12 doughnuts and 12 doughnut holes

Ingredients:

For Doughnuts

  • 2 tsp. baking powder
  • 1 tsp. salt
  • 3 ½ cups flour, divided into 1 cup and 2 ½ cup portions
  • 1 cup sugar
  • 2 tsp pumpkin pie spice
  • 2 eggs, 1 egg yolk
  • 4 tbsp unsalted butter, melted
  • ½ cups apple cider

For Doughnut Powder

  • 1 cup sugar
  • 1 Tbsp pumpkin pie spice

For Frying

  • 6 cups vegetable oil

Pumpkin-Spice-doughnuts-recipe-steps-frugal-coupon-living

Directions:

1. Prepare the items that you will be using. Line a baking sheet with wax or parchment paper. Ready two large plates, one with paper towels and the other without. In a clean paper lunch bag, mix doughnut powder ingredients and set aside.

2. In a large bowl, add the dry ingredients; 1 cup flour, 1 cup sugar, 2 tsp pumpkin pie spice, baking powder and salt. Mix well. In a small bowl, mix the wet ingredients; eggs, egg yolk, apple cider and butter. Mix well.

3. Pour wet mixture into the large bowl containing the dry ingredients and whisk till all lumps are removed. slowly stir in remaining 2 ½ cups flour till fully combined. Chill dough in refrigerator for ten minutes.

4. Heat vegetable oil on medium-high in a fryer or large pot till it is 375°– use a candy thermometer to safely test temperature. While oil is heating, prepare counter space with a coat of flour. Wash and flour doughnut cutter, or one small and one large, round cookie cutter.

5. Remove dough from the refrigerator and pat out onto floured surface. When dough it ½” thickness cut out as many doughnuts with cutters as possible. Gather up dough remnants, ball up and pat out again until all the dough is used up. Transfer doughnuts and holes to lined baking sheet. Should end up with 12 doughnuts and 12 doughnut holes.

6. Drop one to two doughnuts into the frying oil at a time. After one minute dough should rise to the surface. Let dough fry for one more minute, then flip and fry for a minute and a half. Scoop doughnut out and transfer to paper lined plate.

7. When doughnut has cooled enough to handle, drop it into the paper bag filled with powder and shake. Don’t wait too long or sugar will not coat the doughnut entirely. Remove doughnut from paper bag and place on clean plate. Repeat until all the doughnuts are fried and powdered. Enjoy!

Pumpkin Spice Doughnuts Recipe? Don’t forget the Pumpkin Soup Recipe – Absolutely delicious! Also check out the  Pumpkin Bars Recipe with Cream Cheese Frosting.

Find more Recipes on Frugal Coupon Living including the Freezer Weekly meals with Weekend Prep and the Fall Recipe Round-Up.

WHAT’S TRENDING? Looking for a few engaging activities? Grab Minute to Win it Games – Traditional, Holiday, Group, and more! Use these fun activities in the office, classroom, or at your next birthday party.

Welcome Back Apple Stamped Back to School Lunch Sacks

This post may contain affiliate links or ads. Read my privacy policy and disclosure policy here.

August 9, 2014 by Ashley at Frugal Coupon Living Filed Under: Back To School, Crafts, Education, Pinterest, Summer

published date: August 09, 2014
modified datt: August 09,2014

Pin to Pinterest

We’re kicking off a Back to School Bash with Frugal Coupon Living this week! When Ashley asked us to share some back to school ideas, we couldn’t be more thrilled. Being teachers we get just as excited (or nervous) to head back to the classroom as the kids do. For the next several weeks we’ll share with you some fun and educational ways to get in the school spirit.

Packing lunches can be a dreaded task in even the most organized of households. Use this art project as a perfect way to have your little ones help jump start your packing parties.

Supplies:

  • Paper lunch sacks
  • Washable paint (we used red, green, and white)
  • Apple sliced in half
  • Cork
  • Scraps of ribbon
  • Hole puncher
  • Black marker
  • Paper plates

Lay out a couple of paper plates for your kids with some paint on each of them. Show them how the apple can double as a stamp. Have them cover the cut side of apple with paint and stamp their bags. They can use the cork to make polka dots. Once they’re dry you can use the black marker to finish off the design. By folding the top of the bag over once and hole punching, you’ve prepared your bag to be used as soon as school starts. Have the kids design special ones for themselves or their siblings. Let them dry and store them away for back to school time. The final touch is some cute ribbon through the holes on the top once it’s stuffed with a yummy lunch!

For more educational ideas visit us at www.simplysprouteducate.com.

free-first-day-of-school-printables-signs-frugal-coupon-living-with-boarder

Don’t forget our FREE First Day of School Printables – Pin to Pinterest!


Check out these other Back to School Frugal Coupon Living FREEBIES and Crafts:

1.) Introduction – Project Lunchbox – Pin It

2.) ABC School Days Theme – Pin It

3.) Shark Week Lunch Theme – Pin It

4.) Camping Theme Lunch – Pin It

5.) Chicka Chicka Boom Boom Theme – Pin It

6.) Bug Lunch Theme – Pin It

7.) Birthday Lunch Theme – Pin It

8.) Keep Calm and Teach On FREE Printable and Pencil Vase – Pin It

9.) Face Fruit and Food Stickers and FREE Lunch Notes – Pin It

Also check out Back to School Deals on Frugal Coupon Living.

WHAT’S TRENDING? Looking for a few engaging activities? Grab Minute to Win it Games – Traditional, Holiday, Group, and more! Use these fun activities in the office, classroom, or at your next birthday party.

Happy Birthday Lunch – Themed Lunchbox Back to School Series

This post may contain affiliate links or ads. Read my privacy policy and disclosure policy here.

August 8, 2014 by Ashley at Frugal Coupon Living Filed Under: Back To School, Back to School Series, Birthday, Crafts, Pinterest

published date: August 02, 2014
modified datt: August 08,2014

BackToSchool

back-to-school-project-lunchbox-happy-birthday-theme-frugal-coupon-living-cropped

Happy Birthday Theme Lunch

Pin to Pinterest

Welcome to the seventh post in our Back to School Series – Project Lunchbox! Today’s theme – Happy Birthday! With each series, we create a theme and strive to create fun and inexpensive lunches to give your child a little Celebration in their school day.

If your child’s birthday happens to fall on a weekday and during the school year, why not make it special? A few extra touches can really make your child feel extra loved and celebrated. Celebrate your child’s day by making a birthday themed lunch for your little cupcake.

back-to-school-project-lunchbox-happy-birthday-theme-frugal-coupon-living-steps-1-to-3

I went simple with the food this theme, but included my daughter’s favorites; peanut butter and strawberry jelly, Sour Cream and Onion chips, fruit snacks, and fruit. Our school has a no celebration policy in tact for the classroom (class)… but on her birthday, I decided to surprise her with a little sugary treat (this is straying from my daily healthy lunch)!

To make everyday lunch items special, I raided my birthday stash, most of us have gift bags, wrapping paper, bows, and tissue on hand – This is frugal and costs no additional money. I wrapped her sandwich loosely, don’t want them having to wrestle at lunchtime to get into their sandwich. To make a sweet message, scratch lightly on a banana with a toothpick . Carve out a notes  or picture, the air will darken the peel of your scratch, making your note extra visible. The cupcake went into a small lidded container, with a candle on top- not only does this make the lunch more festive but it keeps the cupcake from moving around if the lunchbox didn’t stay upright during the day.

Descent once more on your crafts stash and grab some stickers! With the stickies, I decorated the outside of the cupcake container and the pack of her favorite princess gummies. Finally, tying some curling ribbon to the handle of her drink container added some festivity to her lunch.  Nestle all contents into a tissue paper bed.

While we all might not have the Martha Stewart of decorating abilities, anything that comes with bows, stickers, pretty colors and gift wrap is sure to excite our little ones! Smiles all the way around, you might even hear a “You’re the Best Mom Ever!” when she jumps in the car that afternoon.

To bring a little pizzazz to your child’s lunches with minimal effort begin by designating a drawer or basket in your kitchen. Gather simple items such as a paring knife, some basic cookie cutters, and an apple corer/slicer. Pick up fun items as you go to add to the collection. As you go about your day and life, you will notice little things that can be used for fun accessories or tools when making your child’s meal!

Do not forget the FREE Back to School Lunch Printables – a sweet note is always a great addition.

Find more Back to School Series including…


More Themed Lunchboxes

1.) Introduction – Project Lunchbox – Pin It

2.) ABC School Days Theme – Pin It

3.) Shark Week Lunch Theme – Pin It

4.) Camping Theme Lunch – Pin It

5.) Chicka Chicka Boom Boom Theme – Pin It

6.) Bug Lunch Theme – Pin It

7.) Birthday Lunch Theme – Pin It

Also check out Back to School Deals on Frugal Coupon Living.

signatureFCL (2)


WHAT’S TRENDING? Looking for a few engaging activities? Grab Minute to Win it Games – Traditional, Holiday, Group, and more! Use these fun activities in the office, classroom, or at your next birthday party.

St. Patrick’s Day Chocolate Marshmallow Leprechaun Hats Recipe

This post may contain affiliate links or ads. Read my privacy policy and disclosure policy here.

August 7, 2014 by Ashley at Frugal Coupon Living Filed Under: Crafts, Pinterest, Recipe

published date: February 23, 2014
modified datt: August 07,2014

chocolate-marshmallow-leprechaun-hats-frugal-coupon-living

St. Patrick’s Day Chocolate Marshmallow Leprechaun Hats
Pin to Pinterest

Want to make something for your little Leprechauns? These fun Chocolate Marshmallow Leprechaun Hats will be sure to be a hit this St. Patrick’s Day!

Ingredients:

  • 6 Regular Marshmallows
  • 1/2 cup Dark Cocoa Candy Melting Chips
  • 1/4 cup Green Candy Melting Chips
  • 6 Fudge Stripe Cookies

chocolate-marshmallow-leprechaun-hats-collage-frugal-coupon-livingPin to Pinterest

Directions:

  1. Heat Dark Cocoa Candy Chips by microwaving for 30 seconds stirring and repeating until melted. Allow to cool for 2-3 minutes.
  2. Insert skewer in a marshmallow.
  3. Dip marshmallow in melted candy and roll to coat completely.
  4. Set dipped marshmallow in the middle of a cookie solid chocolate side up.
  5. Immediately place in refrigerator for 10 minutes to set candy mix.
  6. Heat Green Candy Chips in small bowl by microwaving for 30 seconds stirring and repeating until melted.
  7. Transfer Green chocolate to small plastic bag and clip very tiny piece of corner to use for piping.
  8. Pipe Green hat band around hat.
  9. Pipe three dots onto way paper and use a toothpick to make a stem. Repeat this to make 6 sharocks.
  10. Immediately place in refrigerator for 10 minutes to set shamrocks.
  11. Use a dot of green chocolate to “glue” shamrock to hat.

Check out these other great recipes…

  • St. Patrick’s Day Rainbow Cupcakes
  • Marshmallow Filled Lucky Charms Cupcakes
  • Mint Chocolate Chip Cookies
  • Easy 3-Ingredient Funfetti Dip
  • Copy-Cat Bonefish Grill Bang Bang Shrimp
  • ROLO Pretzel Pecan Turtle Recipe
  • Peeps Easter Vase and Centerpiece
  • JELL-O Heart Squares
  • Cupid’s Strawberry Float Recipe
  • Chocolate Cherry Mice
  • Watermelon Mint Shooters 
  • Marshmallow Rice Krispie Treat Snowmen Recipe
  • Microwave Peppermint Fudge Recipe 
  • Easy Homemade Salted Caramel Recipe
  • Doughnut Snowmen Milk Bottles Recipe
  • Gluten FREE Peanut Butter Filled Chocolate Cupcakes
  • Cinnamon Dolce Syrup Recipe – Just like Starbucks
  • Pumpkin Spice Coffee Frappuccino Recipe
  • Copy-Cat Starbucks Recipes
  • Copy-Cat Restaurant Recipes
  • Round-Up of Copy Cat Cracker Barrel Recipes

Be sure to follow FCLAsh on Pinterest.

frugal-coupon-living-signature-green 

WHAT’S TRENDING? Looking for a few engaging activities? Grab Minute to Win it Games – Traditional, Holiday, Group, and more! Use these fun activities in the office, classroom, or at your next birthday party.

Easy to Make Colored Pasta and Do It Yourself Toddler Activities

This post may contain affiliate links or ads. Read my privacy policy and disclosure policy here.

August 7, 2014 by Ashley at Frugal Coupon Living Filed Under: Back to School, Crafts, Education, Pinterest

published date: July 07, 2013
modified datt: August 07,2014

SONY DSC

  or Pin to Pinterest

Colored Pasta Tutorial and Activities

Colored pasta is an inexpensive, fun way to teach your toddler a wide range of beginning math skills. Your tot will think they are just playing but they will be soaking up knowledge, and if you let your little one help you can add in a science lesson by mixing colors such as red and yellow to make orange or yellow and blue to create green.

SONY DSC

Items Needed:

  • 2 cups of pasta (for each color)
  • 2 tsps. Food Coloring (gel or liquid)
  • 2 tsps. rubbing alcohol
  • Ziploc Bags
  • Gloves ( unless you are interested in coloring your hands also in which case…carry on)

Mix the alcohol with the food coloring in the baggie and then add the pasta. Put all into a Ziploc bag. Massage pasta and coloring, making sure to cover the pasta with the liquid. Allow to sit for 5 minutes to absorb (Do not let it sit any longer than this as pasta will become gummy) Massage bag again for even distribution. Spread pasta out and allow it to dry for at least an hour.

SONY DSC

Color Recognition/Sorting

Begin with the basics ; Red, Orange, Yellow, Green, Blue, and Purple. Give your child a bowl of mixed pasta, and an empty, clean muffin tin. Sit with your child and encourage them to sort the pasta by colors or shape. Reinforce their knowledge by calling out colors as they pick them up, or ask your child to name the color.

SONY DSC

Patterning

Patterning is a very important beginning math skill. Begin with abab patterns (red,yellow,red,yellow) encourage your child to copy your pattern or make one of her own. Lay out a simple pattern line and ask your child to mirror the pattern underneath. If your child masters simple patterns move onto patterns like abc and aabb.

SONY DSC

Counting

Begin by placing several pieces of pasta out on the table, show your child how to point to each piece as you count. This teaches one to one correspondence and will show your little one to count in an orderly fashion. Start with no more than 5 as not to overwhelm your child, when they master that add more or maybe even basic addition or subtraction. “ How many are left if I take away 1?”

SONY DSC

Fine Motor Development

Cut a piece of yarn or string approximately inches in length. Tape one end tightly with a piece of masking tape. Slide a piece of tubular pasta over the tape to the other end, wrap around pasta and tie in a knot. Give you child a bowl of the tube shaped pasta and demonstrate how to thread necklace.

SONY DSC

Sensory Bins

Use colored pasta as a base for sensory bins. Some ideas are to use all colors, add cotton balls for clouds and use it as a Rainbow bin to teach or reinforce colors. All blue would be fantastic with some plastic ocean animals for an Ocean Bin. Red, yellow, and orange for a fall bin with some silk leaves, and acorns to spark a discussion on Fall themes. Give your child empty cups, spoons, tongs, etc and you can extend the learning even farther. Pouring and pinching with tongs develop fine motor skills. Filling containers Science and math come into play.


Check out …

  • Six Awesome Ways to do Water Play with Kids – Pin It
  • Make Colored Rice – Pin It
  • Rainy Day Activities Round-Up – Pin It

Be sure to Pin to Pinterest and to find more Pinterest Ideas and Recipe Ideas on Frugal Coupon Living.

WHAT’S TRENDING? Looking for a few engaging activities? Grab Minute to Win it Games – Traditional, Holiday, Group, and more! Use these fun activities in the office, classroom, or at your next birthday party.

Back to School | School Days ABC Theme Lunchbox and Bento Box

This post may contain affiliate links or ads. Read my privacy policy and disclosure policy here.

August 7, 2014 by Ashley at Frugal Coupon Living Filed Under: Back To School, Back to School Series, Crafts, Pinterest

published date: July 28, 2014
modified datt: August 07,2014

BackToSchool

Back-To-School-Project-Lunchbox-Frugal-Coupon-Living-School-Days

Pin to Pinterest

Welcome to the second post in our Back to School Series – Project Lunchbox! This week’s theme – School Days!

With each series, we create a theme and strive to create fun and inexpensive lunches to give your child a little whimsy in their school day.

To recreate this fun school themed lunch use a basic set of Alpha Cookie Cutters  – that come in letters and numbers. You can create random letters, spell your child’s name, include their grade or a fun phrase like – Wow, Love, Kiss! I find it is easier to make the sandwich first and then cut, or you can precut two of each letter from bread, ham, cheese, and stack. You can of course use peanut butter and jelly as well. For the cheese pencil, use a black sharpie to draw the outline of the pencil. Use a red sharpie to make a general eraser shape; you probably already have these in a kitchen drawer.

Our cute little “chalk board “is simply made from chocolate graham crackers with icing piped on to form letters and numbers. Don’t run out and buy a piping bag, I just used some frosting from a partial can leftover from cupcakes. I put a spoonful in a Ziploc, cut the smallest tip off the corner and gently squeezed from behind the frosting. Alternatively, you can buy a little Wilton Icing Tube for writing at the grocery store in the baking section, near the candles and cake mixes.

For another healthy addition to your child’s lunch (and perhaps as well for afternoon snack), create a fun Tropical Salad.

Back To School Tropical Salad:

  • ½ a golden mango diced
  • ½ a kiwi diced
  • ½ banana diced or sliced
  • 2 tsp. shredded coconut
  • 1 tsp. brown sugar

Mix Together. Add a 2 tsp. of lemon juice to keep from browning.

To bring a little pizzazz to your child’s lunches with minimal effort begin by designating a drawer or basket in your kitchen. Gather simple items such as a paring knife, some basic cookie cutters, and an apple corer/slicer. Pick up fun items as you go to add to the collection. As you go about your day and life, you will notice little things that can be used for fun accessories or tools when making your child’s meal!

Do not forget the FREE Back to School Lunch Printables – a sweet note is always a great addition. Find more Back to School Series including…


More Themed Lunchboxes  Coming Soon

1.) Introduction – Project Lunchbox – Pin It

2.) ABC School Days Theme – Pin It

3.) Shark Week Theme – Pin It

4.) Camping Theme – Pin It

5.) Chicka Chicka Boom Boom Theme – Pin It

6.) Bug Lunch Theme – Pin It

7.) Happy Birthday Lunch Theme – Pin It

Also check out Back to School Deals on Frugal Coupon Living.

signatureFCL (2)


WHAT’S TRENDING? Looking for a few engaging activities? Grab Minute to Win it Games – Traditional, Holiday, Group, and more! Use these fun activities in the office, classroom, or at your next birthday party.

Back to School | A Bitey Shark Week Lunch Bento Box Theme

This post may contain affiliate links or ads. Read my privacy policy and disclosure policy here.

August 7, 2014 by Ashley at Frugal Coupon Living Filed Under: Back To School, Back to School Series, Crafts, Pinterest

published date: July 29, 2014
modified datt: August 07,2014

BackToSchool

shark-week-back-to-school-lunch-frugal-coupon-living

SHARK WEEK LUNCH

Pin to Pinterest

Welcome to the third post in our Back to School Series – Project Lunchbox! This week’s theme – Shark Days! With each series, we create a theme and strive to create fun and inexpensive lunches to give your child a little BITE in their school day.

Just in time for Shark Week, this fun and ferocious lunchbox will have your little one squealing in delight – not fear. Check out that shark rising from the whitecaps, ready to… be eaten…. Let’s Begin.

If you don’t already have a pair of good shears dedicated to your kitchen, grab a pair. I use mine daily. I just pop them in the dishwasher between uses to keep them clean. Today I used them to cut out the Shark Pizza Quesadilla filled with cheese, pepperoni, and a bit of sauce, after all we need something red dripping from the sharks sharp teeth!

Cut a tortilla, folded over into two half ovals. Use your paring knife to shape out his sharp teeth on one side before cooking. Load with fillings of your choice. I used my toaster oven to just melt cheese and lightly toast. Alternatively, you can pop a bunch of pre-made Quesadillas onto a baking sheet sprayed with non-stick spray and then into an oven preheated to 400° for about 5-6 minutes until cheese is just slightly melted.  Once cooled, allow to cool, place in freezer bags, label with the date and title, and place in freezer. You now have a quick alternative to PB&J to grab for your child’s lunch box.

The eyes and nostril on the shark are tiny snips of a black olive. Another option is to grab a chef maker (can be used on food and eaten.) For snacks, shark fruit snacks will carry on the theme and of course you need goldfish for shark bait. The ones above in the image are the new French Toast flavor.  And finally for crunch, popcorn is always a big hit – Munch, munch, munch. We shook ours up with a bit of Parmesan cheese for a fun alternative flavor to butter.

Recipe Idea:

To create a healthy dip for the shark bait, mix 2 Tbsp. plain Greek Yogurt with 1 tsp. of honey, and 1 drop of blue food coloring – makes a beautiful fish tank!

To bring a little pizzazz to your child’s lunches with minimal effort begin by designating a drawer or basket in your kitchen. Gather simple items such as a paring knife, some basic cookie cutters, and an apple corer/slicer. Pick up fun items as you go to add to the collection. As you go about your day and life, you will notice little things that can be used for fun accessories or tools when making your child’s meal!

Get creative! There are an ocean of ideas out there to swim in!

Do not forget the FREE Back to School Lunch Printables – a sweet note is always a great addition. Find more Back to School Series including…


More Themed Lunchboxes  Coming Soon

1.) Introduction – Project Lunchbox – Pin It

2.) ABC School Days Theme – Pin It

3.) Shark Week Lunch Theme – Pin It

4.) Camping Theme – Pin It

5.) Chicka Chicka Boom Boom Theme – Pin It

6.) Bug Lunch Theme – Pin It

7.)Happy Birthday Lunch Theme – Pin It

Also check out Back to School Deals on Frugal Coupon Living.

Note: Shark Week for 2014 Begins on the Discovery Channel August 10, 2014.

signatureFCL (2)


WHAT’S TRENDING? Looking for a few engaging activities? Grab Minute to Win it Games – Traditional, Holiday, Group, and more! Use these fun activities in the office, classroom, or at your next birthday party.

  • « Previous Page
  • 1
  • …
  • 64
  • 65
  • 66
  • 67
  • 68
  • …
  • 81
  • Next Page »
  • Search
  • Social
  • Categories
  • Archives
Search
  • Email
  • Facebook
  • Instagram
  • Pinterest
  • Twitter
Browse By Category
Browse by Date
I am a wife, mother, daughter, blogger, teacher, friend – a woman of many different hats. My delights are my husband, my five kids, reading, shopping, and spending time with friends and family. I am a Florida girl transferred to the heart of the DC-Metro area. I'm glad you're here! Learn more about Ashley.

Daily Deals – Don’t Miss One!

December 2025
S M T W T F S
 123456
78910111213
14151617181920
21222324252627
28293031  
« Nov    

Copyright © 2025 Frugal Coupon Living | CCPA Policy | Privacy Policy | Disclosure | Disclaimer | Terms of Use | Do Not Sell My Personal Information | Email Sign Up